Lately, my gaffer seems to take projects that feature a lot of flicker/lantern effects. This can present a challenge since the linear effects engine is not proportional. What does that mean? Setting a flicker effect with a scale of 10 gives the effect the ability to fluctuate the intensity value by 10 points, not 10 percent of the base value. So low intensity flicker effects (base value of 30) with a scale of 10 will dip as low as 20% and look wrong. How to solve this? Using an MC profile.
Since all cells in Eos default to 100%, you can apply the effect to the cell and then set the master intensity at whatever value you want. The flicker will always be proportional, So a flicker effect with a scale of 10 on the cell with the master set to 30 means the effect is actually traveling only three points.
Effects can be tricky to understand, so here’s an example. Double tap [Effect] to get to Effect Blind. Type in 915 [Enter] to select one of the prebuilt intensity effects in Eos. Though this isn’t a flicker, it still follows the same rules. Notice the scale is 25 and the wave form starts at the bottom and then crosses the center (the base value) to go all the way to the top. Go to [Live], select a channel, then type [Effect] 915 [Enter]. Notice the intensity travels from zero to 25. Now set the base value of the fixture to 50 by typing [at] 50 [Enter]. Notice the dimmer now snaps down to 25, then ramps up to 75. The scale is traveling down 25 points, then up another 25 points, based on the base value of 50%. Hopefully this is now clear.
Since most of the flicker effects I run are on fixtures with just a dimmer channel, I decided to make my own MC Dim profile. Here’s how.
Double tap [Address/Patch] to get to Patch. With no fixture selected, touch {Type}.
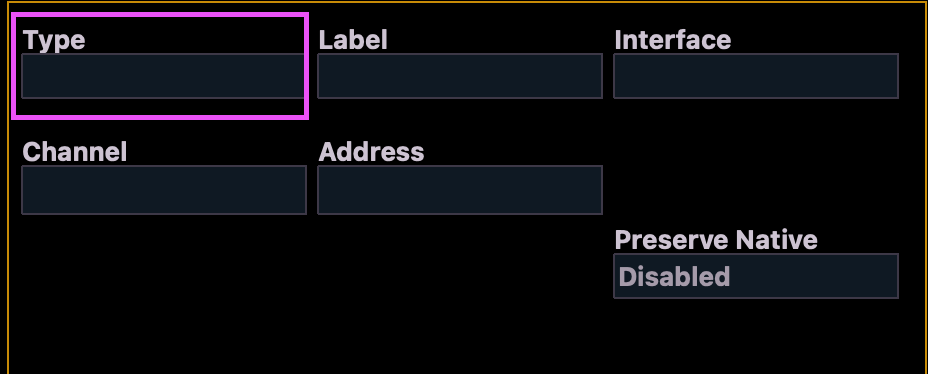
At the bottom left of your screen, make sure you are in {Show}, then touch {Edit}.

This will bring you to a list of every profile in your current show file. At the bottom left, you want to select {New} to create a new profile.

Once you have done so, find the new profile (named “new fixture” in your list) and select it with your mouse.

Now click Label to name the profile. I’m going with Dimmer MC, but you should choose whatever is clear to you.

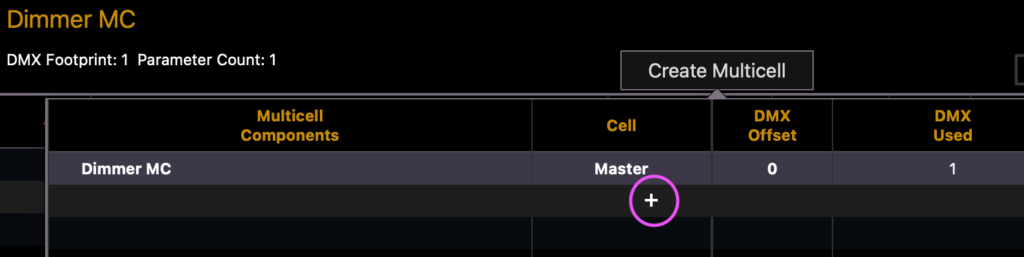
Notice your new fixture has turned red in the list and there is now a green tile mid-screen on the right side that says “Save Fixture” in green. Press that. Saving incrementally is necessary when creating a new profile.

Now touch where it says Create Multicell on the screen.

A popup box opens. Since we want to choose something to be the cell, click the little plus sign.
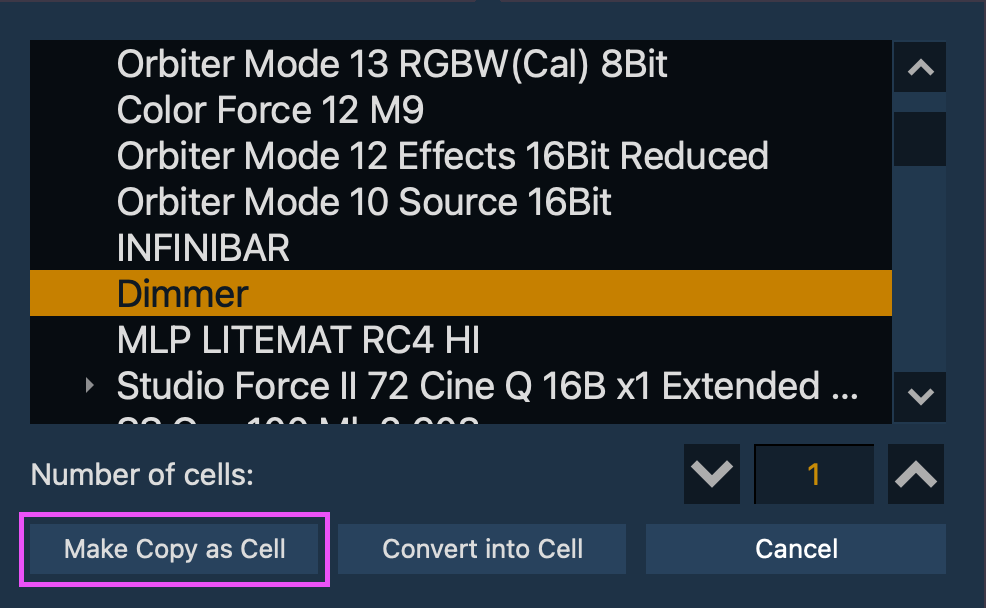
Now another popup appears with a list of all the profiles in your console. Choose All Fixtures>Dimmer in the list, then make sure to touch Make Copy as Cell. This will duplicate the dimmer so this profile stands separate from any other profile.
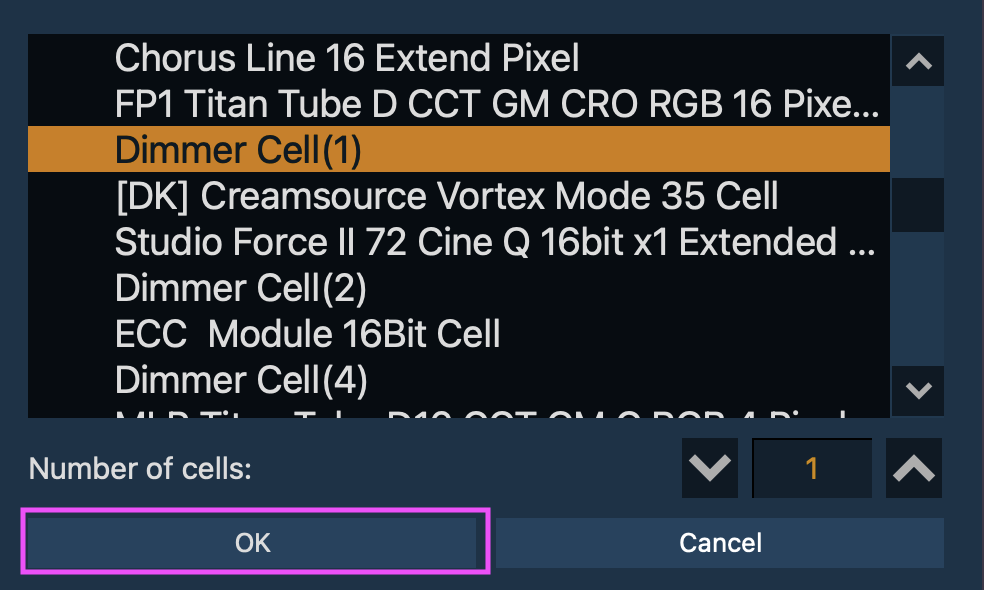
The popup box closes, but nothing appears to have changed. Click “+” again, then from the popup box select All Cells>Dimmer Cell, then click OK at the bottom.
Click Save Fixture at the top. Over in the list on the side, your new fixture now has a > in front of it. Click it to open the “nested” profile.

Select the Master. Click below the DMX value, since it is set to 1 right now, and this Master dimmer needs to be virtual.

When you double click where it says “8b:1” a numerical keyboard will pop up. Select 0, which Eos will translate to Virtual, then press Enter at the bottom. Hit Save Fixture yet again.

Select the Cell in the list on the left. On the middle right, select the box in front of Mastered Cells. Then hit Save Fixture again. This is telling Eos to treat the cell as a cell. If you don’t, with no manual values or cues, Eos will show you the cells as if they are active.
Last step- Select the Dimmer (Master) in the list on the left. Select Edit Multicell. Since this dimmer is virtual, we need to tell Eos to not offset the addressing for the cell. In the column below DMX offset, click where it says “2” and enter “1” in the popup numeric keyboard, then hit Enter.

Hit Save fixture one last time.
Your multi cell dimmer now is in your show file and you can assign it to any fixture you choose. Remember when you test the effect to use “.” to denote controlling a cell, not the master!
This has been incredibly helpful to me in my work on set and I hope either it, or the concept behind it, are useful to you to. What little effect tricks do you love to use to have a better programming experience? Hit me in the comments.
Featured Image Photo by Vladimir Fedotov on Unsplash