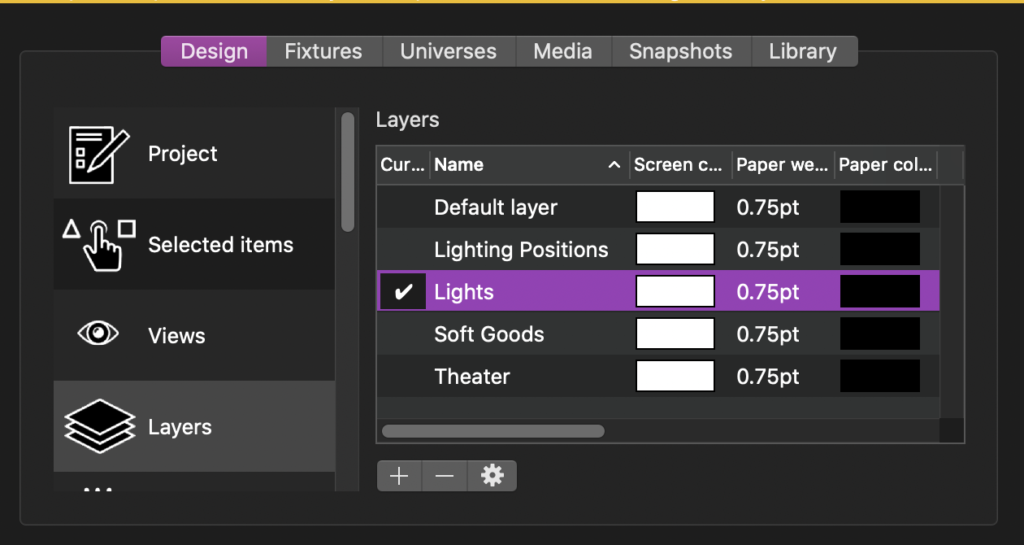
Building out of our file from last time, where we created a theater with basic masking and hanging positions, this time we will hang some lights and focus them as well. Go to Design>Layers and click on the + at the bottom left of the window to add another layer. Name it Lights and double click to the left of it to make it the selected layer so all our lights will automatically be put in it.
Let’s now go to the Library tab and select Fixtures on the left. In the Filter area in the upper right hand corner, start typing Quantum profile and press enter. Click and drag the Quantum onto the Alpha window onto the 1st Electric. If you press Command Enter on a Mac or just Enter on Windows, the view in your lower right hand window will change to Selected items. We want this light to go to X=-14’. The Z value should automatically populate with 3’, since the light should snap to the pipe, and the Y value should be 27’ 10” since Capture adjusts for your clamp height.
Still in Selected items, enter or choose the following info by double clicking next to the field name:
- Location: 1st LX.
- Purpose: Profile (or whatever you wish)
- Note: Movers. (I do this for a macro I use frequently on EOS that is able to search for unused moving lights based off a Text identifier.)
- Mode: 16 bit Extended
- Show Optics: No
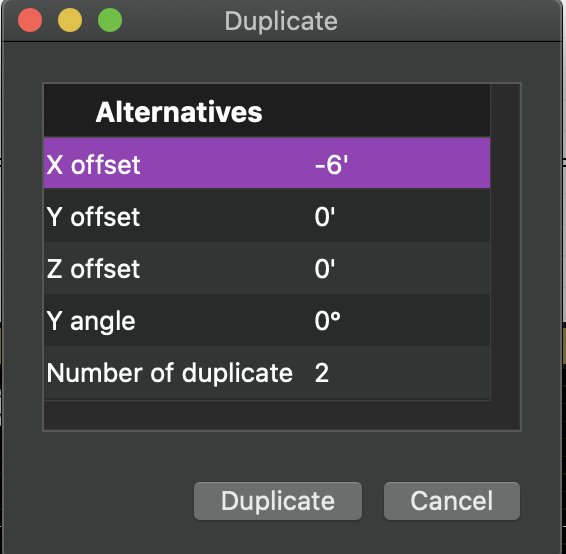
Now that we’ve entered all this helpful data, let’s make good use of the different duplicate functions in Capture, as that will save us time having to enter these same values again and again. Click your cog next to the selected Quantum in your Alpha window and Choose Duplicate. Give it these values:

Now go back and select the Quantum on SR again. Click the cog again and select Duplicate, but this time make your X offset 0 and your Z offset -7’. Take a moment to update your Location field on this new light to 2nd LX. Go back to the first electric and select both fixtures by clicking on one then holding Command for Macs and Control for Windows and clicking the second light. Click the cog, select Duplicate and make your Z offset -14’ and press Duplicate. Take a moment to rename the Location to 3rd LX.
Back to Library>Fixtures, type in the upper right hand Filter field Source four 36 and press enter. Click and drag the light onto the 1st Electric near the end of the pipe SR. Make the X value -20’. Select the cone extending from the light in the Alpa and hold Shift down to rotate the light so it faces onstage. Name the Location 1st LX. Click the cog and select Duplicate. make your X value 2’ and make your Y and Z values 0 and click Duplicate.
Keeping the new light selected (so the onstage of the two) enter or choose the following information:
- Purpose: Leaf Gobo
- Optics: HPL 575x/115 (I choose this lamp because it is the dimmest of the S4 lamps and it balances easier relative to the moving lights in Capture. Choose whatever you wish here.)
- Show Optics: No
Now we should add some color and gobos. Go to Library>Gobos and type 579 in the Filter field and press enter. Under Gam, select 579 Foliage Breakup 3 and drag it onto the onstage Source 4. You should see a + symbol appear when you are hovering in the right place and then just release your mouse button. Now go to Library>Filters and type R05 in the filter field and press enter. Click on Rosco Roscolux and drag and drop the filter onto the same light. Back in the Filter field, type R54 and press Enter. Under Rosco Roscolux, drag out the R54 filter and drop it on the offstage Source 4 36. Click on the offstage Source 4 36 now and enter Hiside Lav into the Purpose field.
Select both Source 4 36 fixtures and click the cog and select Duplicate. X=0, Y=0, Z=-7’, Duplicates=3. Press Duplicate. Then select each pair of fixtures and update the Location field. Because the work flow in Capture is quite different from others, let’s take a moment to focus these pipe end fixtures before we duplicate them to the other side. Select all of the Source 4 36 fixtures, make your Beta view a Live view by clicking the three lines in a circle in the bottom right hand corner of the view and selecting Live.
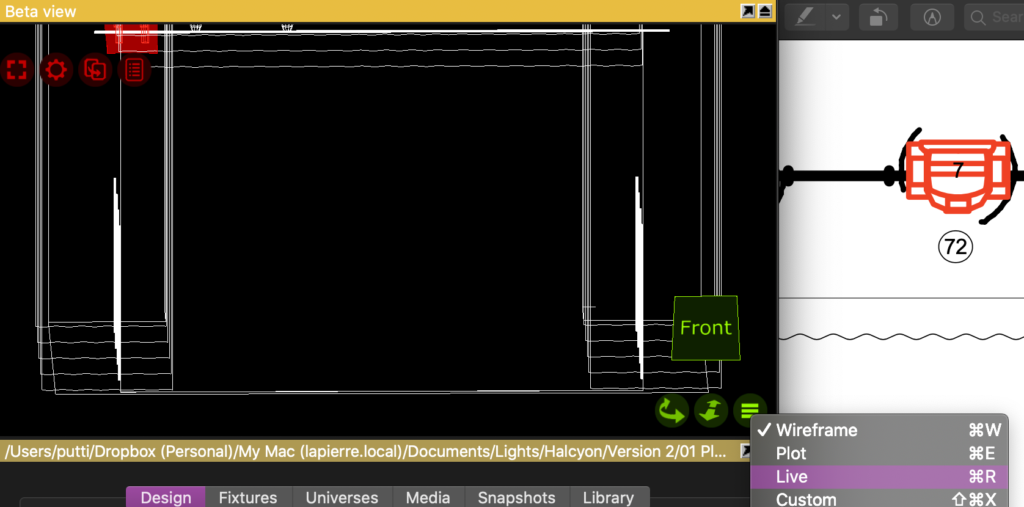
In the same Beta view, there is now a button that hasn’t been there before that looks line an on button.
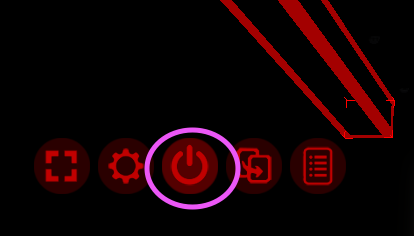
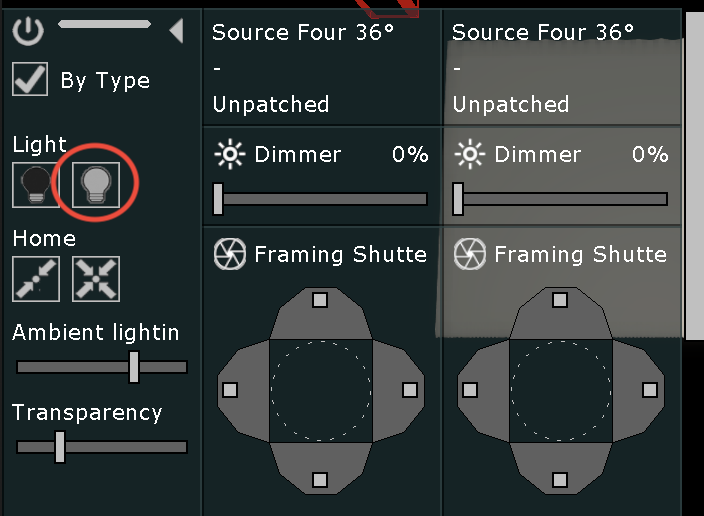
Click it and a panel will be superimposed on the screen. This view will show controls for any light you have selected. Click the White light bulb to turn the lights on.
In your Gamma view, click the three lines in the circle in the lower right hand corner to make this a front view. You will notice the same cone extending from your selected lights. Click on the outmost area to tip all these lights at once to focus them onstage.
We are staying basic at the moment, so we will call this done now. In your Beta view, click the Black lamp to turn the lights off.
Back to Library>Fixtures. In the Filter field, type Rogue R3 Wash and press Enter. Drag and drop the fixture onto the 2nd LX dropping it onto an X value of -10’ (or correcting it to suit.) In the Selected items area, fill in:
- Location: 2nd LX
- Note: Movers
- Mode: 21 Channel
- Show Optics: No
Now, duplicate the fixture once onto the same LX to hang at 3’6”. Back to the Library>Fixtures. In the Filter field, type RGBWA and hit enter. Under the “Unknown” listing, find LED Zoom Moving Head Light RGBWA, and drag and drop it onto the 2nd LX at X=-6’ 9”. Now drag and drop another one onto the 3rd LX at -1’ 6”. Fill in:
- Location: appropriate LX
- Note: Movers
- Show Optics: No.
Get all your fixtures selected in the Alpha/Plot view, then click the cog and select Mirror making the Relative to X value is 0’. Press Mirror at the bottom to confirm, and the system is mirrored on the other side with Location, color, gobo and focus copied over.
Library>Fixtures. Search for Source Four 36 and press Enter. Drag and drop it onto center of the 1st LX.
- Location: 1st LX
- Purpose: CC Special
- Optics: HPL 575/115x
- Show Optics: No
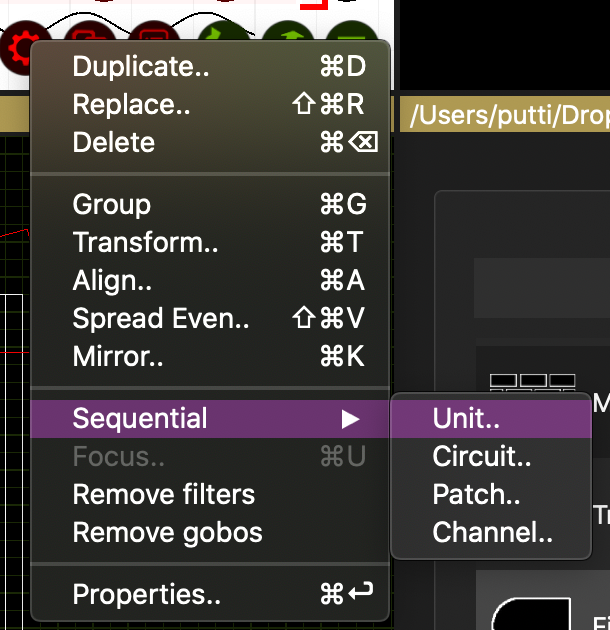
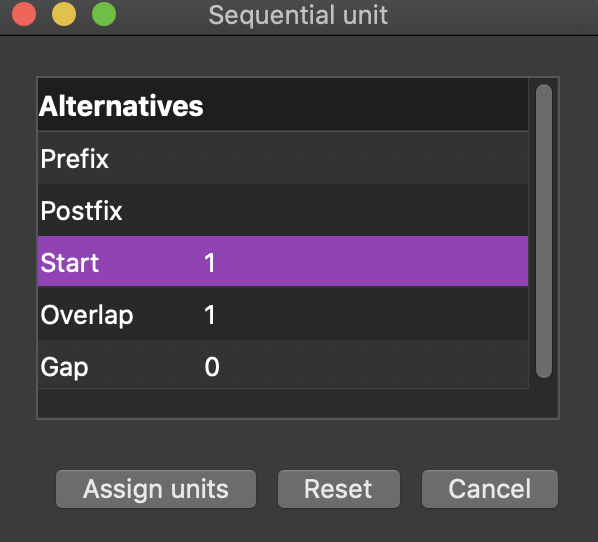
As this is a video-intensive show (and a VERY light hang), we are done adding lights to the overhead LX. So let’s number, channel and address them. Select all fixtures from SL to SR on the 1st LX (selection order is important from here on out) and click the cog. Sequential>Unit.
No need to change the default settings this time.
Repeat across all LX, keeping in mind you will need to correct the Start number each time to set it back to 1.
Let’s hang the front of house. Library>Fixtures. Search for Source Four 19 and drag one out onto the center of FOH 2, the furthest FOH position. Adjust the following:
- Location: FOH 2
- Purpose: Front
- Optics: HPL 575x/115
- Show Optics: No
Now go to Library>Filters and search for 4915 and drag it onto the fixture. Repeat for R132. Click the cog by your selected fixture in the Alpha view and select Duplicate. X= -6’ and Duplicate= 2.
Now, select the two lights that just appeared SR of center and Mirror them to SL, Relative to X=0’. Select all the FOH 2 lights form SL to SR and use Sequential>Unit to number them. Keep all the lights selected and Duplicate with a Z value of -10’ and number of duplicate set to 1. With the new lights on FOH 1 selected, rename Location to FOH 1.
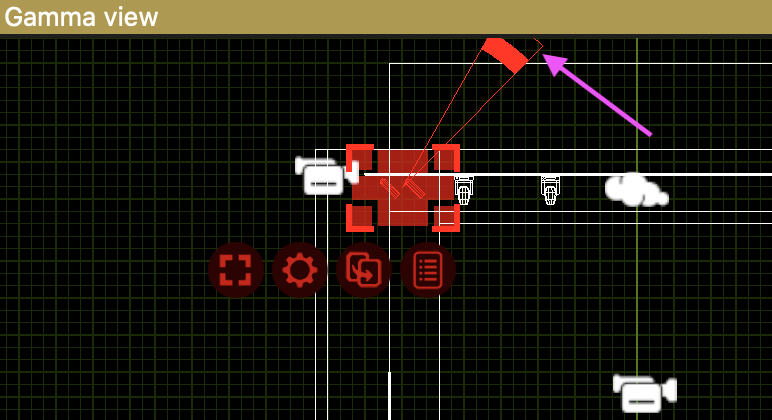
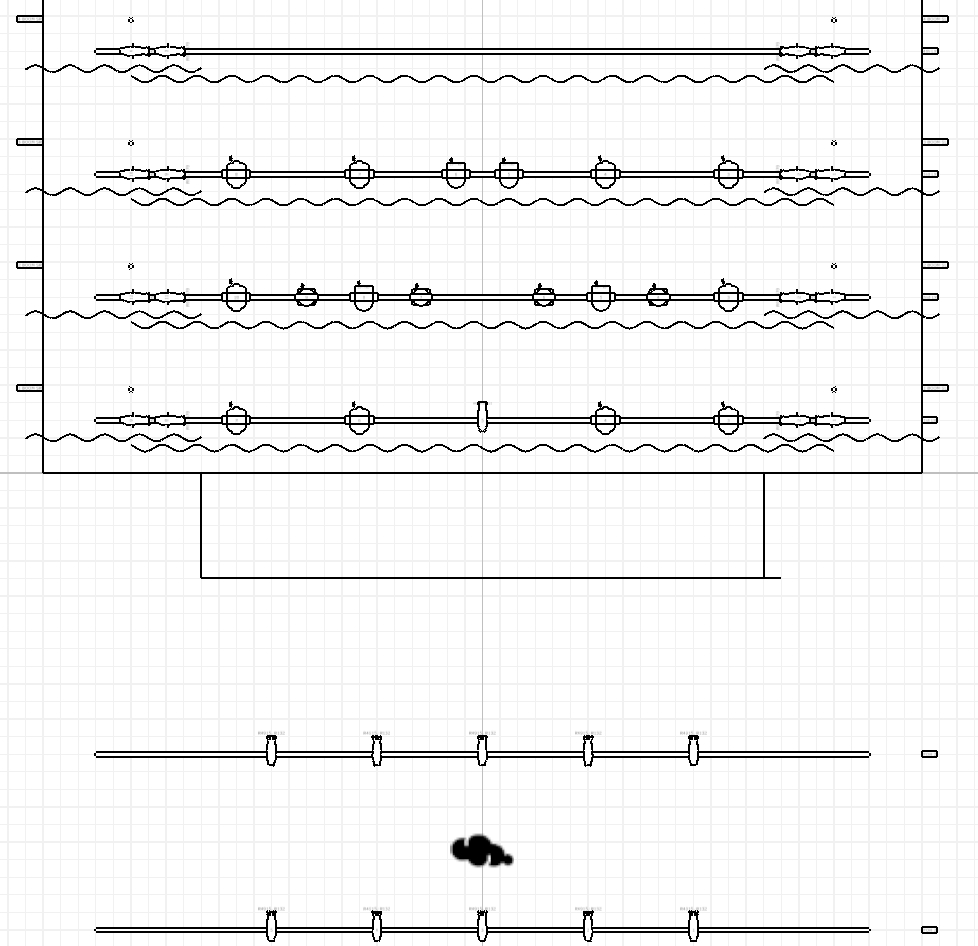
Select all the lights and in your Beta view, turn them all on. Switch your Gamma view to Right by pressing the three horizontal lines in the lower right hand corner and selecting Camera>Swing to Section. Use the cone in your Gamma view to focus all the lights towards the stage. Turn them all off. Your drawing should now look like this:
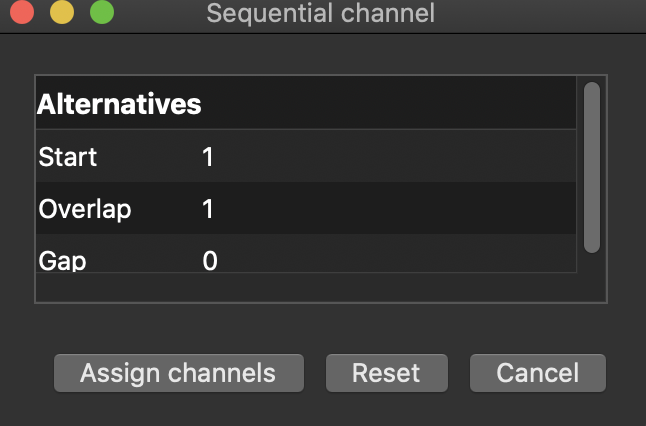
Time to channel and address. Select the FOH fixtures starting out in the house and the furthest SR light. I channel for the programmer from House Left to House Right, instead of the Union method of channeling, which goes from Stage Left to Stage Right. Select all ten front of house fixtures with that in mind and click the cog. Sequential>Channel. Default settings will work for this first one.
Press Assign Channels, and the fixtures will be number 1-10. For now, we will be skipping 11-40, since those channels are on the booms. Next, select the Source 4 36 fixtures the are furthest offstage on either side. Select the unit SR on the 1st LX, then the unit furthest SL on the 1st LX. Continue doing this as you move to the 2nd, 3rd and 4th LX. Cog>Sequential>Channel. Start: 41, then press Assign Channels. Do the same thing with the next set of fixtures onstage from these, but number them starting with 51.
Select all the Quantum Profiles from SR to SL on the 1st LX, then from SR to SL on the 2nd LX, and finally the 3rd LX from SR to SL. Cog>Sequential>Channel from 61. The Rogue R3 washes get selected from SR to SL and channeled from 71. Select the RGBWA moving head fixtures from SR to SL on the 2nd then 3rd LX and channel from 101. The DSC fixture is channel 111.
Since making Booms is a multi-step procedure and this is already long enough, this is where we are stopping for now. Save your file as we will return to it as we continue through this series. We will continue by building booms, addressing, and the set about fussing the plot to be presentable. If you have questions or requests, comment below.