I never enjoyed the game of Monopoly as a child, so it’s no wonder I’m not a fan of monopolies as an adult. The options for drafting are few, but they are getting better and better. Lately, I’ve been exploring how Capture is at plots. There are many reasons to think seriously about Capture.
- Lower prices to buy in at. You can buy a single universe license, a two universe license, a four universe license, or an unlimited license. Prices range between 395 euros to 2195 euros.
- MUCH lower prices to upgrade each year (and upgrading is optional). Prices ranges between 99 euros and 149 euros.
- No penalty for buying a single license and upgrading later. The price to upgrade to the next higher license is the difference between what you paid already and the cost of the license you want to upgrade to.
- Design your show as you draft. No awkward focus positions needed, just select a light, turn it on and right click where you want it to point.
- Amazing integration with Chamsys, and pretty darn great integration with the other “greatest hits” consoles.
All of this said, there are things that can feel very confusing to a previous Vectorworks or AutoCAD drafter in Capture. The biggest weirdness is the whole program is object-oriented. Instead of selecting a line tool and making a series of lines to create a box, for instance, you simply drag a box form into the drawing and adjust it’s dimensions to suit.
To help people who are curious about making the change to Capture, or people who already use Capture but still find drafting in it off-putting, I’d like to do a mini series of articles to walk you through the experience. As you may already know, I work mostly in theater, and since I feel like Capture is perhaps better documented for the Music designer, I’ll be fairly theater/dance/circus oriented.
I’m going to walk you through building a plot by scratch for a small touring aerial show I have out on the road since it’s a light hang and features boom lighting. Getting a boom to work in both 3D and 2D has a few complications in any software, so why not get familiar immediately? We’ll be working in Capture 2021 since they just added some nice tools to help the drafting process, and because I’m a nerd and I’m excited to play with the new software.
So as not to overwhelm you with millions of details, I’m going to assume you understand the basics of the interface. So with Capture open, let’s go to the Library and go to Objects>Stages>Proscenium and drag a proscenium stage into our project, making sure your DSC mark lines up with the center of the X that exists in an empty Capture document. I was taught this is called the Zero Crossing (where both X and Y have zero values). Capture, for reasons I do not know, swaps the Y (often the depth coordinate) with Z (often the height coordinate). So place DSC on the X and Z crossing.
The beveled front of the stage is called the Apron in the Selected items window. This show doesn’t typically have this part of the stage, so please set Apron depth to zero. The Thrust contains measurements that are relevant to the Proscenium. Typically, we tour small to medium theaters, so I’m looking for a proscenium that is at or exceeding 32’ wide and 24’ high. Go to the Design Tab>Selected items view. Make Thrust Width 32’ and Thrust Height 20’ with a Thrust depth of 6’. Adjust the Apron Width to 34’. Stage Width should be 50’, Stage Depth should be 32’, Stage Height can be 30’.
Take a moment to verify this is exactly right, as all measurements stem from this placement. X and Y should say 0’, Z should say 6’, since it takes the zero crossing as the downstage edge of the Thrust.
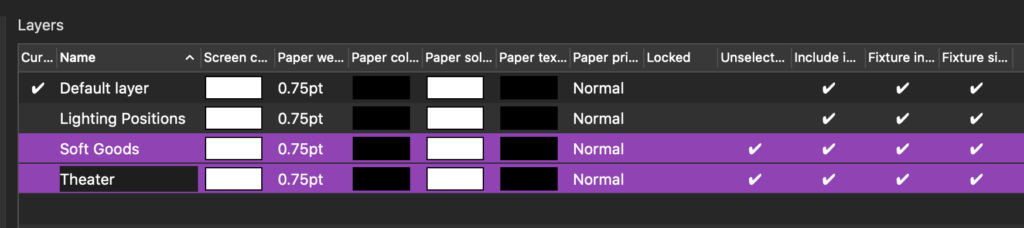
Now that we have a rough stage, let’s go to the Layer menu (still in the Design tab) and create a Layer called Theater by clicking the + at the bottom of the window and typing the name in. While we are here, let’s add two more layers for your next two tasks: Soft Goods and Lighting Positions. Back to Selected Items, Double click where it says “Default Layer” and a pull down menu will show you the layers we input. Choose Theater by clicking once on it.
Let’s make some Masking, shall we? Go to Library>Forms and select Curtain. Drag and drop it out onto the plot. In other drafting programs, I’m very precise where I place things, but not in Capture. Nothing in the software shows you where anything is except the Selected items window. Therefor, precision is always entered manually once the item is in your drawing already. Let’s first give the curtain border dimensions. 12’ high and 40’ wide. When you look at the curtain in your Front view, you will notice it has magically broken through the stage floor. This is because Capture takes measurements from the center of an item. We want this to reach a trim height of 25’ (remember- it’s an aerial show, so trims are VERY high), so we need to add half the height of the border from the out trim. Set your Y value (remember that Y is height in Capture) to 31’. X should be zero and Z should be setting to -1’ 5”. I for some reason find it funny to see the border popping up above the proscenium arch.
Now let’s make some legs. Using the same item in Library>Forms>Curtain, drag and drop one approximately behind the boarder and SR. Back in Design>Selected items, make the Height 30’ and the width 10’. Again, the drape is halfway underground, so let’s set the X value to -21’, the Y value to 15’, and the Z value to -2’. Keeping the drape selected, click the cog icon in your Alpha window and select Mirror.
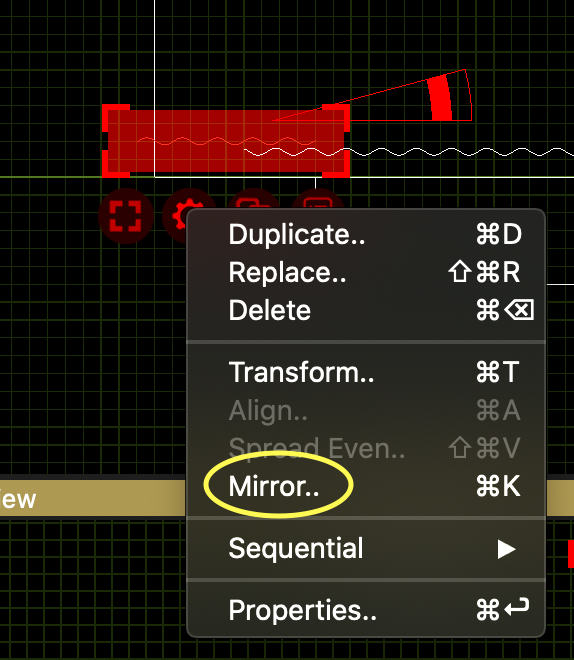
In the Mirror dialogue box, you want the Relative to X value to say 0, so it will mirror across the stage. You also want to tick the box to opt to Duplicate, since Capture does not assume Mirroring to be an additive function by default.

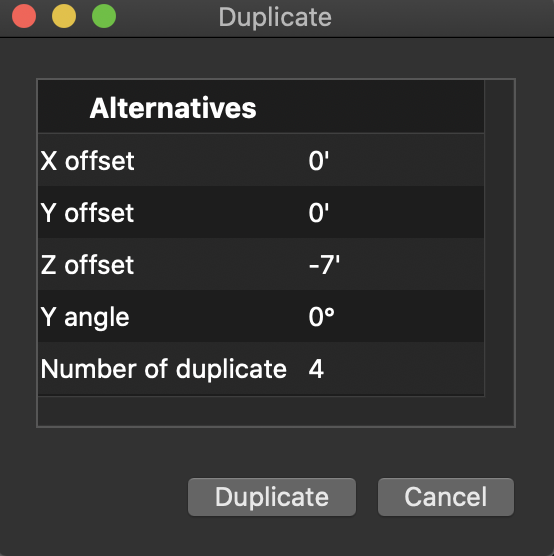
Now let’s select the border and both legs to clone our masking upstage a few times. You can either draw a selection box around all three items, or you can shift click to select them one at a time. Click the Cog and select Duplicate.
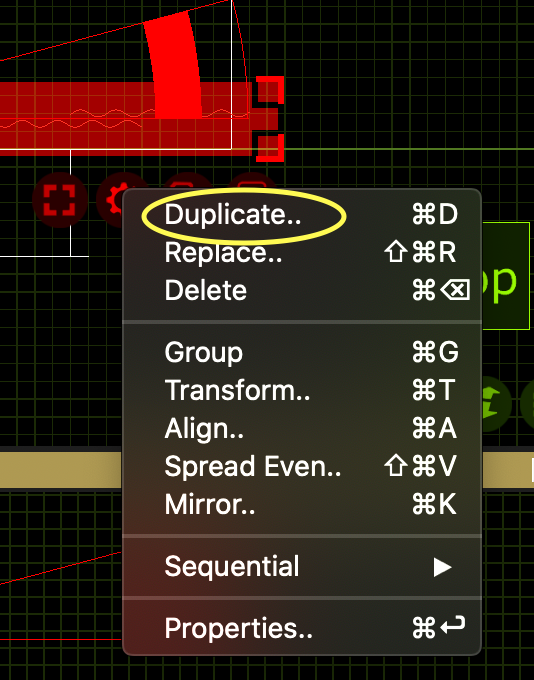
In the next dialogue box, you want to select a Z value of -7’ and enter a duplicate value of 4.
You should now have 4 wings setup and a set of legs and borders ready to frame the cyc. I think this is a great moment for a painting party (always paint without the cyc in the room!) Let’s select all drawing a selection box around all the masking as well as the theatre. Let’s go to Design>Materials (NOT Library>Materials) and click the plus at the bottom left and choose Add to create a new material. Name this new material Black.
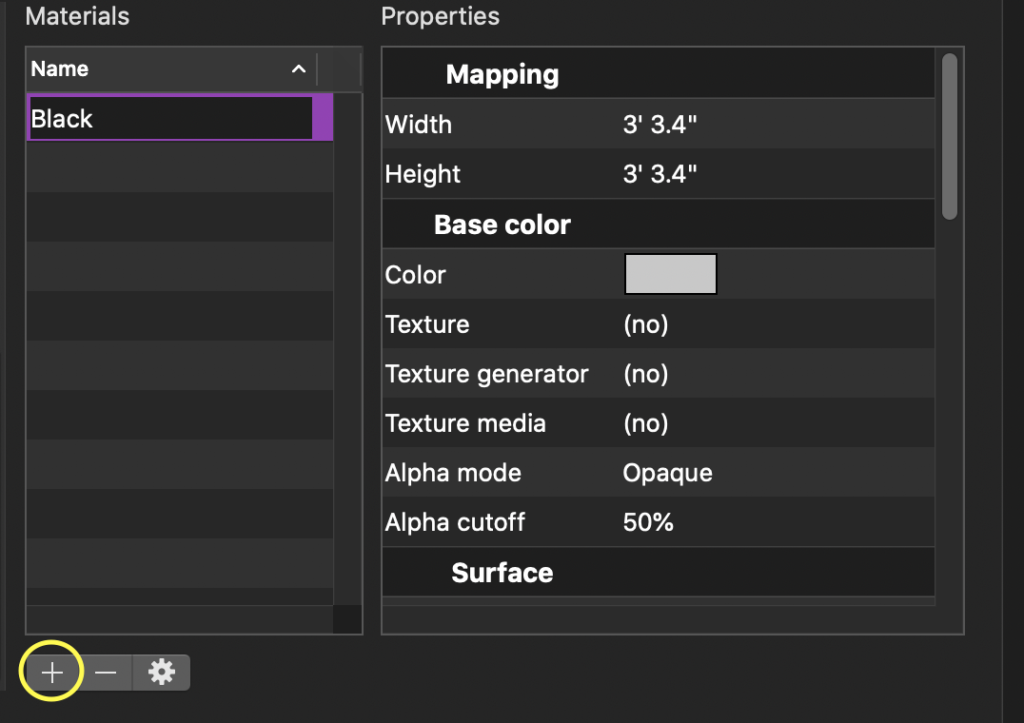
Notice that this new materials is a bland grey. Double click on the actual grey swatch to the right of Color and take the RGB values to zero to turn this black. Now, click on your label of Black and drag it out over your theater. You will see the selected items turn purple when you hover over any of the items. “Drop” the paint by releasing your mouse. A dialogue box will ask you what you want to add this Black material to. Choose All. Congratulations, your theater is now black.

Go to Edit>Deselect or press outside the area to deselect your items. Let’s add the Cyc by going to Library>Forms>Box and dragging it out behind the upstage-most set of masking. Go back to Design>Selected items. Let’s make the cyc 28’ high, 40’ wide with a depth of 1”. Give it an X value of 0’, Y value of 14’ a Z value of -31’. We choose the box items because I’ve never found a way to make a Curtain have no fullness. Let’s go back to Materials and make a white color (slightly creamy if you wish). R=255, G=240, B=220 for cream. Drag and drop it onto your cyc.
Let’s select all the soft goods at once and go back to Design>Selected items. Under Layer, double click and select Soft Goods to put them in that layer. Now let’s go to Design>Layers and make all of these things unselectable (a small drafting convenience I enjoy, but is entirely optional.) Look for the column labeled Unselectable and double click there for both Theater and Soft Goods.
Now that we have that done, let’s make some pipes to hang some lights on. Since we are still in Layers, let’s take a moment to double click the space before the name Lighting Positions, since that selects the layer so everything we are about to add goes in that layer.
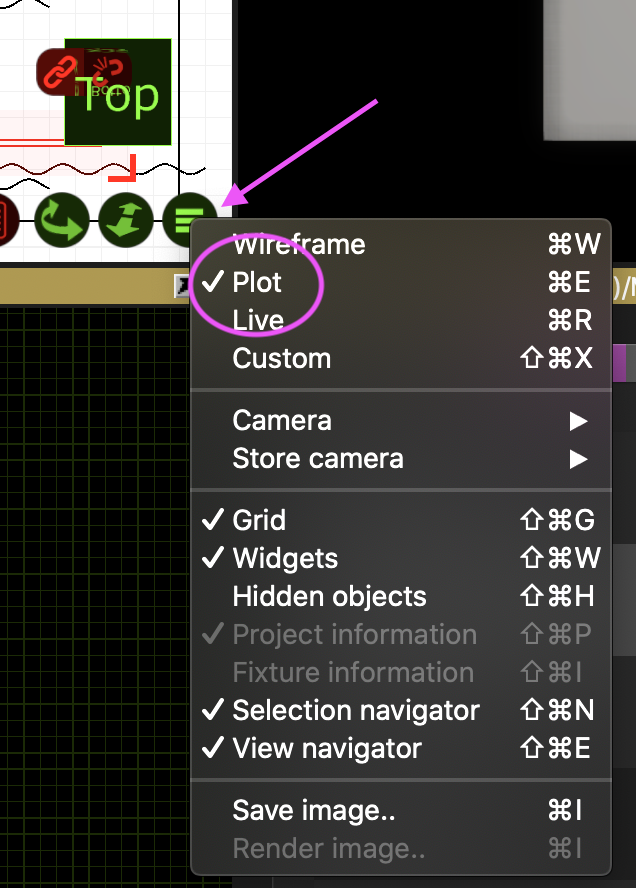
Now go to the Library tab and select Truss. If you click on “Bar” in the filter/search window to the right, options will show up. Find Generic in the list and click on it. You want the first of the two, which is the straight pipe. Click and drag it out into the first wing. Got to Design>Selected items. For Position, it should be X=0, Y=28’ and Z=-3’. Now make the length 44’. Scroll to the bottom of the Selected items window, and you will find the word Text. This is where you tell Capture the name of the lighting position. Type 1st LX, or whatever version you prefer, by double clicking on the empty area to the right of Text. At this point, it would be a great idea to change your Alpha view to be Plot instead of Wireframe. Click the Three lines in the lower right hand corner of the Alpha window and select Plot.
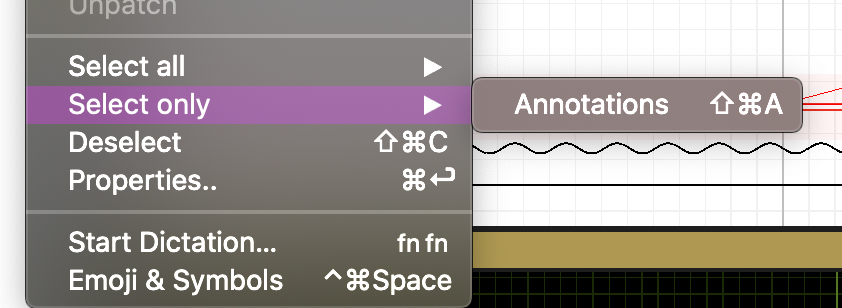
Now your Alpha view looks more like a conventional plot, and you can see the label at the center of the pipe. I find it less than helpful to have it there (who doesn’t hang a center fixture if they can?), Go to Edit>Select Only>Annotations.
At this point, we need to meet a very important tool. Above whatever you have selected and ONLY in plot view, there is a chain link and a broken chain link.
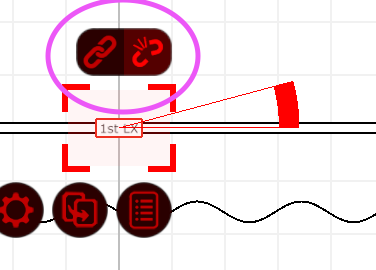
The icon on the left means whatever movement or adjustments here will also affect all the 3D views. If you click the broken link, you can position the item wherever you wish to make it easier to read. Click the broken link icon to be able to move the label. I favor it being on the right side of the page, but you do you.
Now that we have a hanging positions, let’s use Duplicate to make some more. Hold Shift and click the pipe to select both the label and the pipe. Now click the cog and select Duplicate. Z Offset -7’, number of duplicates 3. Click outside the pipe area to deselect, then click on each of the pipes to enter their correct names (2nd-4th LX).
Let’s do our Front of house positions. Select the 1st LX again, and select Duplicate. Be sure to click the chain link so it is NOT broken now. Input values in Selected items so the pipe ends up at X=0’, Y=28’, Z=26’. Label it FOH 2. Now, use duplicate again and set a Z value of -10’. Rename this pipe FOH 1.
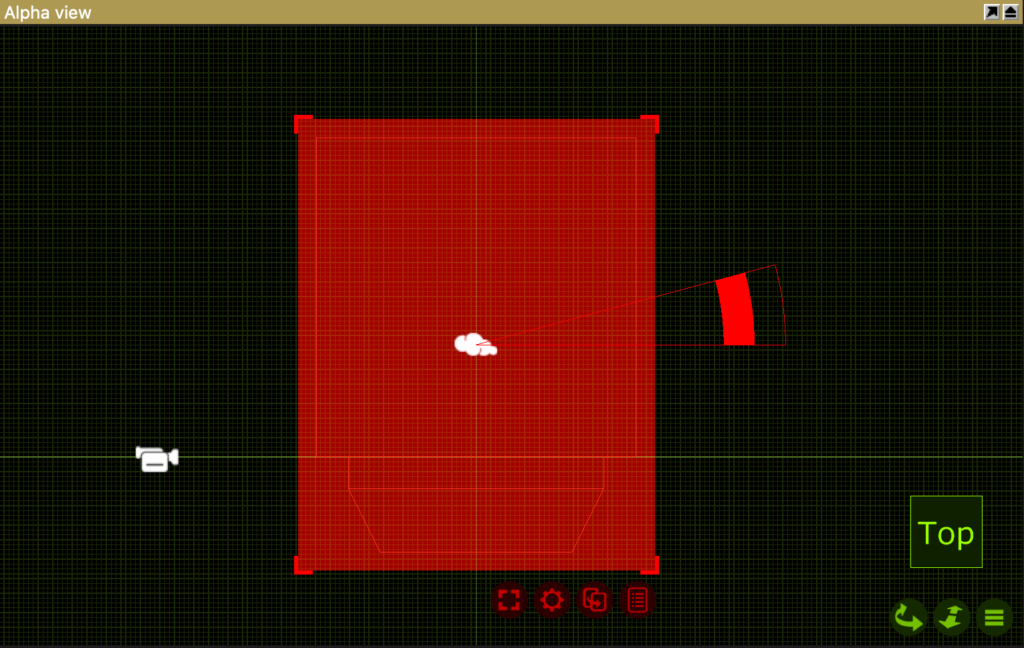
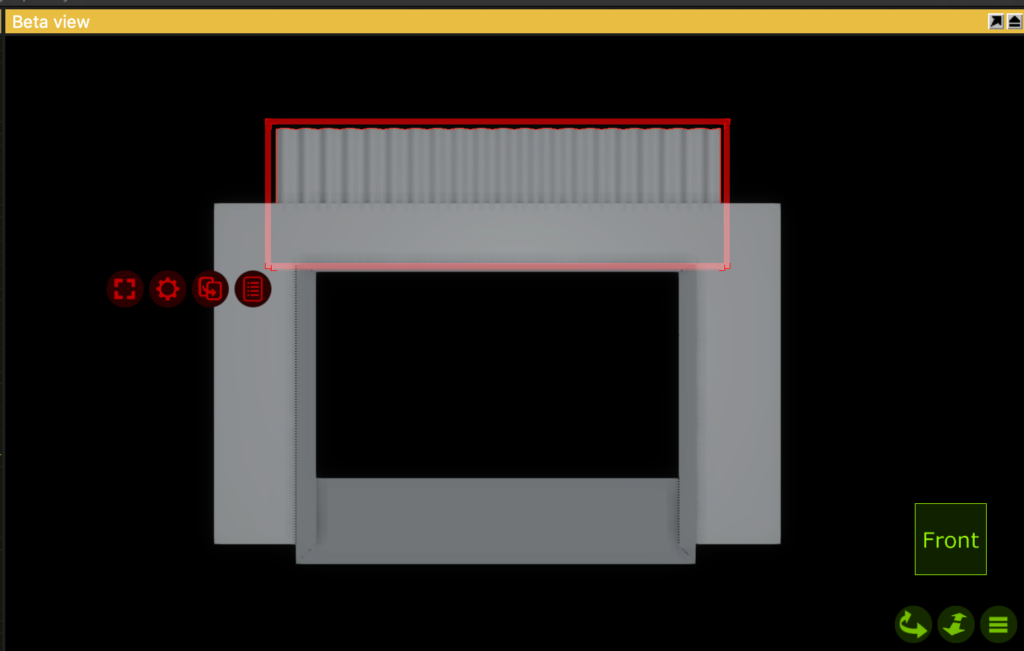
Now, we need some booms. Go back to Library, Truss and you should find the Pipe symbol still waiting for you. Drag and drop one out into the first wing. The pipe goes in flat, and we want it to be vertical for hanging, but eventually horizontal again for the drafting. In your Beta view, you will see there is a cone extending from the pipe.
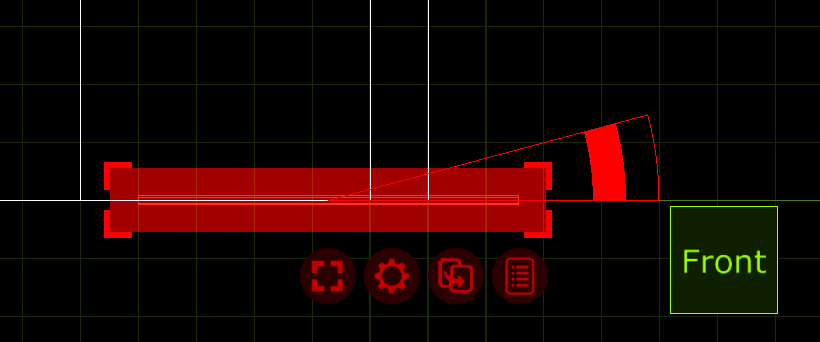
Click in the furthest from center part of the cone (the outline portion, not the filled portion). This will allow you to rotate the pipe to vertical. If you hold Shift at the same time, it will snap to every 5 degrees. Do that until the pipe is at 90 degrees. Back to Design>Selected items. Let’s make the pipe 12 feet tall, and then pull it from the stage floor by entering 6’ for the Position Y value. Enter 20’ for Position X and -4’ 9” for Position Z. Scroll to the bottom to name the position 1 Boom SL. Select just the annotation (position label) in the Alpha view either the same way as last time, or by double clicking just the label. Drag it where you like.
Hold down shift and select the pipe again. Let’s use duplicate to create 3 more booms (-7’ Z) to create a full set of booms for SL. Now take a moment and rename the new booms 2-4 Boom SL. Select all the correctly labeled booms and press the cog to get to Mirror. It should have the same setting as last time (Relative to X= 0’) and make sure Duplicate is still selected. That will work to fill in SR with boom positions. Then go through and relabel each, correcting for SR.
Click Save, name your file, and that’s where we are leaving off for this tutorial. Next week, we will hang the light plot! If you have questions or requests, hit me up in the comments.
2 comments