Welcome back to this continuing series. If you’ve been reading along, open your file with the theater and overhead electrics. I realized in the first tutorial I hadn’t spaced the booms far enough offstage. Click on all the SR booms and reposition them to -23’. Let’s also take a moment to put the position labels for the booms in a better place. Click the broken link that allows you to make changes to the 2D plot only (leaving the 3D environment untouched). Press Command Shift A to select just the Annotation and drag the position label SR to the edge of the deck. Repeat for SL.
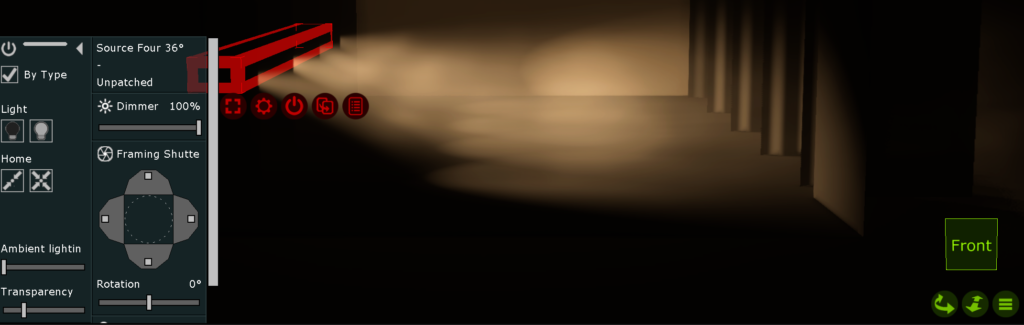
Time to add some lights. Go to Library>Fixtures. In the Filter area on the right, type Source Four 36 and press Enter. In general, vertical positions are easiest to build from the lowest fixture heading up. Since this is a lean plot, and an aerial show, the lowest position is a head high position.
Drag out the Source 4 to right in front of the Boom. Press Command Enter (or Enter for Windows) to open the Selected items view. Under Z Rotation, enter 90 and press enter. Doing this is better than grabbing the cone to rotate, since we are currently in the broken link mode that changes only for the Plot view. Entering the data through Selected items will rotate the fixture in all views. While you are in this view, confirm or change the following:
- Position X: -22’
- Position Y: 6’ 6”
- Position Z: -4’
- Purpose: Head High
- Optics: HPL 575X/115
- Show optics: No
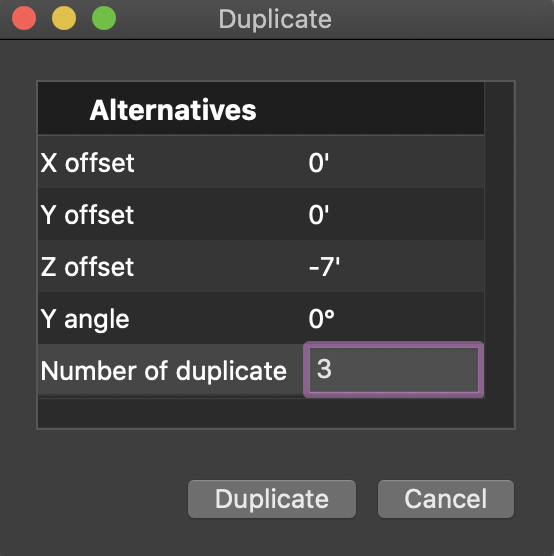
Since we’ve done all this helpful work, let’s click the cog or click Command D to select Duplicate. Enter a Y value of 2’6” to duplicate the next light to 9’ in height. Edit the Purpose to be Aerial Cool. Keeping the fixture selected, again we will duplicate the fixture with the same settings. Once done, edit the new fixture’s Purpose to be Aerial Warm.
In your Beta/Front view, hold down shift to select all three fixtures from top to bottom. Click the cog and go to Sequential>Unit.
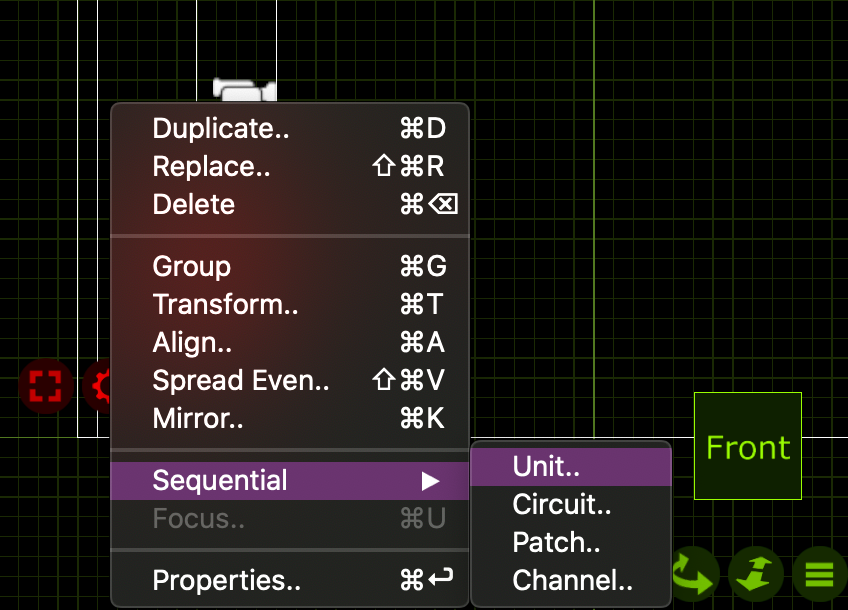
Make sure your Start value is set to 1 and click Assign. Your boom is now numbered from top to bottom. Let’s go to Library>Filters. The top unit wants R3408, the mid wants R4230 and the bottom wants R53.
Now that the boom is built, let’s select all the lights and the boom bar. Click Command D to Duplicate. We want the selections to look like this:
You now have three booms filling wings 2-4. Go through and select each position of fixtures and make sure Location is labeled correctly. Click separately on the boom bars and correct the Plot Annotation Text. Input your Unit numbers as well and make sure all your booms are numbered top to bottom.
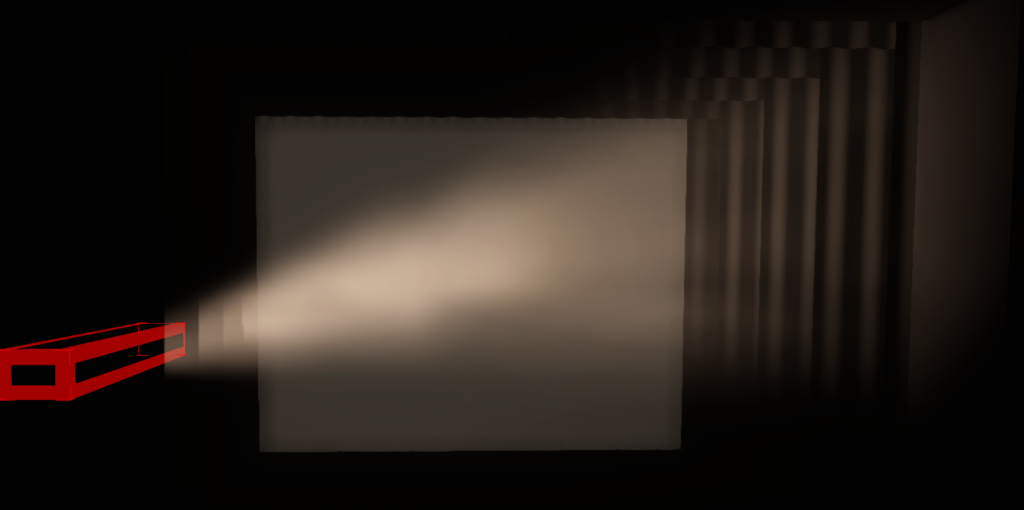
Now to focus the fixtures. Grab all of the Head High fixtures by clicking in your Gamma view, which should be set to Right. Change your Alpha view to Front, angle the view to suit your preferences, and change the view to Live. Click on the On button in the Live view and press the white-filled bulb icon to turn all the Head High fixtures on. Grab the outermost part of the cone in your Beta/Front view and angle them down so the near side is about 4’ SR of center.
You may want to click on the upstage most and downstage most of the Head Highs to adjust the shutters off the Cyc and the Proscenium. When complete, reselect all the lights and turn them off.
Select all the Aerial Cool fixtures and turn them on. Using the cone, tip the lights up so the top corner just passes the point where visually the leg meets the border.
Adjust your shutter cuts, select all lights again and turn them all off. Repeat these steps to make the same focus and cuts on the Aerial Warm system.
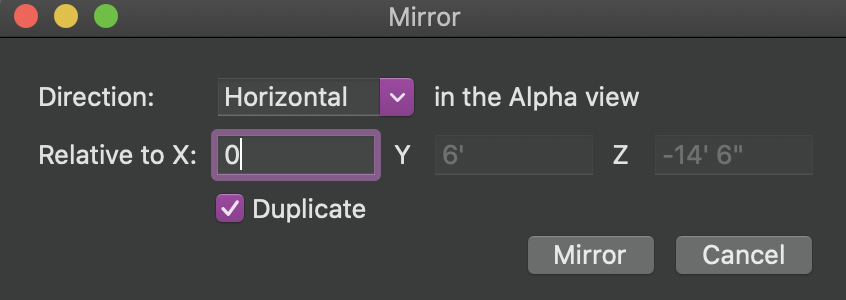
Restore your Alpha view to a top view (Command 1) and a Plot view. Select all the booms and all the boom fixtures. I do this with drawing over each boom and bar in the Top view, holding Shift down to add the next selection until done. When all selected, click the Cog>Mirror and enter a Relative to X:0’.
Now, all your booms are copied to Stage Left. Go through each boom and fixture to correct their Location or Plot Annotation Text to be 1SL Boom through 4 SL Boom. Irritatingly, you will also need to renumber each boom for Units, since that information isn’t copied, duplicated or mirrored.
On to Channeling. I address from DSR heading USR and restarting DSL to USL, system by system. Switch your Beta view to Section so it faces Right. Make your Gamma view be a Left view. This will give you easy access to select the fixtures system by system. Starting with the Aerial Warm fixtures, select from DSR to USR then from DSL to USR holding Shift to add each selection. Click the Cog, Sequential>Channel. Start 11, Overlap 1, Gap 0, then press Assign channels. Select the Aerial Cool fixtures in the same way and assign channels 21-28. The last fixtures are the Head High position. Same selection order and number them 31-38.
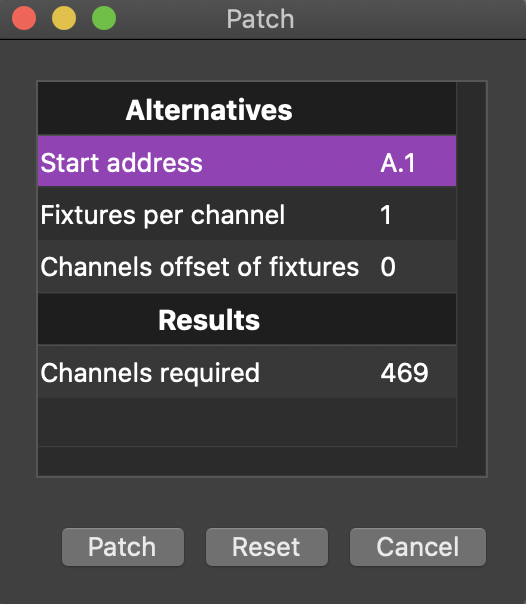
Go to your Fixtures tab. If the fixtures aren’t showing in order of Channel, click where the column is labeled Channel, and it will sort it for you. Since this a touring plot, and therefor the addressing will change from venue to venue, let’s be very simplistic. In the Fixtures tab, click on channel 1 and scroll down to channel 111. Holding Shift, click on channel 111 to select all the fixtures. Click on the cog in your Alpha window and go to Sequential>Patch. In the dialogue box, set a Start address of A.1. Click Patch.
In real life, I would separate the Moving heads into Universe B since I travel with them and the addressing stays the same. But in case some of you are on Capture Solo, I’m sticking with one universe.
That’s it for this tutorial. Next week, we’ll go through the process of taking our design and adjusting it in Plot view to make it a clear and readable plot for load in. We’ll also explore the basic paperwork reports. If you have requests or questions, hit me in the comments.
1 comment