As a companion to my earlier post about what I use, here is how I configure for multicast. Please note- I’m not a networking expert. To be honest, I read Wayne Howell’s brilliant articles on the Artistic License website and followed his instructions. I highly recommend reading all three of the articles (found under Support & Resources>Multicaster) because it will gain you a deeper understanding of sACN and how to utilize it. My interface was different than the screen shots he had, so I experimented for a while until it worked. These settings work for me, but I offer no guarantee. Let’s get into it.
In my setup, I use a Netgear GS108T as the console-side “leader” switch since it has IGMP Snooping, IGMP Query, and Loop Control. All of these things need to be present on one and only one switch in your network. All of the “follower” switches are Zyxel GS1200-5HP Managed Switches as they have IGMP Snooping, which ALL switches on the network need to have for Multicast to work. So I don’t go on too long, we’ll do the Netgear Console switch in this post and follow up with the Zyxel in the next post.
Setup Netgear GS108T
IP Configuration
First thing, we need to setup the IP address, Subnet and Gateway. Make sure your computer is in the default IP range of your switch. On the GS108T, the default IP is 192.168.0.239 with a subnet mask of 255.255.255.0. Once you sign in, go to System>Management>IP Configuration. I use Eos, so the image below shows my numbering.
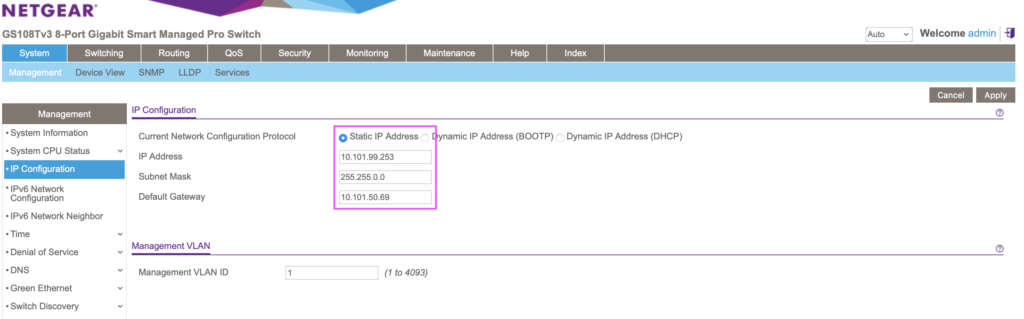
You know your IP scheme, so you don’t have to follow mine. The point is to choose what supports your system here. Be aware when you do that you will lose contact with the switch and need to reset your computer IP address to match whatever you chose, then sign back in.
Enable Snooping
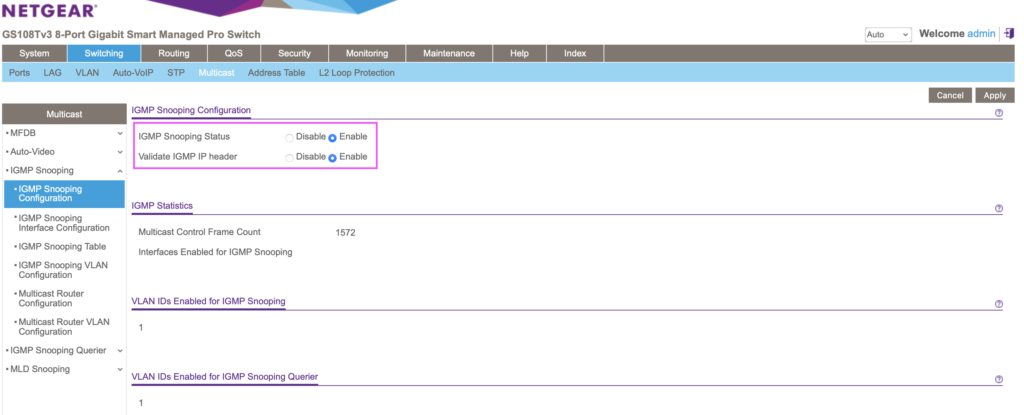
When you are signed back into your switch, navigate to Switching>Multicast>IGMP Snooping Configuration. Here, we want to turn on IGMP Snooping Status and Validate IGMP IP Header. Click Apply.
IGMP VLAN
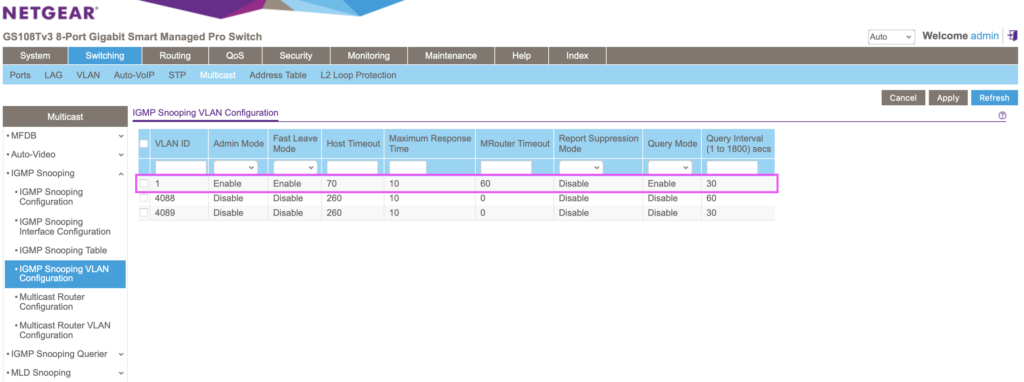
Next, navigate to Switching>Multicast>IGMP Snooping VLAN Configuration. This interface confused me at first. You need to check one of the boxes on items on the left to edit one to suit, or you need to tick the box next to the empty row to create a new line. After that, it’s fairly straightforward. Here I’m following Wayne’s directions of VLAN of 1, Admin Mode Enabled, Fast Leave Mode Enabled, Host Timeout of 70, Maximum Response Time of 10, Router Timeout of 60, Report Suppression Mode Disabled, Query Mode Enabled, Query Interval of 30. Click Apply.
Querier Configuration
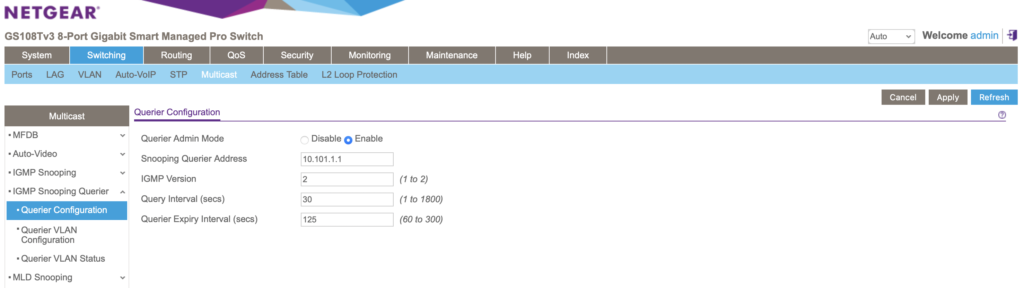
Go to Switching>Multicast>Querier Configuration>Query Configuration. Enable Querier Admin Mode, Provide and IP address for the Snooping Querier Address. Make sure this is an address you don’t intend to ever use on anything else. IGMP version of 2, Query Interval of 30, Querier Expiry Internal of 125. Click Apply.
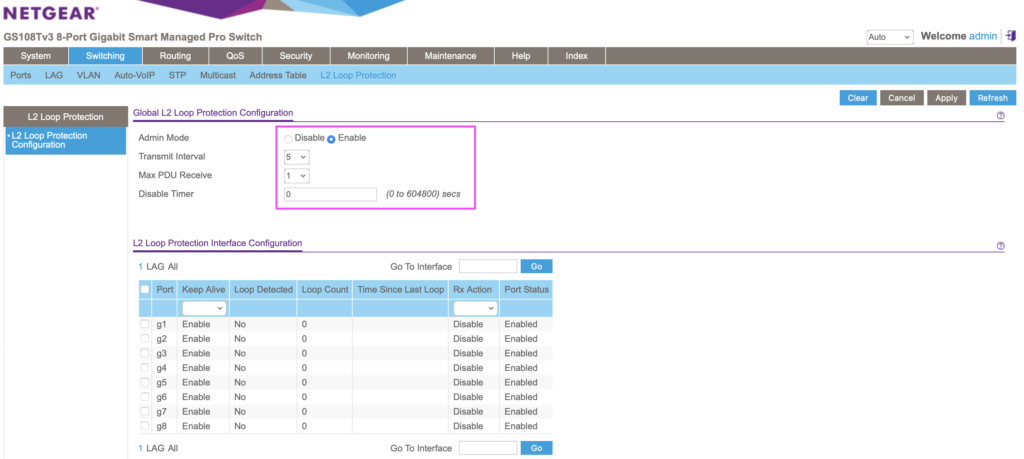
Loop Protection
Go to Switching>L2 Loop Protection. Here, we need to turn on Admin Mode to turn on loop protection. It basically authorizes the switch to turn off any loop of data that is hogging the network resources and has no destination. Multicast won’t function without it. I believe the other settings in this area are all defaults and I didn’t need to change anything after turning Admin Mode on.
Be sure to press every Apply all the way, but leave the editor open in case you need to adjust settings since we are about to test our setup. Also- there is a thing called EEE, which stands for Energy Efficient Ethernet. Go to System>Managment>Green Ethernet>Green Ethernet Configuration and make SURE it is turned off on yours. This can turn off your sACN universes randomly whenever the switch feels like it. It’s a hideous problem to identify and resolve, so even though they default to having this “feature” off, it’s important to verify.
Test With Multicaster
To verify everything is working, it’s time to open up Multicaster 2, which you can download from Artistic License. https://artisticlicence.com/support-and-resources/multicaster-project/
For this, you will need a computer that runs Windows and two network adapters. Set the IP addresses (in Windows Networking) to compliment your IP scheme. Plug both ethernet cables from your adapters into your switch. Open the software, specify your IP addresses (Multicaster needs to be told what to use) by directly typing in the addresses.

You don’t need to change anything else to start. Go to the bottom and press Run Test.

Hopefully, you will get a Good Results message, like this one.

If you don’t, go back through and check all of your settings to make sure your IP scheme looks good, Snooping is on, Query is on and Loop control is on then retest.
Assuming you have a good result eventually, notice that we only tested 10 universes and the interface suggests you try again with a higher universe count. To be exact, the interface speaks of Multicast Addresses. This is because each universe in sACN gets its own IP address. Anyway, I always immediately skip ahead to 200 universes.

Hit run test and see how many universes you are cleared for. Here’s my result.
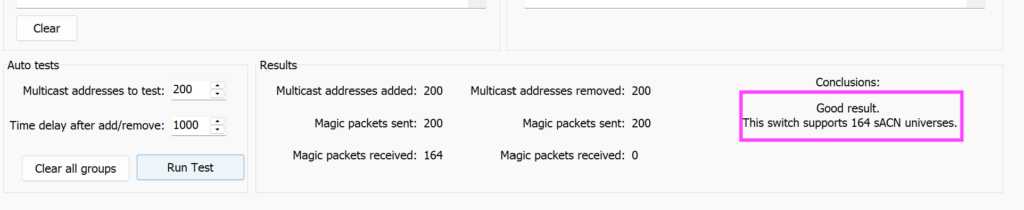
I’m very pleased with this result. 164 universes is going to support me very well for quite a while. Hopefully your result also is good.
That’s it for now. Next time, we’ll go into setting up the switches for the rest of the system. If you have questions or notes on my setup- I’ve very happy to hear from you. I’m constantly wanting to learn more and get better, so please hit me in the comments.