Welcome back to the third in a little series about network switches. Last time, we went over the Netron NS8 setup and the setup for the Zyxel switches I use to insure good performance. This time we will do the same thing, but with the Netgear M4250 switch instead of the NS8.
Signing in can be a bit tricky in my experience. You want to use the port on the back of the unit, which is dedicated to IT tasks and is called the OOB. The default IP address is 192.168.0.239. For some reason, Chrome stalls on this sign in nearly every time. Not sure what is happening. Safari appears to sign right in, though. On the sign in page, you have a choice of two routes to sign in through.

The AV UI option(unlabeled on the left) is the safest for the non-IT experts, as it is a simplified environment that allows you to choose what function you want ports to serve by using pre built profiles. To sign in the first time, type “admin” as your user and leave the Password blank. You will be prompted to create your password right away.
Once inside, you are on the default Configure tab. This is where you can reassign the default IP address for the front facing ports, which is the Management IP address.

To edit this address, click the pencil to the right of the IP address. A dialogue box opens.

I’m choosing Static, since that’s how I set up my networks. Then fill in the IP, Subnet, and choose a VLAN number. Click Apply. You won’t need to change your IP on your computer and sign back in since you changed the IP range for the network ports on the front, and you are plugged into the OOB port on the back.
Next we will choose the Network Profiles tab on the left.

On this page, there is a list of protocols that you can choose from to configure your ports. The idea is you choose the protocol- in our case Lighting- then you select the ports that should have this profile applied to them. I’m choosing ports 1-8 to be for Lighting and I’m leaving port 9 (the one port on the front without POE) to be a generic data port.
Click Lighting from the list by clicking the cog to the right.

Click on the ports to select them- again, I’ve chosen 1-8. Name these ports (Console and sACN for me), choose a color (cannot be the same as any color you’ve used elsewhere), and choose a VLAN number (also cannot duplicate). When finished, scroll down and click Apply.

VERY important- to save all your work, click Save at the top of the interface!

A test on Multicaster shows an incredible 1013 universes supported port to port on the M4250.

When you are scaling up, the switches have a function where they will assign the lowest IP address to be the Querier, so you don’t have to change the configuration of additional switches. Nice.
Zyxel
Now let’s set up the Zyxel GS1200-5HP. For those who read last weeks directions, this is exactly the same.
Sign into your unit using the default IP address and password. You will be prompted to make your own password.
IP Configuration
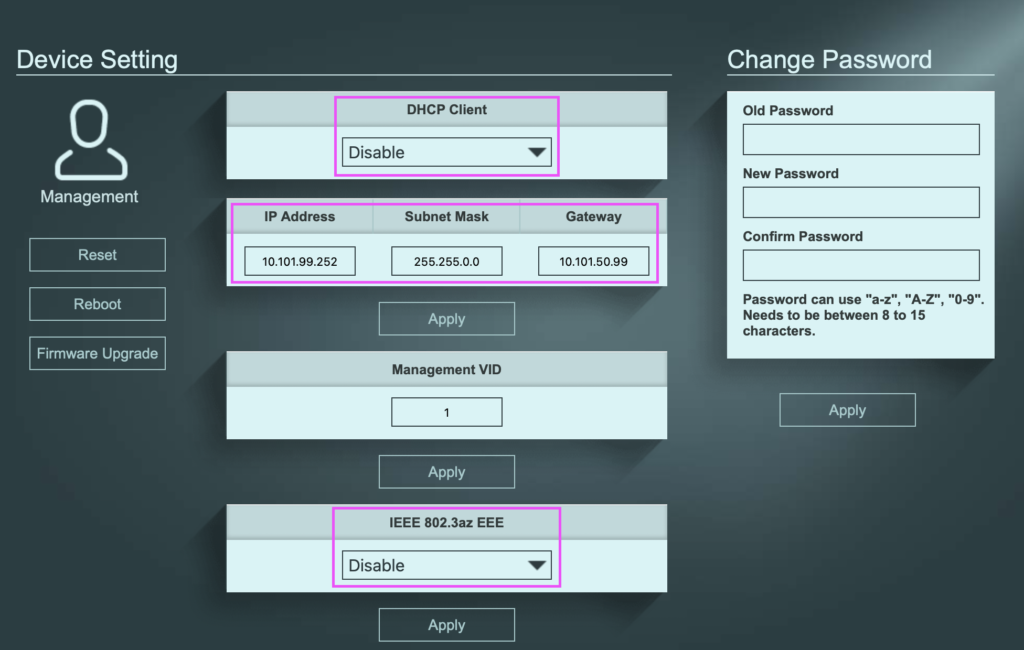
Go to the Management tab. Make sure DHCP Client is disabled (assuming you prefer a manually-set IP scheme for your network). Set your IP address, Subnet and Gateway to suit your IP plan. Though it is off by default, make sure the EEE is set to Disable. This is the horrid power savings “feature” that will sometimes turn off universes you are actually using because the network doesn’t detect “enough” traffic. Maddening. When finished, click apply to assert your settings, the you’ll most likely need to reconfigure your computer IP address to sign back in.
IGMP Snooping
Go to the IGMP Snooping tab and turn on IGMP Snooping. Keep Unknown Multicast Drop set to OFF.

Click Apply and you are done.
A test on Multicaster that tests from the M4250 through the Zyxel is even more remarkable. It surprised me so much, I tested 4 times, rechecked my cables and even switched ports just to see if I could change the results.

1011 Universes from the M4250 through the Zyxel! WOW. I’m absolutely blown away.
Last thought- since customer support is a big deal to all of us who earn our living with gear, I want to tell you that you will have a great tech support experience IF you contact the AV tech support. Do NOT contact the general tech support. Reach out with questions to proavdesign@netgear.com.
That’s all I have to report at the moment. I’m so excited to have been able to test both the Netron and the Netgear units and to compare the results. If you have stress tested your networks, regardless of price point, let me know what you are using and what your results were in the comments!
5 comments