My favorite thing to light is aerial. The artists do super heroic moves in real time, the work invites expressive lighting, and the geometry is challenging. What’s not to like? I started lighting aerial 8 years ago, and I approached it from concert dance background, so that influences my style. When I started, I had no clue what I was doing, and it was kind of a brutal learning process. I figured some of y’all might like to have a super basic methodology if you are ever in a position to light an aerialist guest artist or something of that sort.
First off- these are physical artists, and that means side light. Front light flattens the depth of the body and while some front light may be necessary, it’s not doing their performance any favors. Here is a plot with overheads and booms. It’s the booms I’d like you to pay attention to since the other lights are nice, but not mandatory.
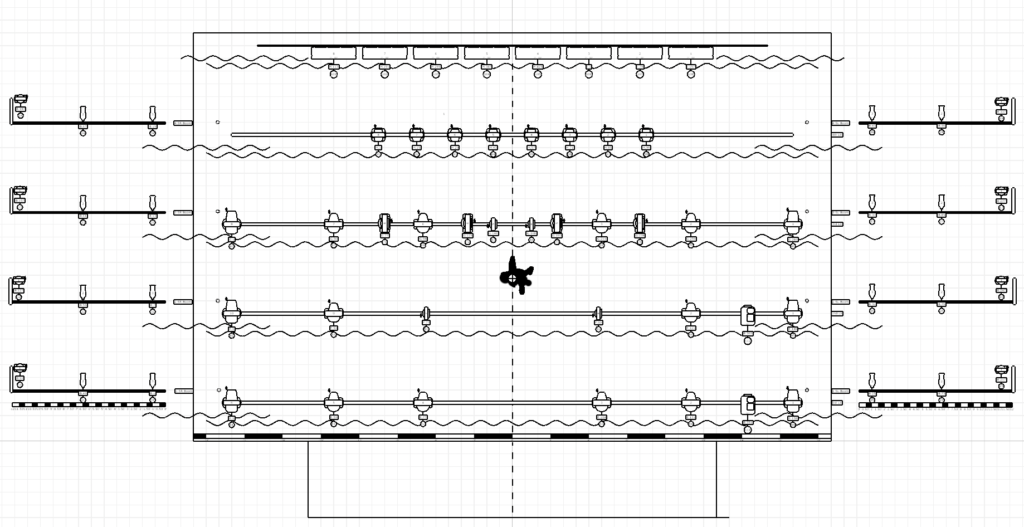
Notice the “usual” boom lights are there. A shin position and a head height fixture are what I consider the bare minimum for dancers. But look at the top of the 12’ boom. This is the key light system for them in the air. It needs to work in tandem with the shin and head height positions. If the top light is a moving light, you could possibly get away without the shin or head height lights, but I don’t recommend it. That’s a lot of extra programming, and if you have a duet, it’s not uncommon for each performer to take a solo moment up in the air while the other one is on the ground. I’m using a moving light here and I favor the Rogue Outcast as it is punchy, light weight, inexpensive to rent/buy and it sips electricity. It should not be hung directly from the pipe, and instead should have a short pipe that is cheeseboroughed to the boom so the fixture hangs straight down.
When focussing lights for aerial (moving or fixed head), it’s important to have a few things in mind. To help frame this conversation, let’s look at a side section.
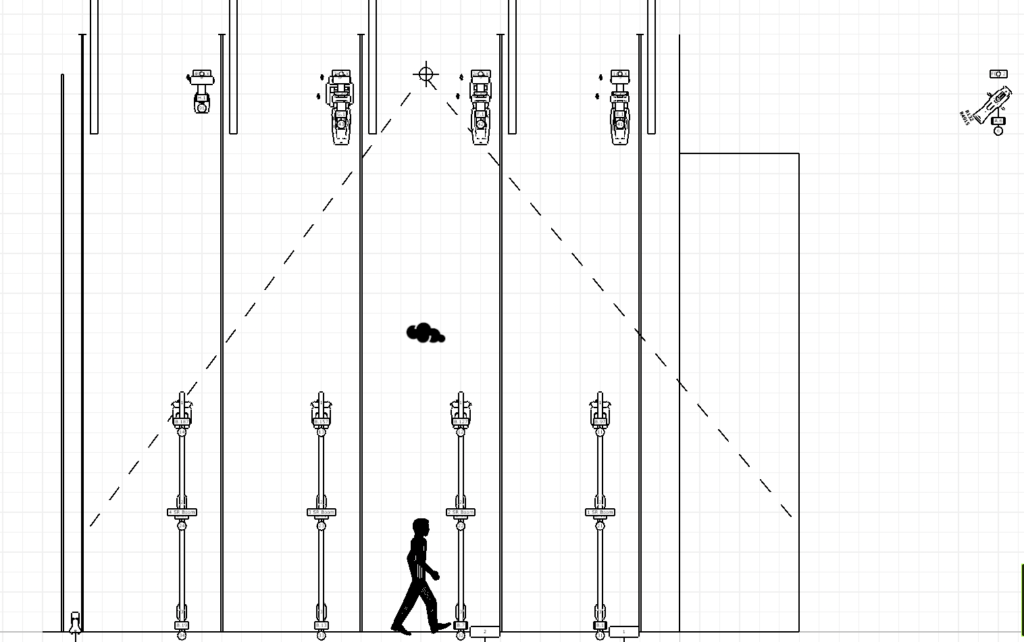
In the second wing is the aerial rig point. The dotted lines represent the range of movement the performer can do. I’ve seen performers go a bit higher when far upstage and downstage, but if there can be a usual, this is it. Perhaps obviously, the performer tends to occupy from 6 feet and above most often. As the performer gets higher, the potential depth of us/ds movement gets reduced as the performer gets closer to the point. I find it’s super helpful to have something hanging from the point when I’m focussing. Silks are ideal since it makes the light the easiest to see. It’s hard to keep in my mind that the focal point needs to be at center, as it is easy to look at the far wing and assume you have lit the area completely.
Speaking of focus, let’s look at a top view with beams projected into the space.
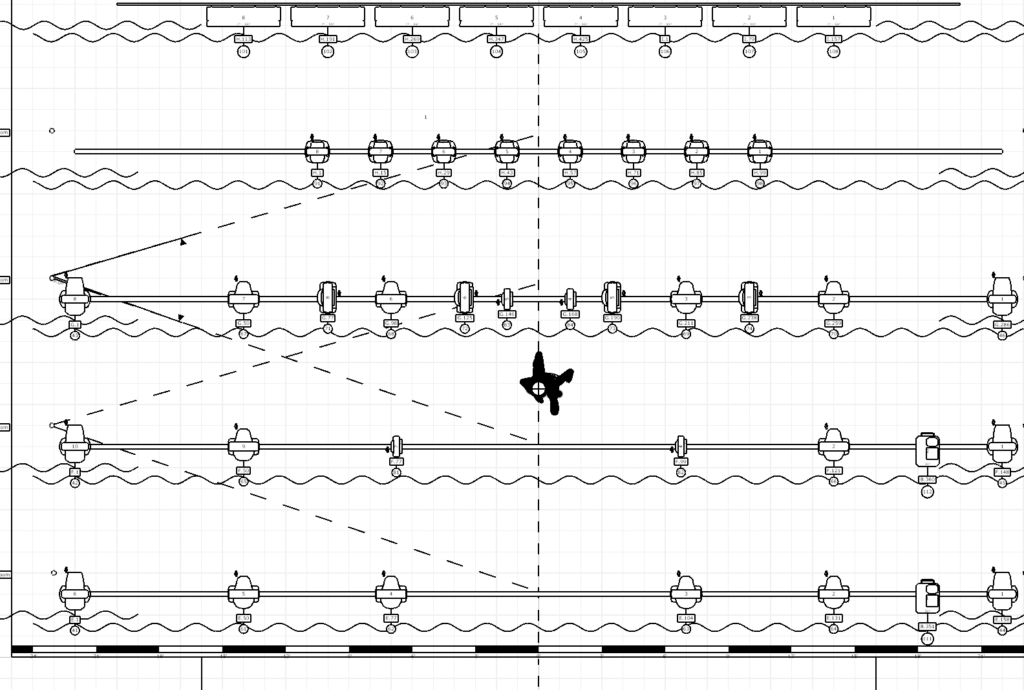
Hopefully seeing this makes the focus considerations clearer, between this and the side section. Notice if the performer is doing a circular move that draws them away from center, they can fall out of the light coming from SR. They would, of course, still be lit from the SL booms, but having the clearest idea possible of what movements your performer will do is key to having a stress-free lighting experience. To possibly overstate what is obvious, though I drew in only two 36 degree fixtures, hopefully it’s plain to see the need for all four booms (or more depending on the depth of your stage.)
In general, I start with three focus palettes:
Low (skimming the bottom of the beams to overlap at the point)
Medium
High (the performers will go higher than you might suspect)
I use the legs as a shutter cut to keep the moving lights neat, but I also have a wide zoom palette to layer on top of any of these for when the performers do an orbit run or something similar. Though it’s hard to describe in words, the take away is during an orbit run, the performer occupies the full range of possible movement in the span of a few seconds. The wider zoom will often hit the proscenium, but that’s a little better than the performer falling through darkness.
If automated lights are impossible, don’t worry. You can do what you need with conventional lighting as well. In this case, refer to this drawing.
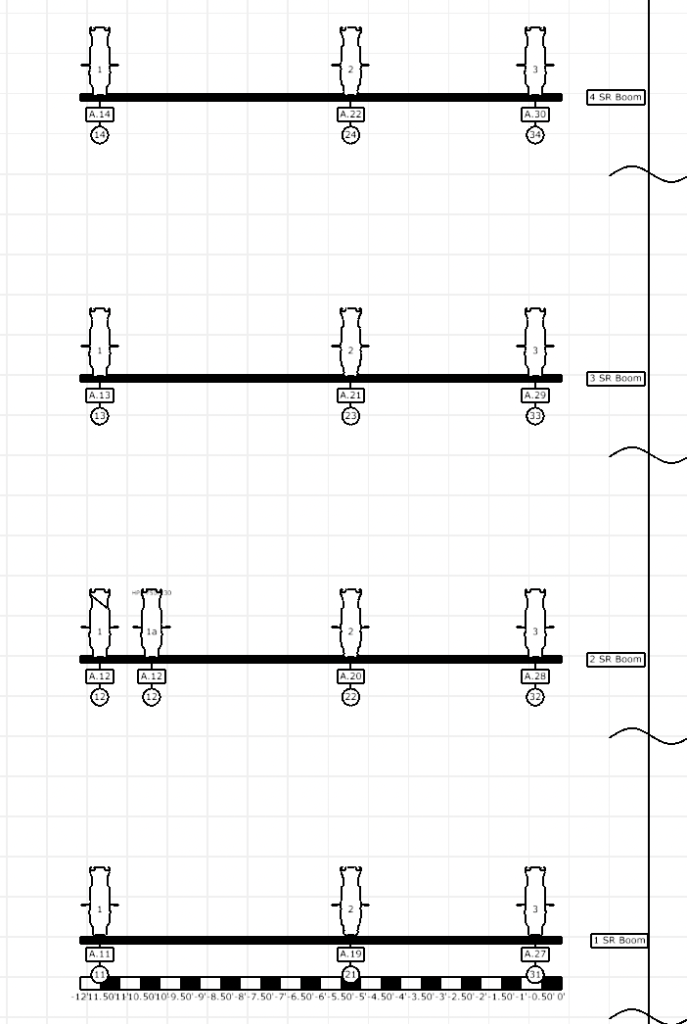
Here is a fixed-focus light minimum. In this case, the other lights on the pipe are mandatory for blend. With just 3 or 4 lights per boom, it would be ideal if all lights with color-mixing LEDs. If not- choose a singular color that flatters everyone’s skin tones and move on. Notice the second boom, as it now has an added light. This is necessary because the second boom in my plot lines up with the rigging point. Since this is the plan where the performer can go the highest, you need to add the 26 degree fixture to point straight up to the point. Use the side section drawing to focus the lights for best effect.
Though there is much more that I’ve learned in my years with aerial, I feel like this is a good place to stop for now. Using this approach (or modifying it for your situation) will help with the challenge of simply illuminating performers who can move so quickly and dynamically. Feel free to ask questions, or if you are already doing aerial lighting- share your experience. It’s always great to get more perspectives.
5 comments