Macros are funny things. They are massively useful, but many users I know avoid them- as if they were somehow an unexploded bomb. Let’s defuse the situation and walk through some examples of what can be useful macros and how to make them easily.
What’s that mean? Macros
Macros are prerecorded commands that you can trigger at will. Everything from keys you may be missing on a classic Ion to a long series of commands that Query a cue for unmarked fixtures, filter the results to select just those fixtures, then perform an action such as Mark Earliest M and assign them to Part 20 with a discrete timing of 2.9. Macros can do nearly anything. They can pause for your input and then continue, they can release cue stacks in busking situations- the sky is the limit. They can be created in Live by using the Learn Macro function, or in Blind using the Macro Editor.
Get to the Instruction Already
I work a lot in movement arts, and wow, do they move through tech fast. So one of the first macros I ever made (when I was programming the Ion Classic on the regular) was Update Trace. For those who don’t know, Trace allows you to be in the middle of a sequence- a song for example- and decide to change something foundational about the piece- like the color of the scene- and update it back to when the sequence started. It’s backwards tracking. Since I think it’s the lowest-stress way to create a macro, I’m going to build this one in Blind using the Macro Editor.
Open a new tab 18 for your Macro Editor. Hold right here a second- EVERY time you touch the Macro button, the console expects to trigger a macro. So unlike in other parts of Blind where you create something new by specifying the type of item (Cue for instance) and then the number- you ONLY type a number and then hit enter to create a new macro you can edit. Type 801 [Enter]. You now have an empty macro. Immediately Label this Update Trace. (I really can’t emphasize the value of labeling enough.) Softkey 6 currently says Edit.
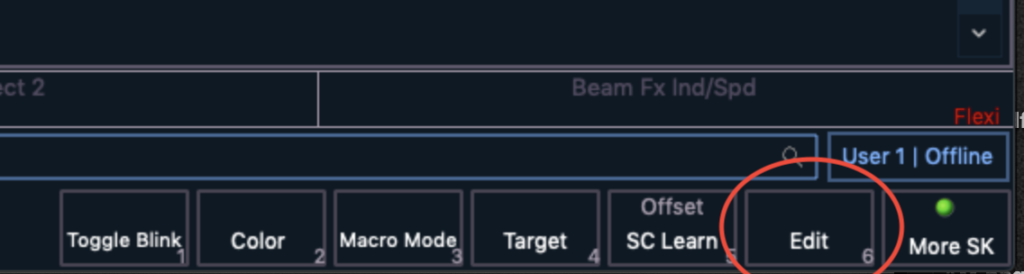
Press this and stop for another second. Once you are in Edit, EVERYTHING you press will be recorded except the arrow buttons you use to navigate. All Faders, on screen tiles, and buttons- including Delete. So stay calm, and watch your blind editor to see what you are doing. Once you have pressed Edit, please notice that there are now different selections on the softkeys.

The two most useful are Softkey 4 which is the only thing you can use to delete items from a macro and Softkey 6 which is Done. You must press done to save your work and stop “recording”.
All the CIA tiles are on the left, where they always are, and they are recordable. In the larger right side of the CIA there are three tabs- Common, Softkeys and Lamp Controls. Select Softkeys.

Hit your [Update] button, then using the onscreen arrows, navigate to the Ts for Trace and touch the tile, then hit [Enter]. Now press Softkey 6 for Done. Your Macro should look like this:

Your Macro is ready to use. You can hit [Macro] 801 [Enter], or better yet- use the built in macro buttons or an X-keys device (my favorite) to trigger it. Now that we have tasted Macro success, let’s do a couple more to show other use-cases.
Back to Macro Editor Tab 18. Type 802 [Enter] and label it Record Preset. Presets are very powerful references because they can include everything a fixture can do. However, very few programmers actually record everything a light can do into a Preset. I use Presets instead of Focus Palettes since I want not only where the light is pointing, but how big it is zoomed and all shutter data. And since I make anywhere from 20-1000 of these per show, I want a macro to speed things up. So let’s make a macro that specifies which attributes we want to record (Focus, Zoom, Shutters) and what kind of thing we want to record (Preset) but then waits for the user to input the preset number and press enter. Touch Softkey 6 {Edit}.
As I was doing this example, I made a mistake and pressed [Record] first, so let’s take a moment to walk through how to fix that. This is the display in my macro blind editor:
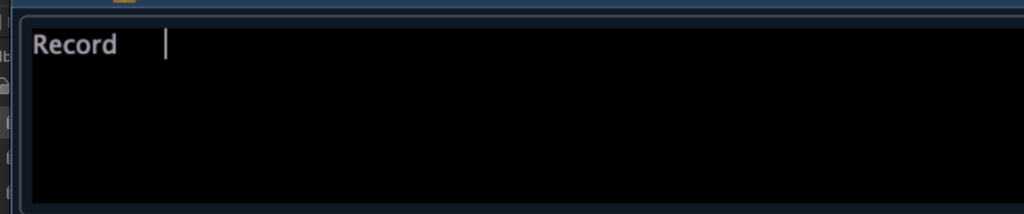
Using the arrow buttons- either on your typing keyboard or on the console- arrow to the left and you will see Record turn yellow, which means it is selected. Now press Softkey 4 {Delete}- NOT the Delete button! Gone. Let’s resume.

I always input the selection of fixtures myself each time I’m about to record to a Preset, but many programmers I know use Select Last as their first item here. Feel free to put that in if it makes sense to your working method. Then touch {Focus} in the lower left hand corner of the CIA, then {Zoom} in the CIA tiles (found above Form) and touch {Shutter} in the lower right of the CIA tiles then hit the buttons [Record] [Preset] then click Softkey 6 for {Done}. Notice that I did not have you press [Enter} since the macro allows you to choose your number (and then label!) Your macro should look like this:

Last example is another simple macro, but a very useful one if you have a way to assign it to a button of some sort. It recalls a snapshot. I always have at least three snapshot macros next to each other on my X-keys, though a tiny view of either a Magic Sheet or Direct Select will give you the same thing on a screen.
Back to Macro Editor Tab 18. Type 803 [Enter] and label it Snapshot 1. (This obviously intends for you to have already created a few snapshots. If you aren’t yet saavy with Snapshots, I’ll be covering them in an upcoming post.) Click Softkey 6 for {Edit}. Under the Softkeys tab, select {Snapshot}, type 1, then press [Enter]. Touch Softkey 6 for {Done}. That’s all there is to it. Check this screen capture for reference.

Hopefully, this gives you a good intro to Macros- how to use them and things they may be useful for. What were your early macros that you used a lot and how do you use them now? Comment below!
2 comments