(Why Should you Care? – Skip this if you want to jump to instruction)
EOS can import patch data, labels, gels, notes, a host of great information from Lightwright. It saves you a ton of time (why do things twice?) but it also means you don’t risk making mistakes by manually inputting your patch into EOS. Repeating data entry is a recipe for small frustrating disasters. Once you understand some of how EOS and LW (I’m abbreviating Lightwright from here on out) work together, you can get into some more really cool stuff that allow you to reconcile patch, import/export groups, import cues, label cues and create scenes- all sorts of features I will cover in a future blog.
(What Does That Mean? “Lightwright”)
Most of us in the Theater world use Lightwright. For those of you who don’t know the software- if you can imagine Microsoft Excel, but aware of what lights are, what electrical loads are, etc. I can’t imagine doing a show without its error checking, it’s handy way of sorting data and exporting useful paperwork and lists.
(Get to the Tutorial Already! Instruction starts here)
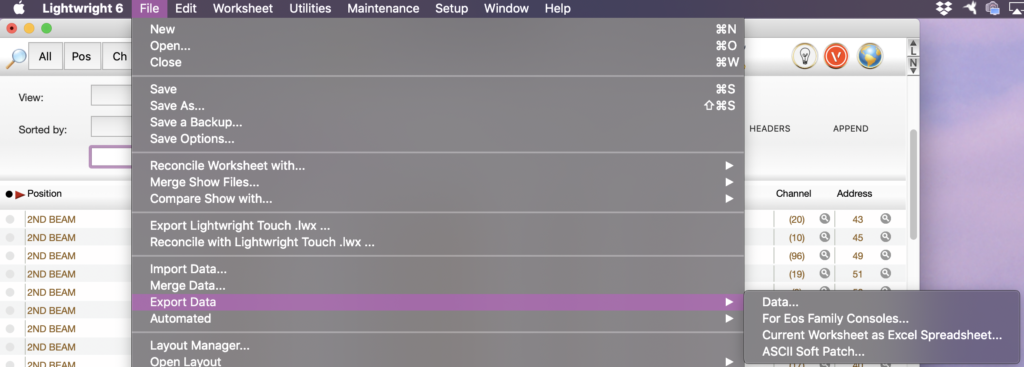
We start in LW to go over the exporting process. Here I am using a House Plot LW file for a local venue here in Portland. It has intelligent fixtures, but the file doesn’t have profiles specified in LW. No problem- we will specify that in EOS. Go to File>Export Data>For EOS Family Consoles.
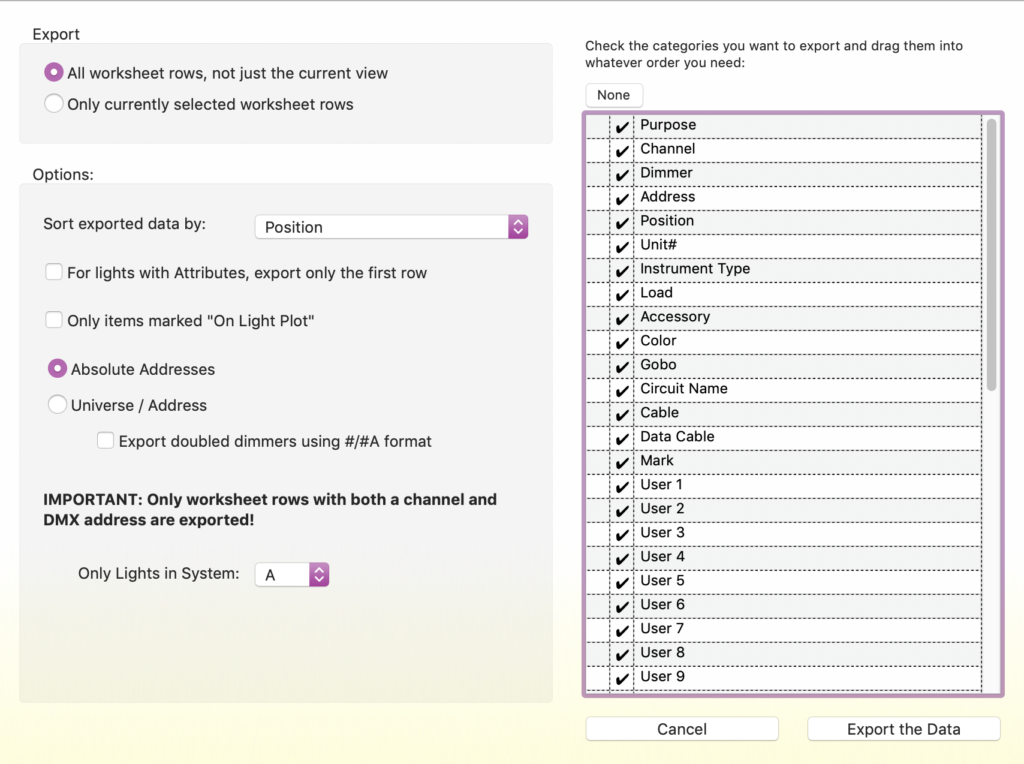
I prefer to export all data so I can sort what is important on the console side. Please note that I have selected to export Absolute Addresses in the Options area. I’ve found better luck across several platforms traveling in and out of EOS, as some applications use different dividers between Universe and Address that can confuse consoles. You need to export so your EOS can see the file. On a laptop- put the file in a folder in the EOS Showarchive folder.
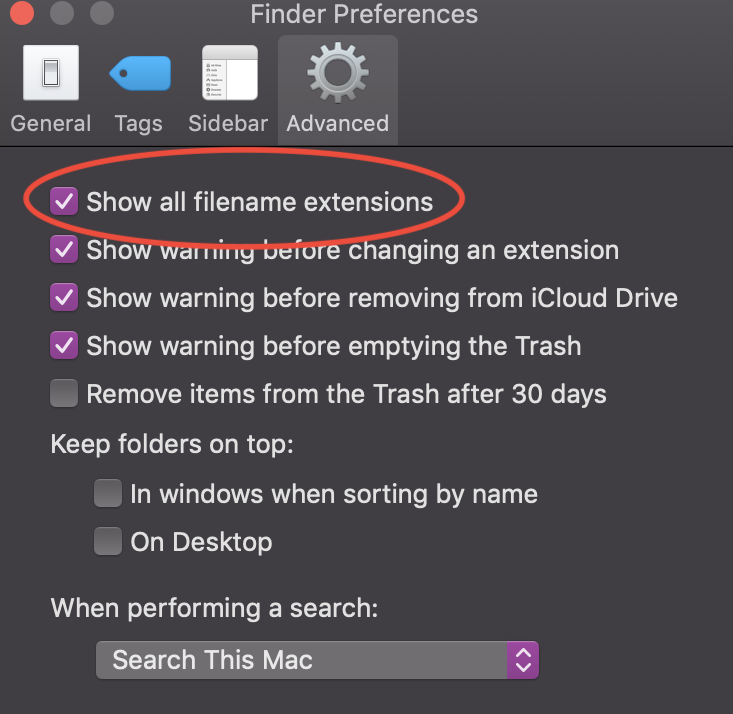
ATTENTION MAC USERS: Today is your lucky day. Many Mac users have been confused as to why this function doesn’t seem to work. There is a Mac Finder preference you need to set so that file extensions can be seen on your system. Go to Finder Preferences and select Show all filename extensions. Obviously, if you have already exported your data, redo the export.
Now that you have successfully exported your info, let’s go to EOS and choose File>New. (It’s less risky to Import into a New file then Merge into your Template.) From your new empty file, go to File>Import>Lightwright and choose your file. You will see the following:

I typically leave the options on the right, but it’s vital to press Map Devices on the left now.
This next area is where we tell EOS what fixture profile to assign to each of the lights we are importing. (Note that EOS remembers past mappings- note the list all the way over to the right in my dialogue box.) I start by locating Generic Dimmer (1) and then selecting every conventional fixture in the show in the middle column. Then, I click on Link Devices all the way over on the left.

Now we can move ahead linking all the other fixture types in our import one at a time, always being careful to choose the correct profile before pressing Link Devices. When you are done linking all the items in your center Lighwright column, press Done. In the next window, on the left press OK to finish this process.

At this point, check your patch to verify that everything looks correct. If everything looks correct, go ahead and Save As (Name of Show Patch) and then open your Template file and Merge just Patch in (remember to select Merge Channels!!!!!) and you are good to go. Honestly, sometimes this process has gotten fussy with me in the past, but the time savings is worth it. If you have question or thoughts- comment below.