Last week, we exported from Capture into Lightwright. It seems reasonable that we might want to change things in LW and to update information in our Capture file. As usual, it’s not terribly difficult, but there are a few things to embrace and avoid. Let’s get to it. We are using the files from the Aerial show I’ve been using to teach basic drafting in Capture.
First we need to change some stuff in our LW file. Since the most common thing in the world is for me to receive updates to patch for the conventional lights, I went ahead and changed the source fours on the 1-4 electrics and booms. Go through and change some thing- whatever you wish- but make sure you don’t create overlapping dimmers with anything else in the show. I also added some more Purpose information where there wasn’t any (for the mover primarily). Let’s also change some channels. I changed the front wash from 1-10 to 201-210. I also pretended my Production Electrician updated the gobos from 579 (Capture- please add the Manufacturer identifier to these things) and pretended they didn’t have R54 and subbed it for R53. Go ahead and make as many of these changes as you wish. If you don’t want to do everything, that’s fine, but try to make sure you do one of each category of change.
In Lightwright, go to File>Export Data>Data. A dialogue window will open.
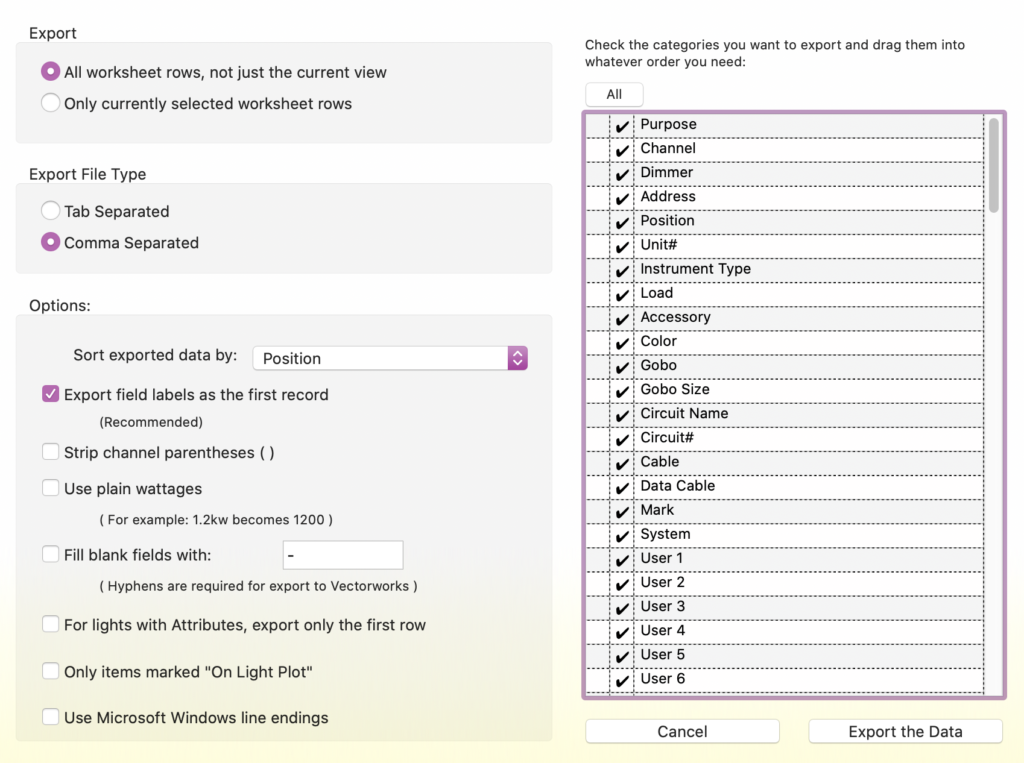
Keep all options selected for info to export. Make sure under Export File Type that Comma Separated is selected. Leave the rest and press Export the Data in the lower right hand corner. In the next window, name your file and decide where it should be saved. In the final dialogue box, Lightwright will give you the option to save this as an automated action for the future.
In Capture, got to File>Import fixture data. Navigate Capture to the csv you just exported from Lightwright, then press Open. A new dialogue box will open.
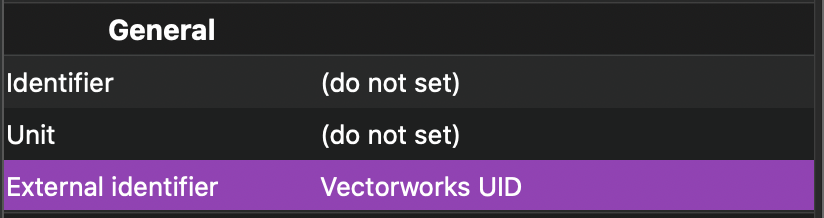
There’s a lot going on here. Most important is right at the top- choosing “Identify Fixtures by:”. We want to choose External Identifier from the pull down menu.

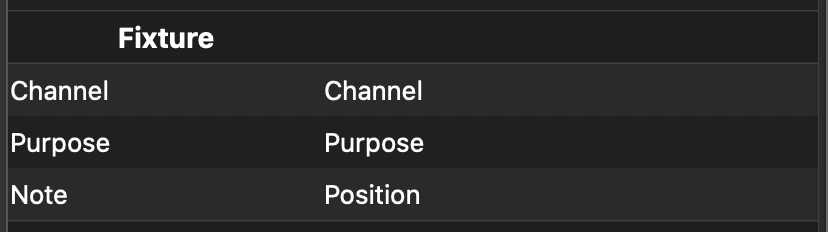
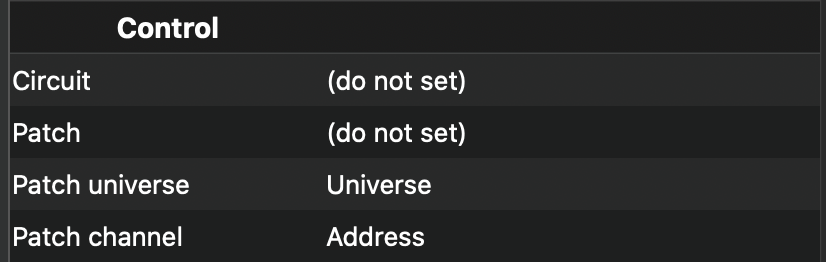
Since we choose External Identifier, we need to tell Capture what column in the csv to use. If you remember last week, we put the Capture UID (Unique Identifier) under the LW column Vectorworks UID. This is the reason everything will work- keeping track of this piece of data. Since we don’t need to use everything, I’m going to show screen shots of only the things I changed.
When you are ready, press Import at the bottom. Capture should tell you that all the fixtures were updated. When I go through what I changed, there are many successful items, but not all.
Address, Channel, Purpose are fine, but all changes to Gobos and Color were not accomplished. Not a big surprise since there were no items in the import window that aligned color from one the LW export to the Capture columns. So those things will need to be updated manually.
Even with the limitation, this is a pretty huge time saver. It’s easy enough to even import added fixtures in this process (my most common example is adding a hazer- a device I adore and often forget to add to my plot). If you don’t have XYZ data with it, the fixture will be added at your zero crossing and be spaced stage left as more fixtures are added. You can then simply move the added items where you need them.
That’s all there is to it. As long as you keep track of the original Capture UID and make sure to tell Capture where it is, you’re good to go. Happy drafting. If you have questions or requests- hit me in the Comments.