Welcome back to the final installment of my Busking Template Series. So far, we’ve made all the color cue lists, the main cue list (with base intensities and positions), and the magic sheet. Strictly speaking, we could do a basic show right now. But there isn’t quite as much control (and fun) as I think meet the minimum requirement. So let’s dive in.
Starting with Inhibitive Submasters. One of the things that will bring our little template life is the ability to play with intensities between systems of light (backlight, sidelight, cyc, etc) including taking entire systems out sometimes to pull down or refresh the eye and reduce the feeling of “sameness”. The minimum we need are five inhibitive subs. Go to Blind and type:
Sub 101 Enter Label Backs Enter
Group 2 Full Enter.
Sub 102 Enter Label Hisides Enter
Group 3 Full Enter.
Sub 103 Enter Label OH Movers Enter
Group 7 Full Enter
Sub 104 Enter Label Booms Enter
Group 9 Full Enter
Sub 105 Enter Label Cyc Enter
Group 22 Full Enter
Two things to point out here. One- OH Movers means Overhead movers to me. Rename to suit yourself. Two- Notice we did NOT include the FOH Movers in the inhibitive sub. This is because I’m essentially using the five FOH movers as spots- one for each band member.
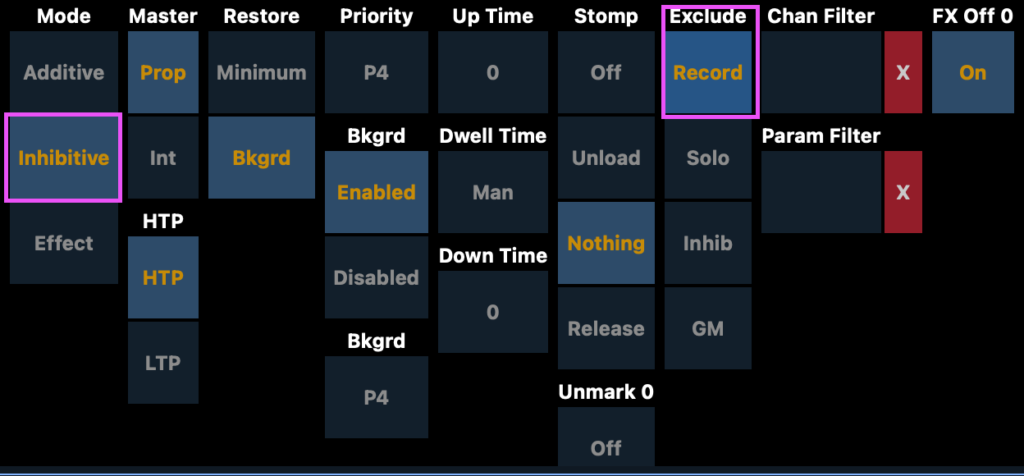
Next, we need to make sure our submasters are configured how we like. Double tap Sub to get to Tab 15 Submasters. Here, we want to select all of the subs at once to configure them together.
Sub 101 thru 105 Enter
At the bottom of the screen, select Inhibitive and Record Exclude.
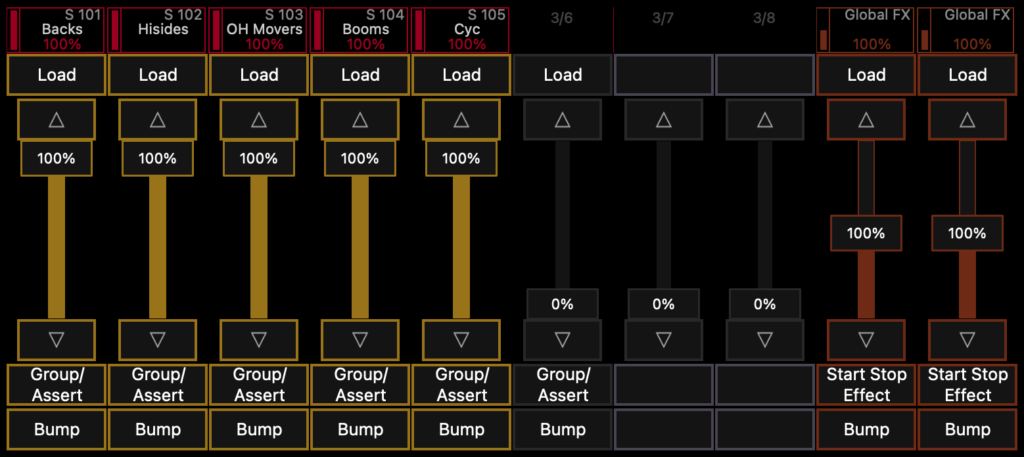
Let’s give these submasters a home. Let’s get to either Tab 28 Faders or just look over at your faders if you have a wing set up. Go to page 3 of the faders. We want to get rid of the first eight faders, but keep the Global Effects Rate and Size controls that are on faders 9 and 10. To get rid of faders, press and hold Shift and then hit the Load buttons on each fader.
Now, put Sub 101 Thru 105 on your command line and hit the Load button on the first fader.
To me, it’s remarkable how much mileage I get out of simply making systems of light dimmer, brighter, or out. Take a moment now and play with your inhibitors to both make sure that they work and then get a feel for how they help you do your busking work.
What kind of busking template would we have without at least a couple of effects and some movement? Let’s do a minimal list of actions:
- White strobe submaster
- A “Ripple” that keeps everything in the same color but adds some motion through just intensity.
- A flyout Sub.
White Strobe Sub
Double Tap Effect to get to Tab 13 Effects. Type 111 Enter and choose Absolute. Label Strobe. We want to edit the first action under Level where it says 0. Click the 0, then type:
At /-90
Notice both the slash and the minus. This means that Eos should take down the level of whatever is up by 90% of the current value (you can of course go lower, but I don’t tend to do that unless I know the band/act and they have said they are okay with it). Finally, you should notice the way Eos displays the command. It doesn’t look like how you would think.
We want the strobe to be fast with no attack and only a little sustain. Edit the Time on both Actions to say 0, then edit Dwell on both Actions to say 0.1. If you are using tungsten fixtures, you may need to change the Dwell to 0.2 since the filament will struggle to respond quickly enough. Also- resist putting a strobe effect on tungsten lights. It causes a LOT of wear and tear.

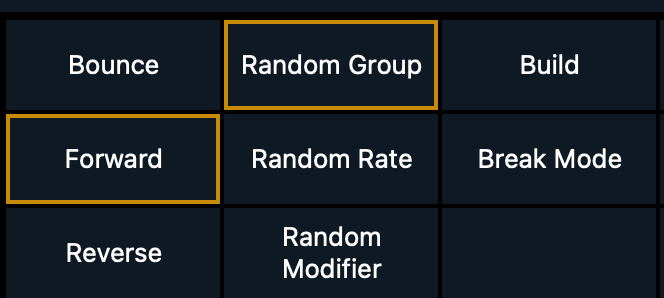
Last thing is to make the effect Random. Tap in the area to the lower left below the label that says “Attributes”. Select Random Group.
This effect is now done. Let’s put it into a sub.
Blind, Sub 111 Enter Label Strobe
Group 99 – Group 5 Effect 111 Enter
Color Palette 0.1 Enter
Double tap Sub to get to Tab 15 Submasters. You should be selected on Sub 111. Make sure this has Record Exclude. Also, we need to change the priority of the sub to P5.
Go back to Faders (Page 3) and assign this Submaster to Fader 6 by typing Sub 111 and hitting the Load button on Fader 6.
Next, we need to make that attractive ripple effect/sub. Double tap Effect to get back to Tab 13 Effects. Type 112 Enter and choose Absolute. We want to again edit where the effect lists 0 , so click on the zero. This time, type:
At /-50 Enter

Label the Effect Ripple
Go to Blind. Sub 112 Enter Label Ripple Enter
Group 99-Group 5 Effect 112 Enter
Double tap Sub and set Sub 112 to Record Exclude.
Assign the fader to the 7th fader next to the Strobe.
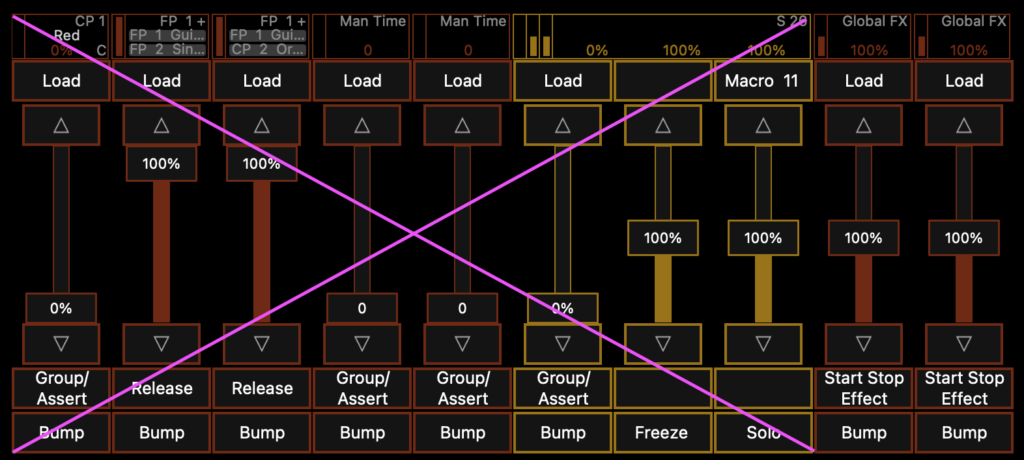
Last element (for now). Did you know you can assign a Focus Palette directly to a fader? You can. Put Focus Palette 13 on your command line, then hit the Load button above Fader 8. The completed fader page should look like this:
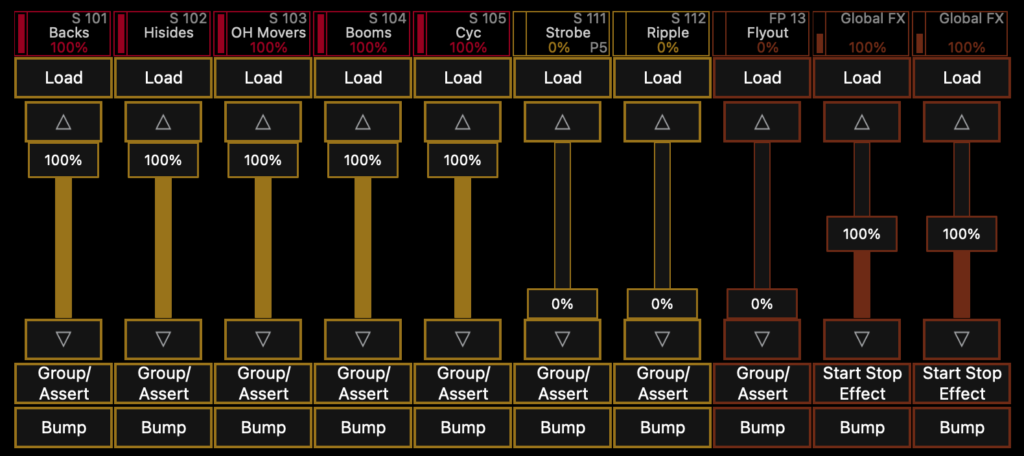
Put on some music and play with all of the elements we’ve built. For a simple setup, I think this is pretty versatile. Be sure to play with your Global effects Rate and Size and notice what they can do for you.
As you get more sophisticated, some things you may want to add (besides a lot of other effects):
- If you have movers with gobos (especially on stage), you can build cue lists that are triggered from the magic sheet (with pictures of the actual gobos) fairly easily. Filtering can become tricky on these, since I would imagine you would want rotation to not be included so you can have that set from another fader/cue list.
- Some more focus palettes on subs for more movement in the onstage movers would be great.
- You’ll find that the colors for the FOH Movers are too saturated to be useful. I would grab those lights and edit each color palette to be a Red at 50% saturation, for instance. Same for all the colors except NC and WW (Color Palette 0.1 and 0.2). It will make this rig work better for this very specific use.
- I’d split up the cyc cue lists to do top and bottom separately.
- You could write some Delay macros to overwrite the delay data in the color cue lists so they would ripple the change from outside to in, inside to out, right to left, etc. Make good use of groups with offset for this.
- You could start splitting your backlight systems so one row of color tiles on the magic sheet affects odds and another will effect evens.
- It’s an interesting question to me of whether you would want to add a line to the macro that we tied to Cue 1/3 that takes down fader 8 (Flyout fader). I can see reasons to do it or not do it too.
These are just things I’ve been thinking of while writing these tutorials. There are an infinite amount of other possibilities to be explored. What are your go-to busking effects, faders, elements that you can’t live without? Hit me in the comments!