I had a last minute gig I was called onto that had me busking an outdoor concert with a couple of acts. I was expected to provide my own console, and I own an Eos. Typically when I’ve done concert work in the past, I’d been on an MA2, so I had to make a basic template fast that would get me through an evening of who-knows-what kind of acts playing. Since I was used to the MA template that seemingly everyone uses, the one with the grid of color squares allowing you to fade systems of lights to whatever color you want, I decided to make an Eos version of that.

My approach involves the Magic sheet controlling system colors (which actually trigger separate cue lists) , a Main Cue List that has intensities and Focus Palettes, several inhibitive submasters, and as many position/effect faders as I have room for. Several timing macros are needed as well as your usual color and focus palettes, effects, etc. This is a fairly long tutorial, so I’ve split it into 3 posts.
For simplicity, and so we all have a known starting point, I’m going to start the tutorial in the Eos Family v3.1 Level 4 Complete show file and the Mind the Gap vis file that are available at https://www.etcconnect.com/workbooks/. You want the zipped file at the center of the page.

With many of my tutorials, having the vis file open is optional. On this project, I would say it’s a requirement.
First- do a Save As of your show file and rename it to something you will remember later. I’m naming mine Busking File Tutorial. Now let’s clear away some clutter. We are going to erase both cue lists in the board since they will be in the way. Double tap Cue to get to the Cue List view. Type Delete Cue 1/ thru 2/ Enter Enter.
Add Some Palettes
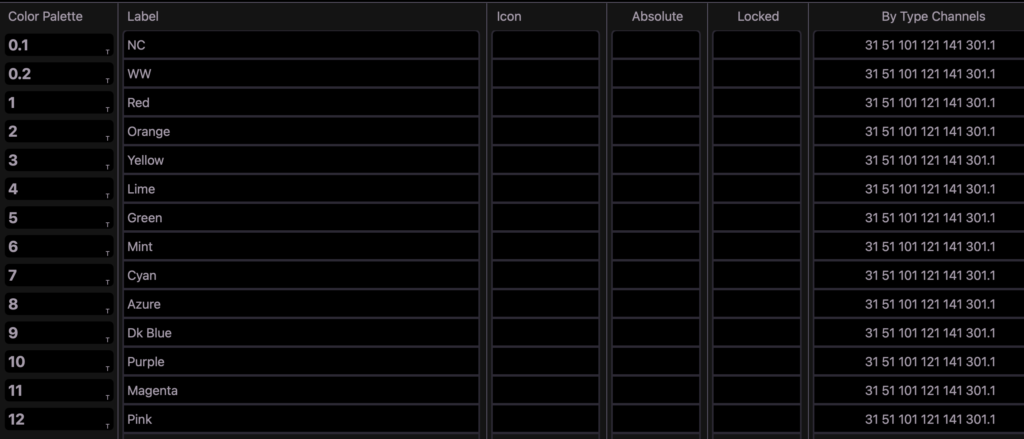
Double tap Color Palette to get to Tab 24. I’d like to have a fuller color palette list. Since I’m trying to keep things simple, type Delete Color Palette 11 thru Enter Enter.
I’d like to have the following color palettes:
0.1 NC White
0.2 Wm White
1 Red
2 Orange
3 Yellow
4 Lime
5 Green
6 Mint
7 Cyan
8 Azure
9 Blue
10 Purple
11 Magenta
12 Pink
We are going to stick to using just Group 99 of the file for this project, so start by moving the color palettes you already have to match the numbers above and erasing the Lt Blue color palette (or moving it far away so neither of us have to deal with it). Next create your new color palettes. Use Group 99 if you wish to do simple color palettes, or create a new group with fixtures 31, 51, 101, 121, 141, and 301.1 (I put these in Group 99.1 since I’m a number nerd) to create your color palettes By Type. Check your palettes in Tab 24 Color Palettes to make sure they look like this:
Create your First Color Cue List
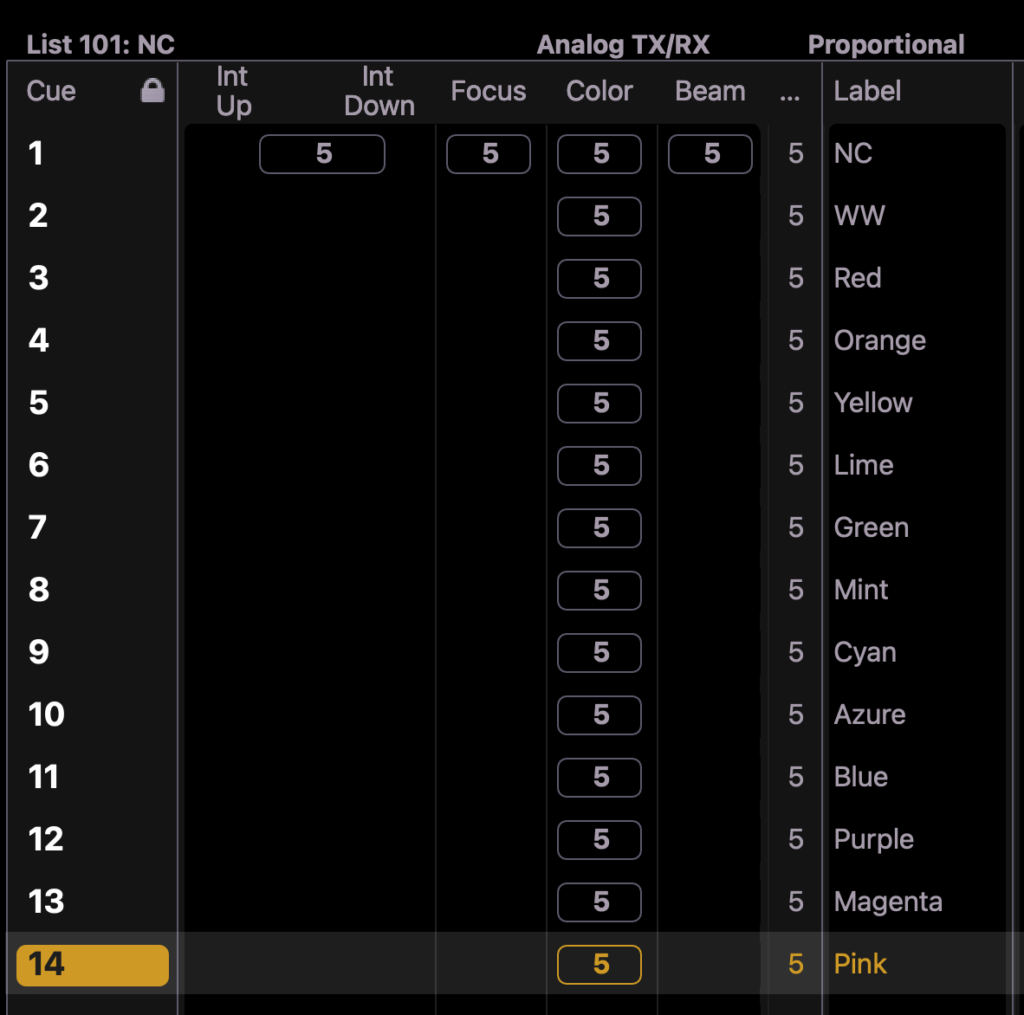
Now that we have our basic palettes, it’s time to start generating some content. We are going to start out by creating a cue list of every color across all the lights, configure it to suit our needs, then we will use that one list to create many more lists that allow us to control things very easily. We will be using multiple cue lists throughout this project, so pay attention every time we are recording a cue for the Cue List / Cue Number syntax.
Just in case- Goto Cue Out Enter. Make sure you have a dark stage. uGroup 99 Full Enter.
Color Palette 0.1 Enter. Record Cue 101/1 Label NC Enter.
Color Palette 0.2 Enter. Record Cue 101/2 Label WW Enter.
Color Palette 1 Enter. Record Cue 101/3 Label Red Enter.
Color Palette 2 Enter. Record Cue 101/4 Label Orange Enter.
Color Palette 3 Enter. Record Cue 101/5 Label Yellow Enter.
Color Palette 4 Enter. Record Cue 101/6 Label Lime Enter.
Color Palette 5 Enter. Record Cue 101/7 Label Green Enter.
Color Palette 6 Enter. Record Cue 101/8 Label Mint Enter.
Color Palette 7 Enter. Record Cue 101/9 Label Cyan Enter.
Color Palette 8 Enter. Record Cue 101/10 Label Azure Enter.
Color Palette 9 Enter. Record Cue 101/11 Label Blue Enter.
Color Palette 10 Enter. Record Cue 101/12 Label Purple Enter.
Color Palette 11 Enter. Record Cue 101/13 Label Magenta Enter.
Color Palette 12 Enter. Record Cue 101/14 Label Pink Enter.
When you are done, your cue list should look like this:
Configure Your Cue List
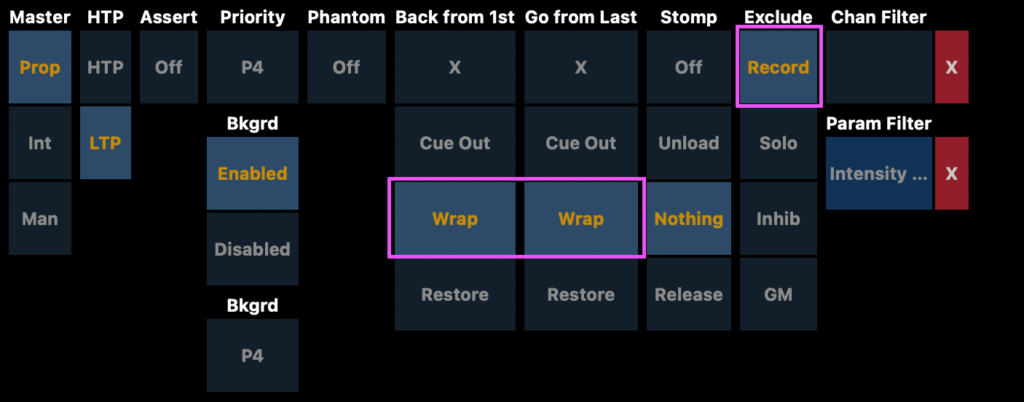
We want to make sure that we set up our cue list to be helpful before we copy it. To me, this means engaging Record Exclude, turning on Phantom (so that these cue lists don’t grab focus on the Master Fader) and filter them down to only the data we need. Double tap Cue to get to Tab 16 Cue List Index. You should be selected on the only cue list that exists- Cue List 101. If you have more than that list, you need to review the previous steps.
For the first two steps are easy. Touch Where it says Phantom and Record.

Next we want to apply a Param (short for Parameter) Filter. One of the frustrating things about working with multiple cue lists is when you accidentally recorded intensity into your color cue list. Which we did. We also recorded position data and a whole bunch of other stuff we don’t need. Rather than remove this data, we are simply going to filter the cue list so it will never be played back instead. Touch the open space below “Param Filter” that is to the left of the red X. This opens up a dialogue box.

By touching the Color box at the top center, we elect to playback ONLY color data. Click outside the popup box to close it.
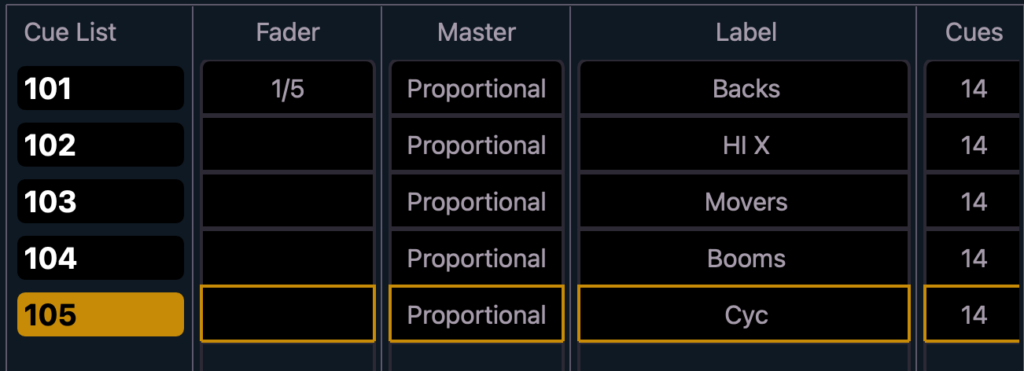
Copy your lists
A guiding principal of programming is to remember that any one thing you’ve made (Palette, Cue, Group, etc) can and should be used to make a new thing. So we are going to make 4 copies of this cue list to have five clue lists total.
Cue 101/ Copy To Cue 102/ Enter.
Cue 101/ Copy To Cue 103/ Enter.
Cue 101/ Copy To Cue 104/ Enter.
Cue 101/ Copy To Cue 105/ Enter.
Now we are going to label each cue list for what we want it to control.
Cue 101/ Label Backs Enter
Cue 102/ Label Hi X Enter
Cue 103/ Label Movers Enter
Cue 104/ Label Booms Enter
Cue 105/ Label Cyc Enter
Your list should look like this:
Now we are going to do another filter, but this time on Channels. Type Cue 101/ then touch the box below Chan Filter.

Notice your command line now says “Cue 101/ Filter Chan” and is not terminated. It’s waiting for you to input the group or channels you wish to filter down to. On this first one, we want to type Group 2 Enter. Now let’s do the rest.
Cue 102/ Chan Filter Group 3 Enter.
Cue 103/ Chan Filter Group 5 + Group 7 Enter.
Cue 104/ Chan Filter Group 9 Enter.
Cue 105/ Chan Filter Group 22 Enter.
Choose Where your Cue Lists Go
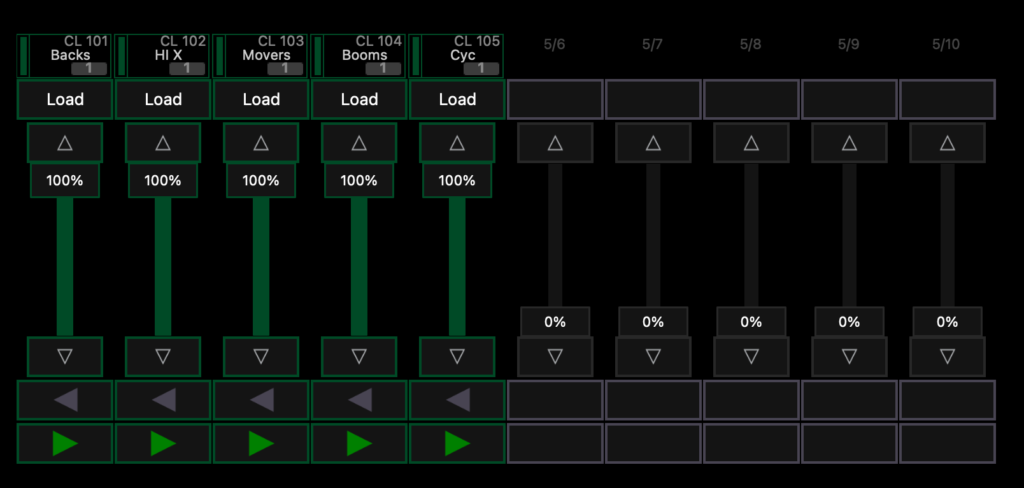
An interesting rule of Eos is a Cue List must be on a fader to work. So if you don’t choose where to put your cue lists, Eos will assign them somewhere at random. So let’s pick a place we want these things so our file stays neat. Open Tab 28 Faders. Eos assigned Cue List 101 to the fifth slot on the first page. I don’t want it there, so I’m going to press and hold Shift then press the Load button above the Cue List to remove it.

Now I’m going to choose Fader Page 5 from the page selections on the right. This should put you on a blank fader page. Type Cue 101/ and hit the load button on the first fader. Repeat for each Cue list till your fader bank looks like this:
Now it’s time to create the Primary Cue List. First- to give credit where credit is due- this is an idea that came from Zak Al-Alami that he describes in his excellent video about how he busks shows at Jazz at Lincoln Center. Essentially, he has only three cues on the Primary Cue List:
- Artist Speaks
- Artists Sings
- Button
Associated with Cue 3 is a macro that will take down any Profile fixtures he may want to choose a different gobo for, take the Effects Master back to a known place, stuff like that. The elegance of this will keep a busker from getting lost in their own template. I have huge admiration for this idea. Anyway- let’s make it happen. The idea of how I’m implementing this plan is for this list to have both intensity, but also a default position and zoom for each moving light.
Group 99 at 65 Enter.
Group 5 Focus Palette 1 Thru 5 Enter (Focuses the FOH truss on the band in the Vis file)
Group 7 Focus Palette 21 Enter. Roll your zoom up so the wash covers the stage. Feel free to adjust the tilt and update your palette.
Record Cue 1/1 Time 2 Label Artist Speaks Enter.
Group 99 at 85 Enter. Record Cue 1/2 Time 2 Label Artist Sings Enter.
Group 99 at Full Enter. Record Cue 1/3 Time 0.5 Label Button Enter.
Now let’s filter this cue list to control only what we want it to.
Double tap Cue to get to Tab 16 Cue List Index. You should be selected on Cue List 1 already because you just created it. If you aren’t, type Cue 1/ Enter. Let’s Param Filter for Intensity, Focus, and Form.

Now let’s select Record Exclude and also set Back from 1st and Go From Last to Wrap. This means our main cue list will always loop through over and over. That’s great for our needs.
At this point, we’ve created all the Cue Lists we need. Since this post is already pretty long, let’s come back next week for the second installment and we’ll start creating the macros we need as well as the magic sheet.
Are multiple cue lists new for you or do you already use multiple lists in your work? Let me know your experience and uses in the comments!
3 comments