I’ve been using Netron EN12s and EN4s quite a bit and I’ve had really good experiences with them. Lately, I’ve been messing around with their ability to receive triggers of different sorts. I started with sacn triggers (that’ll come in a future post) and then I moved onto contact closures.
For whatever reason, contact closures are always the last thing I think of. Perhaps it’s because I’m more comfortable with digital signals than actual hardware closing circuits. Anyway- after using a contact closure on my Eos for a remote trigger gag this last film, I find the Netron implementation even easier.
Why would you want to use a contact closure? Maybe you are a small to mid size venue, sound stage, or retail space that needs to be able to bring up a look on without calling a programmer. Netron allows you to take something as straightforward as a light switch to trigger any cue you record into your EN 12 or RDM10 (EN 4, 6 and EP 1, 2 and 4 do not come with contact closures, but can accept other input triggers). Anything that closes the circuit for the port you want (there are 10 contact closures you can configure) will trigger the Netron. Since a cue is the obvious use case, let’s do that as an example.
I’m going to assume you have already have a console set up on your network with appropriate patch information for your lighting rig. I’ll also assume you have configured and installed your EN12 or RDM10 to work in your lighting network, including configuring each port you will be using. Important to note- Netron will only store data for ports that are configured. If you have data on universe 3 and none of your ports are set to 3, that data will not be captured when you save a cue.
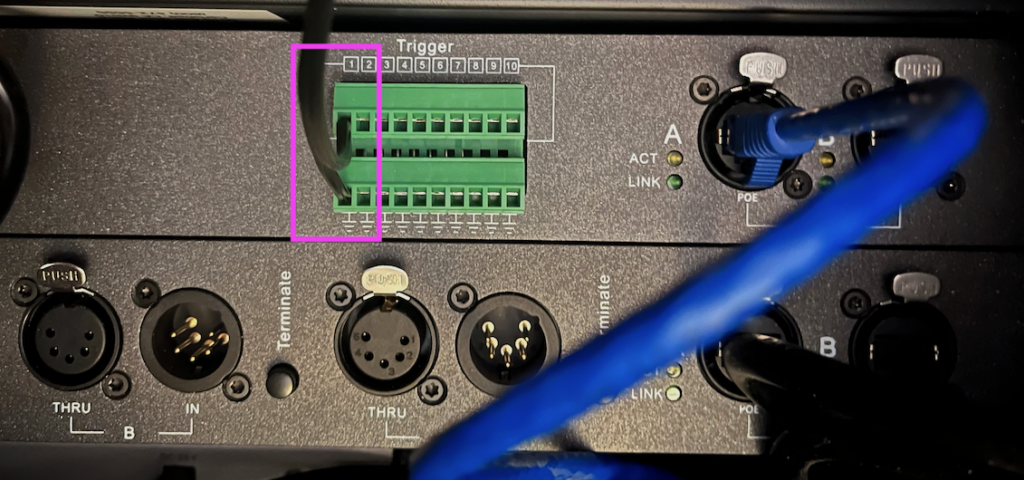
First, you want to wire your your switch to your preferred contact closures. I’m using Contact 1 here. Nothing fancy in this wiring- it’s completely straightforward. I’m using the cheapest light switch I could find at Lowes to be the switch.

Next, set the lights to the values you wish to trigger. Be aware that any information- whether with intensity information or not- will be captured. Hard to imagine a use case where background data will affect you, but you should be aware just in case.
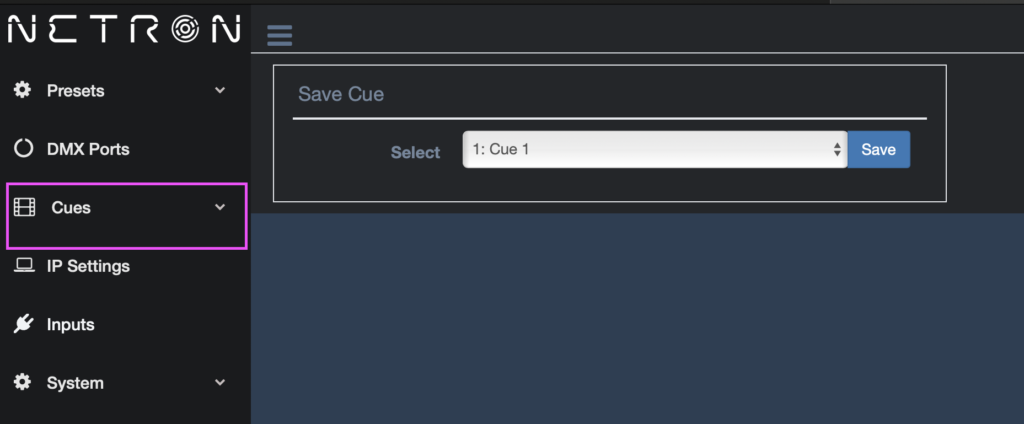
Next, sign into your EN12 (please assume I’m always talking about the RDM10 as well from here on out) by opening a web browser on your computer and typing in the IP address of the Netron. Once there, select Cues>Save Cue.

Click Save next to Cue 1 (or whichever cue number you prefer). As of firmware 2.9.2, there is no visual confirmation that Netron has recorded the value. I’m told at some point there will be in a future firmware update.
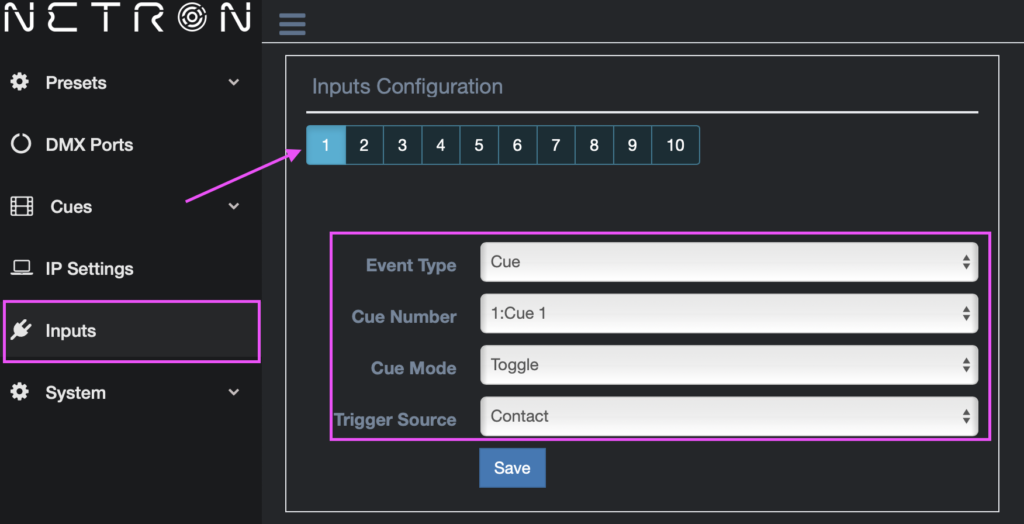
Next, go to Inputs.

We need to tell Netron which Input (in my case, input 1), we need to select Cue for our Event Type, specify which Cue (Cue 1) and choose the Cue Mode.
Trigger- will engage the cue and leave it on even if the button is turned off.
Toggle- will engage the cue while the switch is on and will release it when it is off.
I chose toggle for my needs, since I want the cue to be released when the switch is off.
Next, since there are several choices for a Trigger Source, we need to specify Contact.
Finally, we need to click Save. You will receive green checkmarks next to data that has been saved.
At this point, you can release the look from the console and flip the switch to trigger the cue that is now recorded into Netron. On the tiny screen on Netron you will see Cue 1 in red telling you the cue is rolling.
Important to know- this trigger only works for one Netron at a time. If you want to trigger several at a time, you’ll need to either run the contacts in series (which I have not tested) or use a different trigger method. I’m currently working on a device that sends out a sacn signal to trigger several Netron at once. I’ll post the tutorial when I’ve figured it all out. Of course, you could have one Netron forward a sacn trigger to everything on the network, but that means you have to give up a port (not a big deal), and also insure that port is never changed (possibly harder to guarantee in the heat of production).
Also important to know- so far, I’ve not been able to figure out a way to attach a fade out time when the cue is released. So in order to get a smooth fadeout, you would need to record a blackout cue and rig another switch to trigger it.
Hopefully you can see how this function might be useful to you. There are use cases where you don’t really need a console after setup and just need to be able to trigger some different looks. This could be ideal for that use. What fun have y’all done with contact closures? I’m at the beginning of my journey here having only done this and the one wireless trigger of my Ion. Would love to hear your experiments and projects in the comments!
3 comments