Creating and running effects in film is very different than live events. There are many reasons, but for me the one that guides everything is because we have to sync to the actor. In live events, in general, we agree on a timing between all the departments and we all strive to sync to it. In film, everything you are about to shoot was staged about two minutes beforehand, so expecting consistent timing is impossible. Because of this and other reasons, I’ve needed to redo how I develop and play back effects.
None of what I’m about to share is groundbreaking. Many of these techniques will be familiar to those of you who have done film for a while. But for me, coming from a live entertainment background, these techniques represent hard-won evolutions over time. So maybe this will be a good starting point for newer film programmers, or just be a chance for another programmer to see how someone else does the gig. I often wish I could hang out and watch other programmers work.
Overview of approach
Effect themselves I typically do as reductive. In my experience, Dos and Gaffers want whatever value they call for the intensity to be to be the brightest it ever gets. So I work with custom wave forms almost exclusively that reduce the value to create an effect.
Since I come from theater (and program an Eos), I still program from a primary cue list with additional cue lists or submasters. Why? Eos makes updating the main cue much faster and easier than updating any other source. So over time, I’ve tried to remove as much data as possible from the secondary cue list or submaster in favor of the faster-to-update primary cue. So what used to be a bunch of information of color and intensity and perhaps and effect in a submaster is now all of that data in the live cue and an inhibitive submaster that allows me to bring it up in sync with the action.
Examples of Effects
To try to make this as tangible and easy to understand, I’ll talk about a few key effects that come up again and again in film as platforms to share my approach.
Car Effects
To start simply, let’s do a car gag. My Gaffer likes to have both headlights and tail lights. If he wants an S30 at 3000 CCT and topping out at 40%, I’ll just put that in the cue and set up an inhibitive submaster to give me a fader to bring it up and out. Ditto with the tail lights, which would be red and maybe 50%. This way, as he calls for changes on the overall intensity of adjust the color, a simple Update Enter allows me to capture the revised data and the inhibitive sub allows me to animate it. (This of course relies on the inhibitive sub being Record Excluded, which I always do with subs.)
Fire Effect
I always keep a submaster available with the preferred version of the fire effect. To be precise- I have two versions at all times, since what works for a multi cell fixture (titan or helios) doesn’t work on a single cell fixture (a lantern provided by Fixtures). This last project mostly had titan and helios fire effects, so let’s proceed with that.
First- here’s the wave form I use. It’s an inverted NTX flicker effect that is built into Eos. But whereas Eos is defaulted to have the value come up, I’ve edited it to reduce intensities.

Here, the scale is set to 50, so it’s going to drive the pixels down to 50% at the lowest. The other thing worth noting is Random Rate 75-125. My gaffer sees repetition better than many, so it’s important to introduce as much variation as possible. Also note the grouping. Typically, we are using at least two 8 pixel fixtures for a small fire effect. Setting a cap makes it so there is consistency as you scale the fire up (I think the highest pixel count we did this film was about 500 on a single fire effect) since leaving the default of Spread would have the effect quickly get diluted to the point where you wouldn’t notice much happening with more than 24 pixels.
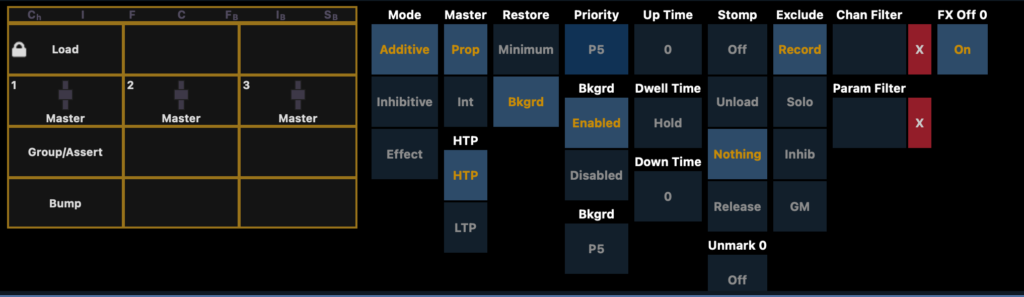
Now that I have the wave form, I create an empty sub in blind. (I almost never get to create effects while viewing them, I always have to get something to 90% or better in blind.) In my case, for no reason in particular, the fire effect sub is always 11. Next, before I even add any fixtures, I record exclude and set the priority to 5. I NEVER want secondary lists information to accidentally be recorded, and it’s always good practice in my experience to have an effect be a higher priority than the main cue list.
Heading back into Blind Sub 11, I will select only the pixels/cells and apply the effect. I also apply color here, since fire effect come up often and I always want to be ready. In our case, the color ranges from 1750- 2200 CCT depending on the light and the moment. I show it to the Gaffer, who may give notes, and I’m always sure to save revisions into this submaster (and directly into he effect wave form) so that it’s easier to copy the effect onto other lights as we move ahead through production. Speaking of that, let’s walk through that process.
Now that we have the first fixture, when the effect is wanted on a new light, I go back to Blind Sub 11. If the first effect light was the pixels of fixture 101, and now we want the same effect on 102, I type 102. (this will change to Cells Only) Recall From 101.1. For reasons I don’t fully understand, Eos will apply hard zeros to the pixels of the new light.
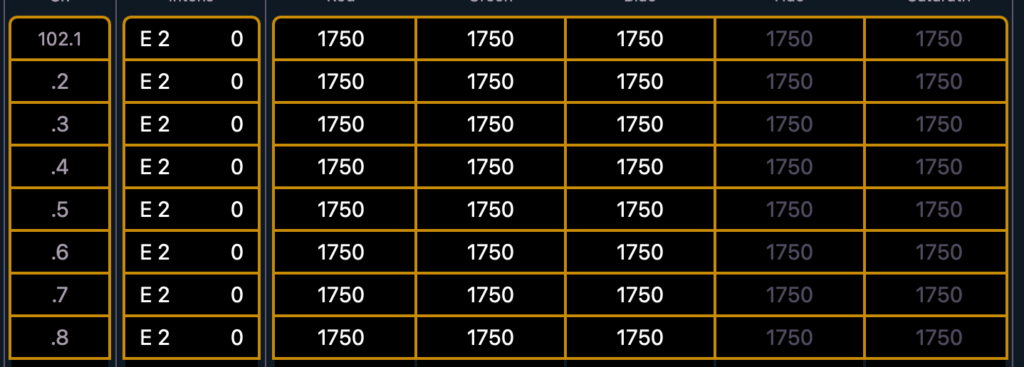
That will ruin the effect, so I then type Intensity at Enter to remove the zeros while retaining the effect and the color.
Next, I go back to Sub Sub to filter the channels to be just 102.
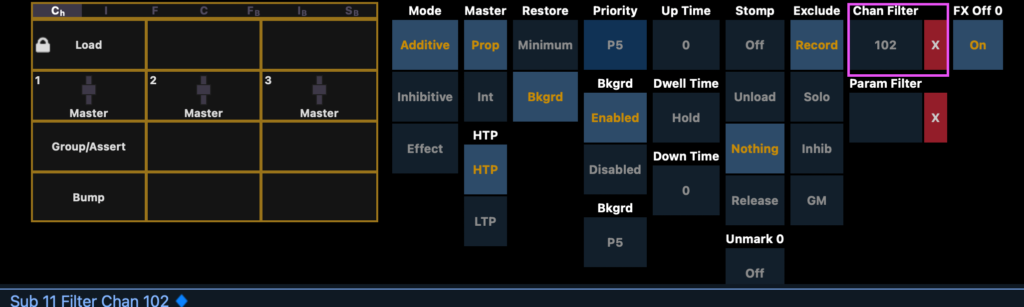
Bring up the fader and it works. Note that the master intensity parameter is in the main cue list, which allows me to adjust the overall intensity quickly and easily when the gaffer calls for changes.
TV Flicker
Though this is essentially the exact same logic as the previous effect, this is another common request, so I thought I’d include it here. A TV flicker is a combination of two effects- a color temperature effect and an intensity effect. Here are images of both effects.


Here again, I’d start with an empty submaster, select the cells of the fixture I want (in this case, we ran this most often on a Vortex 8) and apply the effects. Master intensity stays within the main cue list. When the gaffer wants the same effect on a different light, recall from the cell of the previous light and filter to just effect the one light. Notice the grouping of 2. It looks like a completely different effect if you allow it to evenly disperse among your pixels.
Hopefully this is useful to you in your programming life, either as something you will adopt or makes you invent a better way for you to do something. Did I miss something you want to know about? Hit me in the comments.