Last blog, we went over a basic philosophy of looking at effects and talked through the five types of effects you can build in EOS. Though we will eventually dive into each part of the effect engine in separate blog posts, I’d like to address the controls that they share- also known as “all that stuff on the right of the effects window”. This will not be a comprehensive walk through everything, since that’s what manuals are for. But this will walk you through the “greatest hits” of the options here to give you a broader understanding of how to dial in exactly what you (or your designer) are looking for when you are creating an effect. Since this is (obviously) a very visual experience, you should open both the EOS Family Learning Series Level 4 complete file in EOS and you need to open your Mind the Gap vis file so you can see what is happening to appreciate the subtle (and not) differences that can be found as we go through things.
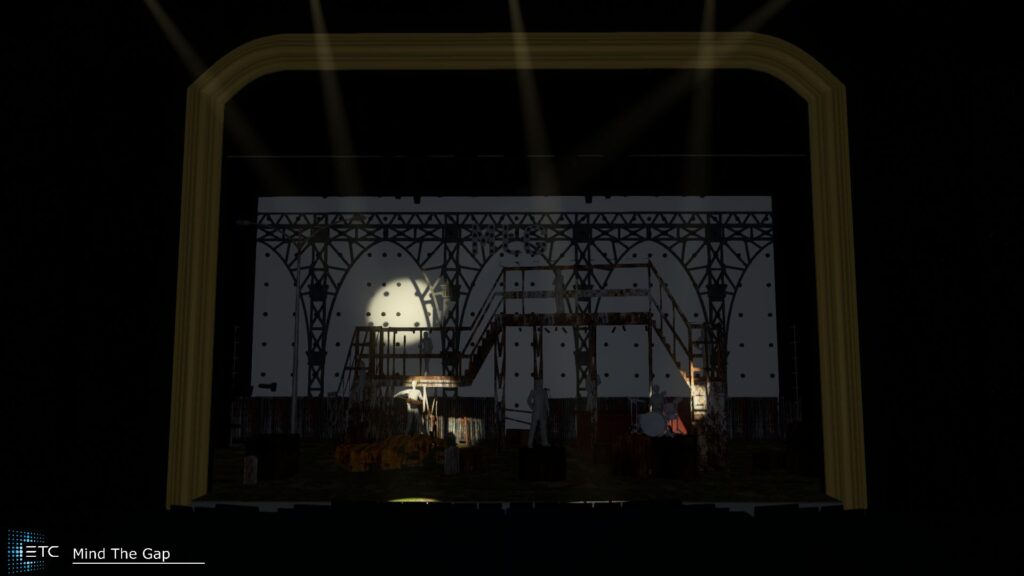
Let’s bring Group 5 to Full and apply Focus Palette 2 to hit the Singer (though I always call this person Hamilton since I’m a musical theater nerd). Let’s go to the Effects engine by double tapping the Effect button or opening a new view with Tab 13. We are going to create a new effect by typing [Effect] 20 [Enter]. Choose Focus for the Type by touching the tile in the CIA.
The console will create a new circle effect by default, and this will suit our purpose just great. Let’s pop back out to Live and apply the effect by hitting [Live] and then typing [Group] 5 [Effect] 20 [Enter]. You should now see all your FOH movers making a circle around Hamilton.
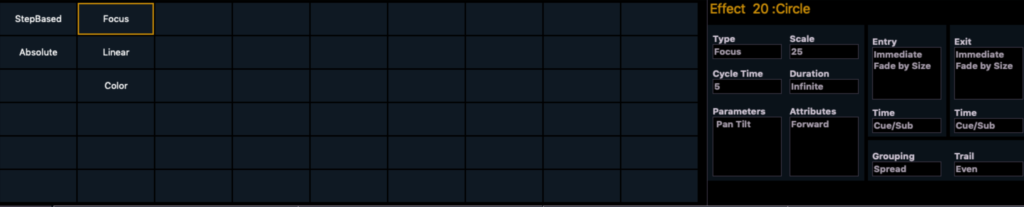
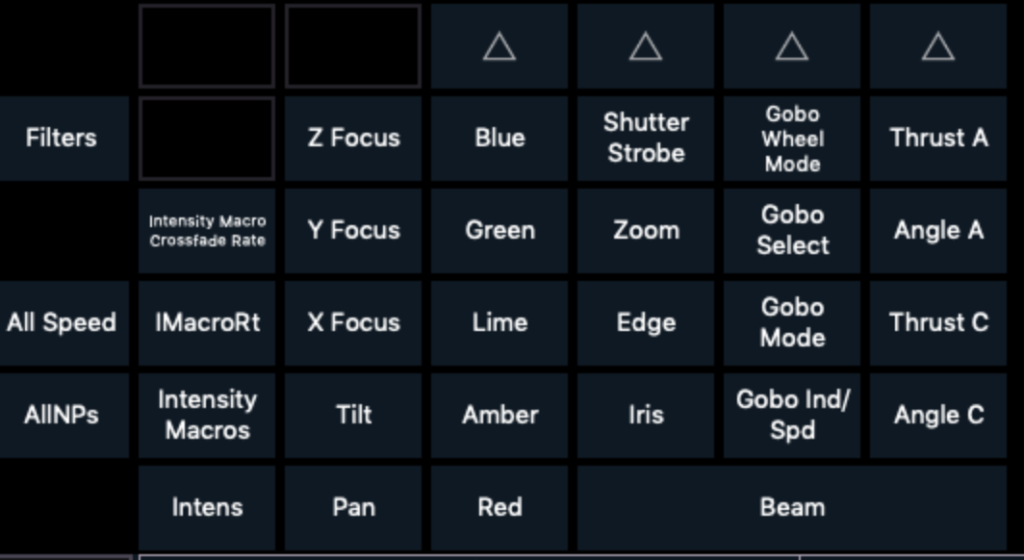
Keep this effect running for this whole exercise, and go back to the Blind Effect window by doubling tapping [Effect] or selecting your Tab 13 in some way. When you do, notice EOS has you ready to edit the effect you just applied, which should be Effect 20. Let’s look at all that “stuff on the right” now. Every place where there is a value (Focus, 5, Pan Tilt) will become editable when you touch there.
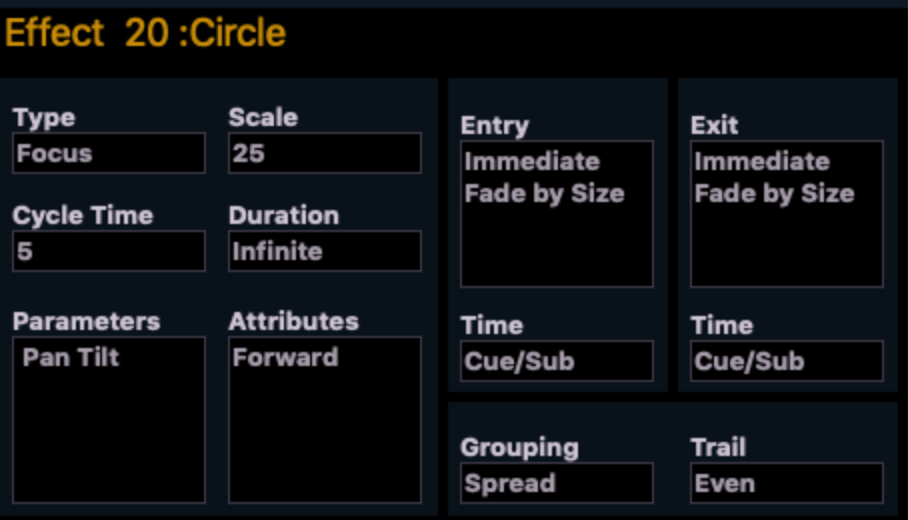
Type
This is a limited use area. When you touch this, the console returns you to the Type selection area. Any editing you have done to the effect will be lost if you choose a different type, so this is only useful if you accidentally chose the wrong effect type when you were starting your effect.
Scale
Scale, in this case, is the size of the circle around Hamilton. So if you touch where it says “25” and then type 50 [Enter], the circle will get larger. Notice the lights are mostly hitting the proscenium now. Since this is only useful once in a blue moon, let’s touch under Scale where it say 50 and enter 15. Notice the circle is much closer to Hamilton now, splashing less on the cyc that when the value was 25. Since many users assume that this value would be limited to 100 percent- let’s again touch the Scale value of 15 and type 200 [Enter]. The audience is now featured in this effect. Let’s restore the Scale value to 25 by touching below Scale where it says 200 and typing 25 [Enter]. This will make it easier to see what all the other controls do.
Cycle Time
Currently, this effect takes five seconds for the effect to cycle through. Go ahead and touch under Cycle Time and input any value and press [Enter]. Play with this for a while. It’s fairly straightforward. When you are done, go ahead and restore the Cycle Time to 5.
Duration
When you touch under where it says Duration, you are presented with a little dialogue box.
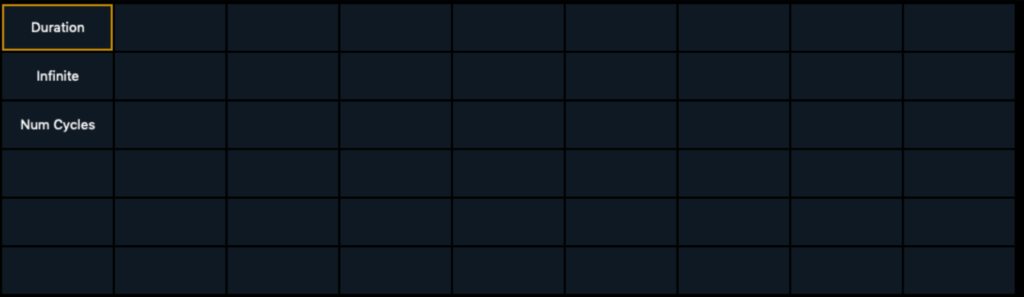
The default is Infinite, but once you touch under Duration, it assumes you want to enter a Duration. Notice your command line is not terminated. This is because you need to enter a time value to complete this command. if you type 10 [Enter], the effect will run for 10 seconds, then snap back to Hamilton. (You can make the snap slower if you wish, but that control is under Exit, which we will get to soon.) If you touch under Duration again and select Num Cycles, that allows you to choose 2 [Enter], you may notice nothing happen. Since the effect “completed” in our last example, we need to re-apply the effect in Live. ([Live] [Group] 5 [Effect] 20 [Enter]) You will then see the lights circle twice around Hamilton before snapping back to focus center. Let’s restore the effect by touching below Duration and selecting {Infinite}. You will again have to go back to Live and re-apply the effect.
Parameters
Touching below Parameters will open a view that brings up all parameter tiles on the left.
Here, you will opt in and out of what parameters you wish to control. This is most effective in Absolute, Linear and Step-Based. Since we have a Focus effect, the most you should be doing is turning off Pan if you want a Tilt-only effect. Or the same in reverse. If (like me) you didn’t alter anything here- press [Clear] or [Backspace] to clear your command line.
Attributes
When you touch below Attributes, a dialogue box comes up.
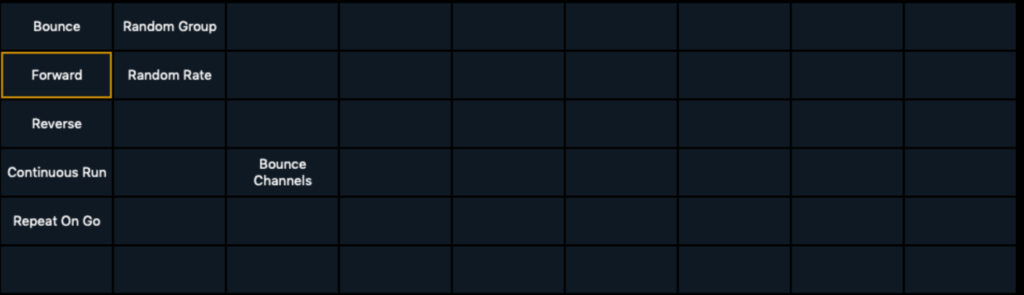
Your default is forward, which has your effect run through your selections in the order they were selected in. Reverse obviously does the reverse- runs your effect through your selection in the opposite order of your selection. Bounce runs forward, then back through your selection. When you opt for Bounce, notice you can still select between Forward and Reverse, which gives you the ability to choose which way you want the effect to start in.
Random group shuffles your selection CONSTANTLY. It is not a “shuffle it once” function, but a continuous shuffle. It’s useful for lightning and flames flickers. Random Rate allows the timing to be randomly adjusted with a range of percentage. So make sure that you only have Forward selected of the tiles, then press Random Rate and notice your command line isn’t terminated. It’s waiting for you to input a percentage range like 40 [Thru] 125 [Enter] representing 40% through 125%. Notice the subtle (or extreme, depending on the range you apply) alteration of the effect here. You can disable this by touching Random Rate again and just pressing [Enter].
Repeat on Go is useful when you want a flash (for example) every time you fire a cue. You set this to Repeat on Go, set Duration to Cycle 1 and write it into your cue. Every cue you roll after that will repeat the effect until you [StopEffect] your effect and record that into the last cue in the sequence. Deselect Repeat on Go, restore the effect so only Forward is on and check that your effect is still running. When you have restored, let’s move on.
Grouping
Touch below where it says Spread to open the dialogue box.
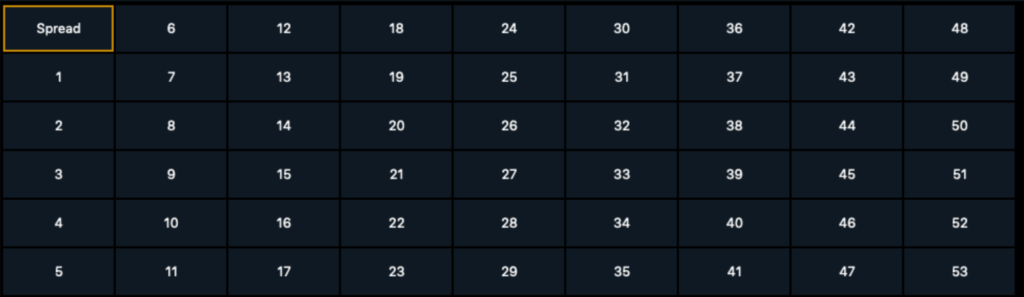
The default is Spread. This means the console spreads your effect evenly through your selection. When you touch 1 and press [Enter], all the lights circle together around Hamilton. That has applied the effect as a group of 1 on your selections. Touch 2 [Enter]. This groups your selections into 2 groups. I’m sure you see where this is going. So step through 3 and 4 on your own, but then let’s apply 5 [Enter]. Notice it is identical to when you had Spread. Why? Because you have 5 fixtures, so that is an even spread through your selection. Let’s do something fun- select 10 [Enter]. The console is now pretending that there are five more fixtures to complete the circle. This is useful since it can create negative space in your effects. Play around, then restore everything by reselecting Spread.
Trail
Touch the space below Trail and you’ll see this:
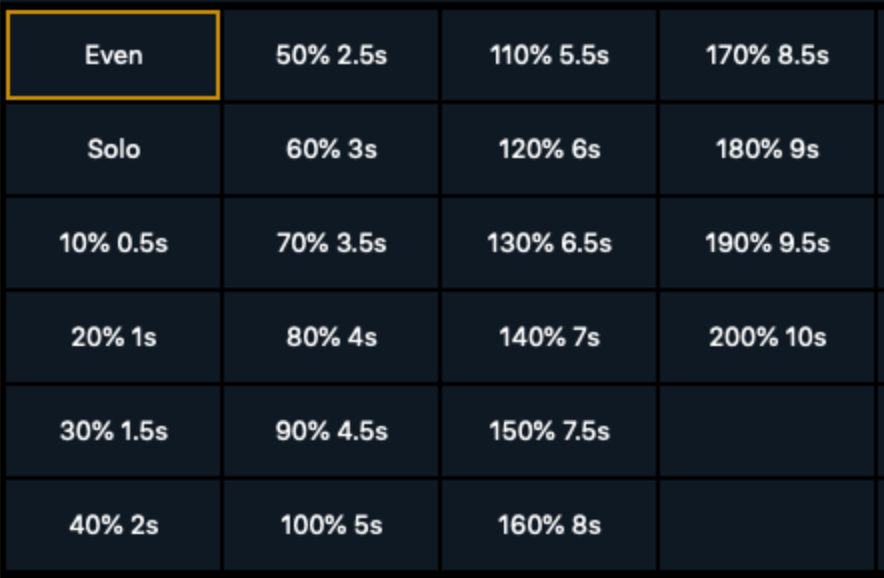
Trail is the space between one fixture in your effect starting and the next unit starting. If you touch Solo [Enter], one light at a time makes a circle around Hamilton, and when it completes, the next one starts. The other thing to notice about Solo is all of your lights have moved off of Hamilton when they are not in motion. When you look at the circle waveform that makes this effect, the reason is clear.
See the green arrow? That’s where all the lights are waiting to start from. When I use solo circle effects, I draw a custom wave that starts at center, draws out, goes around and returns to center at the last moment, since I dislike the lights not being on the subject.
Go ahead and play with other options. Again- it’s pretty straightforward. Notice again that you can go above 100% for time. When you are done, go back to Even.
Entry/Exit
When you touch below where it says Entry, you get this view:
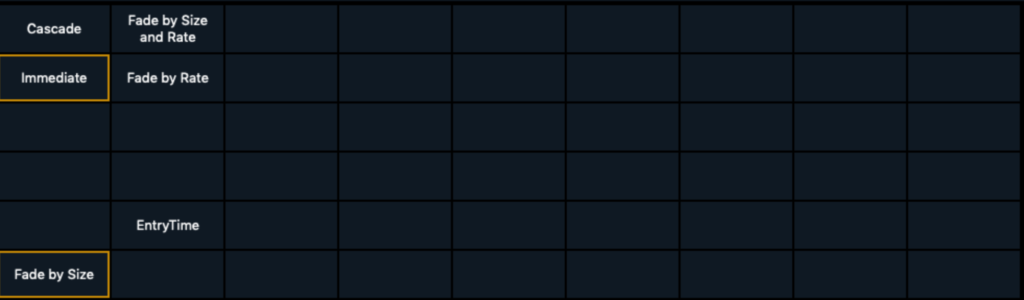
These choices will determine how the effect starts and or stops. Immediate (default) means that all fixtures will immediately start when the effect starts. Cascade means each fixture will- one at a time- enter the effect. It’s a fun difference, so be sure to play with that, stopping and restarting the effect in Live to take in the difference.
Fade by Size and Rate is a modifier to Immediate or Cascade. Select this and restart the effect. The circle starts slower and smaller, then gradually gets to full size and speed. Fade by rate has a fixed size, but eases into the effect, ramping up to speed.
Entry/Exit Time
You may have noticed that you can assign this parameter under Entry/Exit. This is literally the same control, regardless of how you input it. The default is to follow the timing of the Cue or Sub the effect is used in. If you want the timing to go independent of the Cue/Sub timing, you can assign a fixed time here. When you want to restore to Cue/Sub, just touch Entry or Exit and hit [Enter]. It will restore to Cue/Sub timing. Helpful hint- if you want to be able to fade effects in from a magic sheet- you must assign them a timing here, since there is not cue or sub for them to follow the timing of.
But Wait- there’s more!
Something which can go unnoticed is your encoders are all ready to control functions. Let’s go through Horizontal/Vertical and Axis

Horizontal (yes, I know I’m skipping Axis- it’s for a reason)
Horizontal compresses the wave form (in our case- a circle) On the horizontal axis. Go ahead and play with your encoder while your circle effect is running. Notice that you have changed the shape of the effect. Leave this how you have it for a moment.
Axis
Now that you have a movement that is shaped maybe more like an egg, play with your Axis encoder. It pivots the angle of the wave form.
Vertical
Vertical is accessible by touching the screen where it says horizontal. It has the same function as Horizontal, but obviously on the Vertical portion of the wave form. I find this very handy for when a designer likes the circle effect, but the director doesn’t like the lights hitting the cyc.
It’s been a long journey, but we’re there. As I promised- this is not an exhaustive list, but what I hope is a good overview. There are some options that only show up for certain Types of effects, and we will hit most of them as the series continues. What effects are your favorites? What effects have you never gotten quite right yet? Comment below.