Now that we have an overview of the effects engine, it’s time to start a deeper dive into each Type of Effect- starting with StepBased.
Though this is the “legacy” portion of the effects engine, it still has life in it- especially if you are a theatrical programmer. The StepBased combines the flexibility of effects with the specifications of a cue list. I frequently use this Effect Type for Flames, Flickers, Marquee/Portal chases, etc. (Countless holiday show memories are coming back to me at the moment.) It can also be used for more adventurous effects thanks to the Param column that allows you to specify controls over parameters of a fixture. Let’s explore the interface, then build a few effects. We are going to use a custom Viz file I created- no license needed, and both Mac and PC versions are included here.
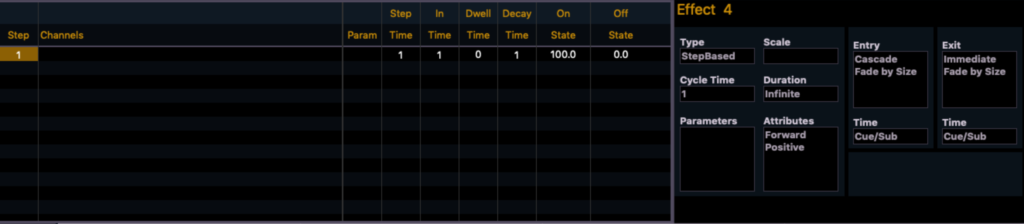
What am I looking at?
Like the name implies- these effects are created in steps, so that’s the first column. You can create new steps by pressing SoftKey 1 {Step} then entering either a single number or a range. But since this effect operates like a spreadsheet, you can also arrow down and enter a value into any cell and a step will be created to fit it.
Channels is where you specify the channels to be controlled in this line. You may also use Groups here, though the console will enter the channels from the group rather than a reference to the group itself. Just like any channel selection, you can input one or a series. Series are with [+] or [Thru].
Param is short for parameters. When you click in a Param cell, you are presented with the CIA Parameter Tiles for you to select parameters this Step will control. If no Parameter is specified, the console will assume the effect is for intensity.
Step Time is the time between the first step starting and the second step starting.
In Time is the amount of time for the Step to get to the On State value.
Dwell Time is how long the step will hold the On State.
Decay Time is the amount of time to fade to the Off State.
On State is a user-defined value. Think of it as the first instruction more than On, since the first instruction could be a 0 value for intensity. The On State can be 0-100 or Background (what the fixture is doing in the existing cue) for intensity, but it could be 0-540 or Background for a Pan parameter. It can also contain a Palette of any sort as well as a Preset.
Off State is the second instruction and can all of the things the On State can do.
All of the controls on the right were gone over in detail last week. I recommend you check that out if you haven’t already.
Let’s begin in an empty EOS file. (File>New) You will be able to use this Capture file I made – both Mac and Windows versions are labeled in the folder. First- we are going to quickly patch in the channels we need. Go to Patch (Tab 12) by either opening a new tab or double tapping the Address button. Type 1 [Thru] 4 [At] 1 [Enter]. 11 [Thru] 13 [At] 5 [Enter]. 21 [Thru] 24 [At] 8 [Enter]. Go back to live. Feel free to turn each channel on one at a time to get to know things if you like.
Flame Effect
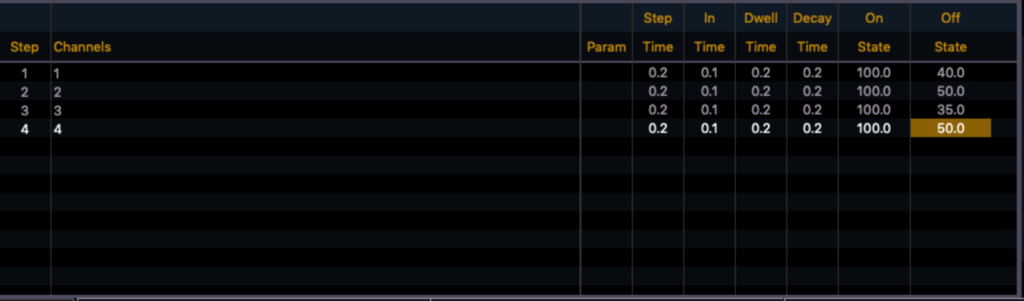
Let’s start with the flame effect. Channels 1 thru 4 are focussed on the (giant) fire. Double tap [Effect] to go to Effects Blind. (Or open Tab 13 in any way you prefer.) Type [Effect] 1 [Enter] and then choose {StepBased}. Hit [Label] and name your effect Flame 1. I would immediately create four Steps by hitting Softkey 1 for {Step} 1 [Thru] 4 [Enter] [Enter].
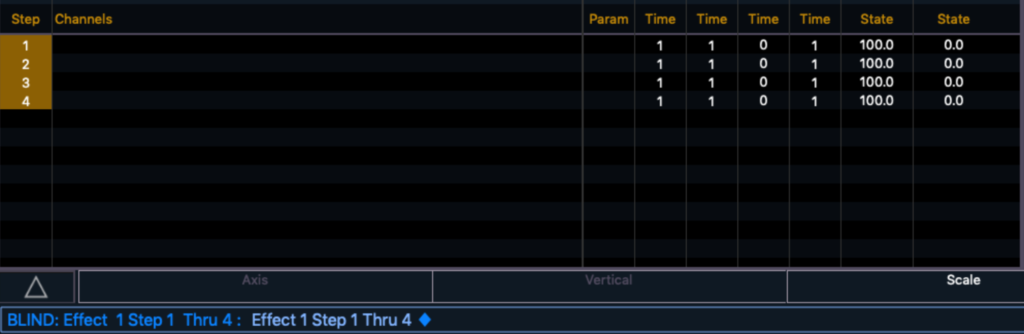
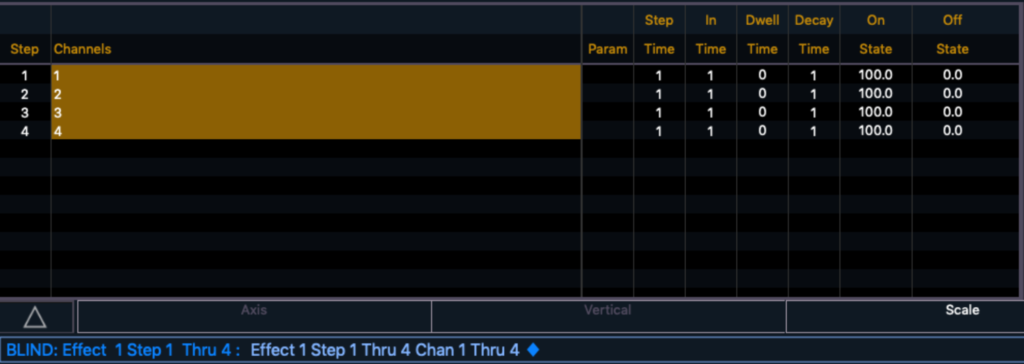
Since this effect acts as a spreadsheet, while the golden highlight is on the Steps 1 through 4 items, you can arrow right to get to the channels column and stay selected on all four Steps. With the Channels column highlighted, type 1 [Thru] 4 [Enter], which will assign channels 1 though 4 to Steps 1 through 4.
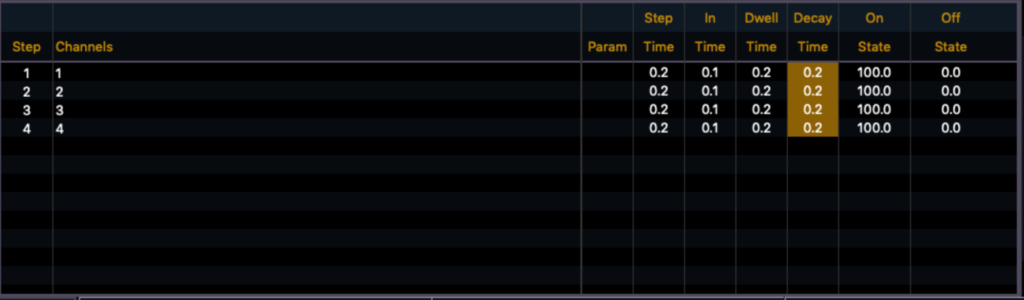
Since we are in blind- we have to guess things to get started. Let’s arrow over to the Step Time column and enter something pretty short- 0.2. Remember- this is the time between one Step and the next starting. Next, arrow right to the In Time and enter 0.1. Arrow to Dwell Time and enter 0.2. Arrow to Decay time and enter 0.2. It should look something like this:
That’s enough guessing for now. Let’s go back to Live and start the effect running by typing 1 [Thru] 4 [Effect] 1 [Enter]. You can now see your lights flickering on the logs. At the moment, it’s far too regular (flames are supposed to flicker unpredictably), the lights going to zero doesn’t seem very flame-like, and at least channel 3 is too bright at full. Let’s go back to Effects Blind (leaving the effect running) so we can edit it and watch the results.
First is to introduce some random qualities. Over on the right of the CIA, touch inside the Attributes area to open this dialogue box.
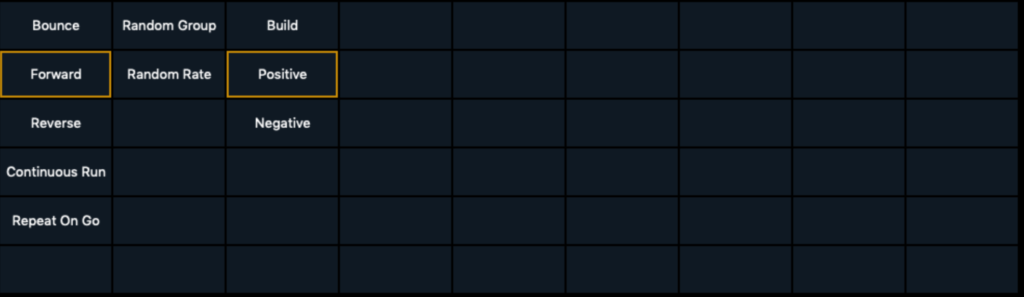
It’s that middle column that’s going to help us the most. Touch {Random Group}. This will randomize selection over and over as the effect runs. Take a moment to look at the improvement just this one thing makes. Now go ahead and touch {Random Rate} and notice nothing has changed. That’s because Random Rate wants you to enter a range of timing values in percentages. Let’s input 25 [Thru] 125 [Enter]. Take a moment to notice the change in your Capture file before hitting [Clear] once to exit out of Attributes.
Next thing to do is deal with the Off State. Arrow over (starting with channel 1) to the Off State cell. Let’s enter 40 for channel one, arrow down (this keeps you in the Off State column) enter 50 for channel 2, 35 for channel 3, and 50 for channel 4.
The next thing to address are the On State values. Channel 3 is too bright, and I’d like a little variation in channels 1 and 2 to add a little more random to the overall look. Either touch the On State of channel 1 or arrow over using your arrows, make you On States match the image.
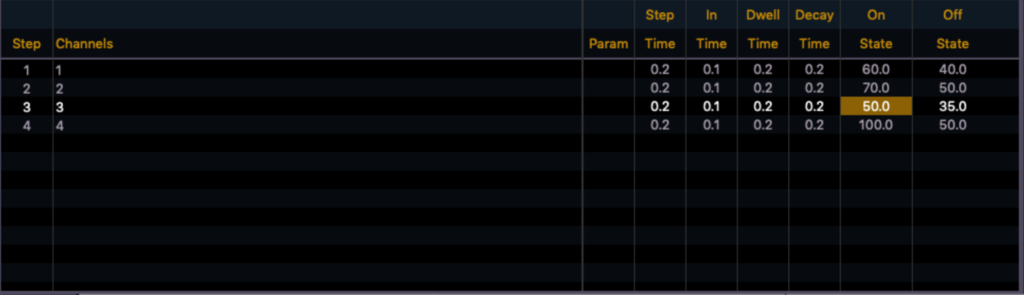
That’s better. What I’m missing when I look at the effect is just a few more timing adjustments. I’d like a couple elements to routinely go faster to break it up a bit more, but have a little longer possible Dwell time. I’m going to edit Steps 2 and 3 to have an In Time of 0.2. Then I’ll change the Dwell Time for Step 1 through 4 to 0.3.

To my eye- that looks pretty good. If you’d like to adjust things, go ahead and experiment. The more you can spend time playing, the better you will be at dialing up effects efficiently on site.
Lightning Effect
So in our scene, some campers have set a fire. They will magically never cross in the staging between the logs and the fours fixtures on the deck, so don’t worry about that. Next thing that happens is a storm starts rolling in. Time for a lightning effect. Budget was stretched too thin to just rent some strobes (honestly, I seldom spend my budget on dedicated strobes- I’d rather have fixtures that serve many needs and then write effects to provide strobing. Today, we are super low budget- and we will build a lightning effect with four pars, channels 21 through 24.
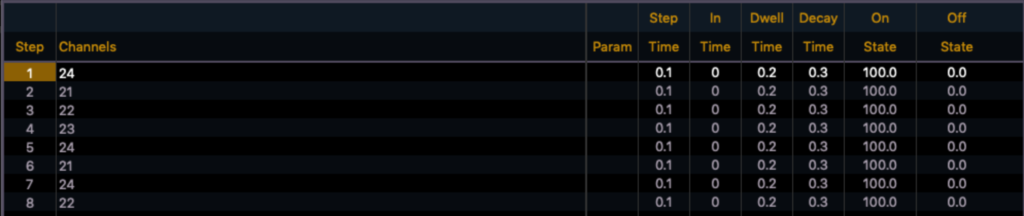
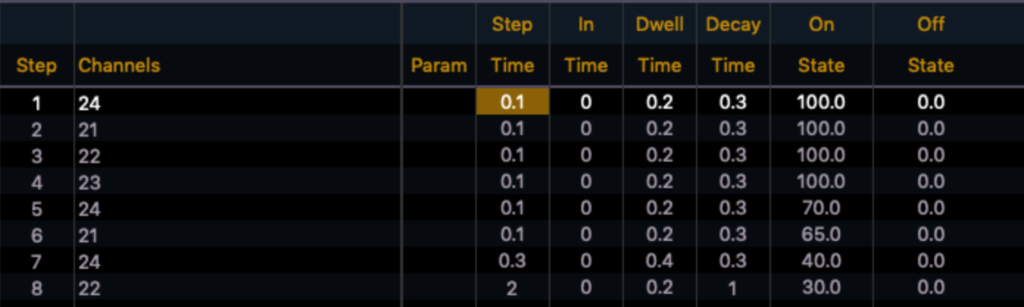
Much like last time, we will go to Effect Blind, type [Effect] 2 [Enter] and choose {StepBased}.[Label] Lightning 1 [Enter]. Let’s start by creating 8 steps by typing {Step} 1 [Thru] 8 [Enter] [Enter]. Click on the Channel cell under Step 1 and enter 24, arrow down to Step 2 and enter 21, Step 3 Channel 22, Step 4 Channel 23, Step 5 Channel 24, Step 6 Channel 21, Step 7 Channel 24, Step 8 Channel 22.
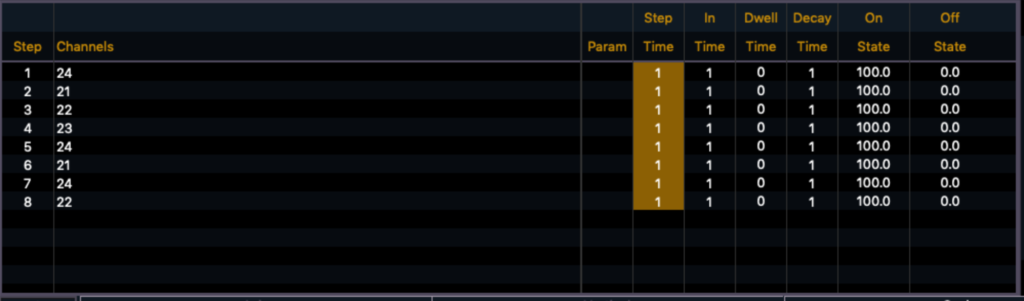
Next, type {Step} 1 [Thru] 8 [Enter]. We want to start making these timings faster. Arrow over to Step Time and we’ll start with 0.1 [Enter]. Arrow over to In Time (remembering this is the “attack” time- how faster the fixture goes to the On State. Make this a time of 0. Make all the Dwell Times .03 and all the Decay Times to 0.3.
Press [Live] and type 21 [Thru] 24 [Effect] 2 [Enter]. Take a look at your Capture file. It’s an ok beginning. The regular timing needs to be corrected and I think we need to adjust the On States of the last four Steps to get gradually dimmer. And we need the Effect to not loop. This should be a one shot effect, meaning it will play through the Steps only once. Back to Effect Blind.
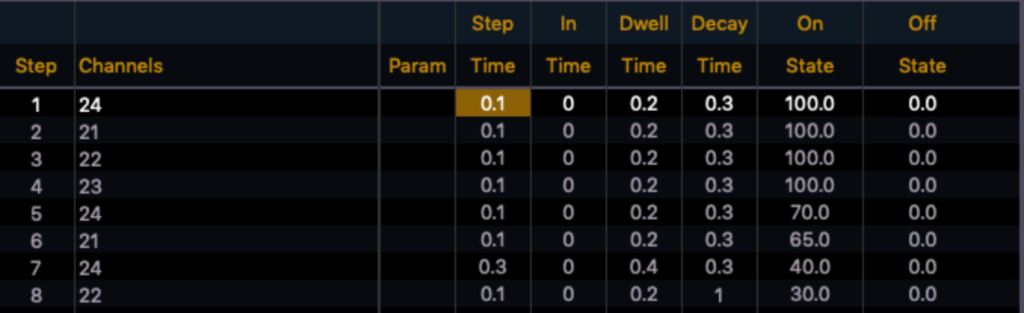
First thing is first- let’s edit the On States for Steps 5 through 8. Step 5 should have an On State of 70, Step 6 should have an On State of 65, Step 7 an On State 0f 40, Step 8 an On State of 30. I’d like to add some time in the last two steps, so let’s change Step 7 Step time to 0.3 with a Dwell time of 0.4 and change Step 8 Dwell time to 0.2 and a Decay time of 1.
If you check your output, we are getting close. Next step is to make the effect not repeat. Touch under where it says Duration on the right.
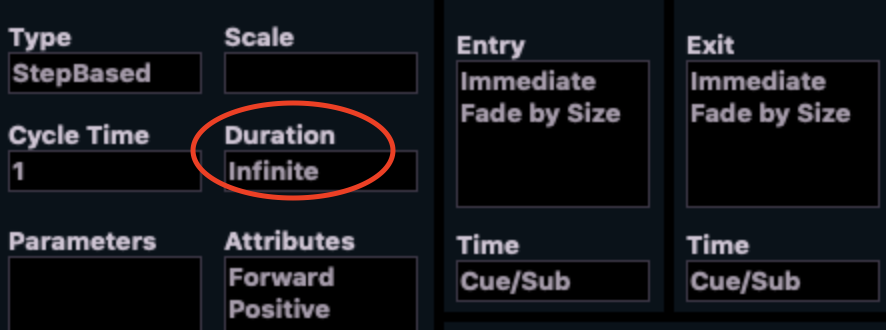
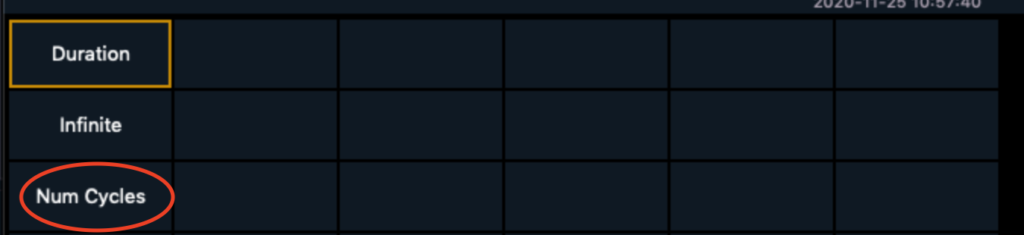
You will get this dialogue box. Touch {Num Cycles} then type 1 [Enter] because we only want the effect to run once. Heads up- every time you want to see the effect from now on, you have to go to Live and type 21 [Thru] 24 [Effect] 2 [Enter]. Since you probably missed what your effect did when you altered the Duration, let’s do that now.
When I restart the Effect, I notice it appears to be repeating the first four steps. I’ll admit this drove me nuts for a while before two colleagues and I worked out what it was. The issue is the fact that I’d like a one second out on the last step. Since the Cycle Time for the effect is less than the total time of all In/Out/Decay Times, for some reason EOS decides to repeat the first four steps. The solution is to lengthen the Step Time of Step 8 to give time for all steps to complete. I lengthened it to 2 seconds to leave extra. Go ahead and do that- Step 8, Step Time 2 seconds. Go back to Live and test. Not bad. Let’s press on.
Plot Thickens
Alright. Our characters have their fire going and the storm has started. It’s time to make a chase, so we can decide one of two things: either Aliens arrive or perhaps the campers are about to do a pretty great dance number. Why? Because Mysterious Stuff, Dance Breaks and Christmas are the most common reasons for an old-school chase. Regardless of which story option the director and/or writer decide on, let’s write a chase.
Old School Blinker Chase
Perhaps it’s nostalgia for me, but I still love a good blinker chase- preferably on some portal lights, or in this case, some low angle back lights are pretty fun too. Let’s go to Effects Blind and type [Effect] 3 {StepBased} [Enter]. [Label] Blink Chase [Enter].
Click under Step 1 Channels and type 11, then arrow down, then type 12, then arrow down and type 13 [Enter].

Since the other parts of the effect engine tend to natively do things with smooth attacks, let’s have a chase that pops to full, holds, then pops to 50. Type {Step} 1 [Thru] 3 [Enter]. Arrow over and set a Step Time of 0.5, In Time of 0, Dwell time of 0.5, Decay Time of 0. Now arrow over to Off State and enter 50 as the value.

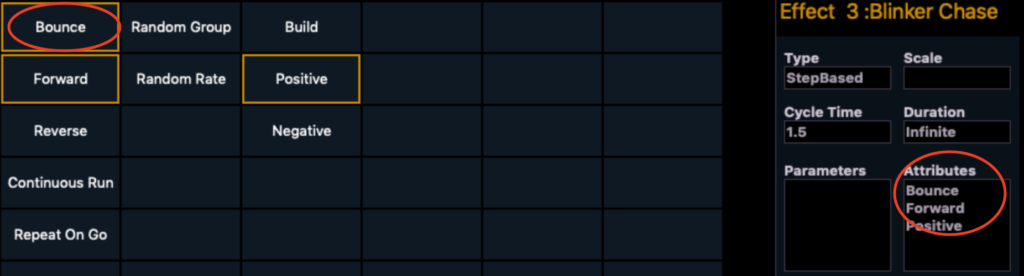
Go to [Live] and type 11 [Thru] 13 [Effect] 3 [Enter]. That’s pretty good. To me- this says Christmas chase or Dance chase. If you need Mysterious chase, I would touch on the right side of the window where it says Attributes and select Bounce.
Well, that concludes this tutorial into the StepBased Effects. Hopefully it was fun and gave you some insight into how to use them and what they are good at. What are your favorite old school effects? Comment below.