Welcome part to our seven-part exploration of effects. This time, we get to explore my favorite part of the effects engine: the Absolute Effects. It’s flexible, fast and powerful. It’s also misnamed, since it can also do relative effects. But we’ll get to that as we go. We will explore the functions of the Absolute engine through referenced data, relative instructions, and direct instructions to parameters.
This time, we will be using Mind the Gap for our vis file and the EOS Family Learning Series Level 4 Complete show file, both found on www.etcconnect.com. Sign up for your free account if you haven’t already. There are a wealth of resources here.
Color Effect
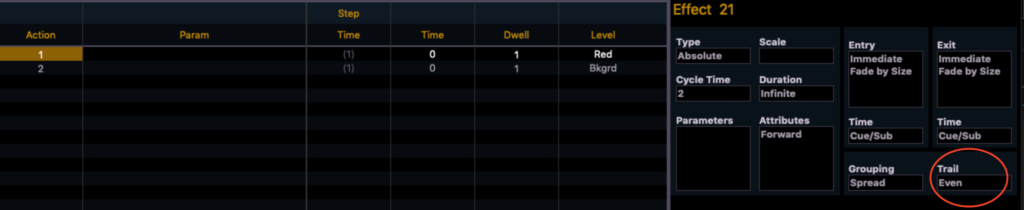
We start simply, with a bread-and-butter effect. One that changes lights from their current color to red and back. Go to Tab 13 Effects by opening a new tab or double tapping the [Effect] button. We will create a new effect by typing [Effect] 21 [Enter]. You will select Absolute from this pop up:

EOS creates a two Action effect by default. Action 1 will take intensity to zero and Action 2 return it to its background state, also know as “whatever the cue or submaster was already telling it to do.”

We want to edit Action 1, all the way over where it says Level. It would be easy to think that this effect will only do Intensity effects when you see the word “Level”, but think of it more as “data” or “action”. If you use your Right Arrow, you will find the golden fill (defaulted on the Action number 1 cell) will travel over to the cell that currently has 0.0 in it. Once there, type [Color Palette] 1 [Enter]. You will notice the cell will display “Red”, since this color palette has been labeled. (Label everything, y’all. Big fan of labeling.) That’s all we need to edit.

Let’s exit to Live and apply the effect. Type [Group] 20 [Full] [Enter], then type [Effect] 21 [Enter]. Check out your vis output, and you’ll see the cyc lit and the red effect running from SL to SR. Let’s go back to Effect Blind by opening Tab 13 or double tapping [Effect].
First, take a moment to label your Effect by hitting [Label] and typing something like “Red/Background”. Now let’s explore these controls with our effect running. The effect we have running is a smooth fade from SL to SR. What if we wanted it to blink to the color and hold there for a short time? No problem. Type {Action} 1 [Thru] 2 [Enter]. Now arrow to the right until you get under Time (not Step Time, you can’t edit that) and enter zero [Enter]. Then arrow to the right one click to edit the Dwell time by typing 1 [Enter].

When you look at your vis output, you will see a crisper version of the effect, but perhaps we are looking for a narrower strip of red tracking across. No problem. We will edit Trail by touching below where it says {Trail} over on the lower right of the screen.
This will open a new screen of options.
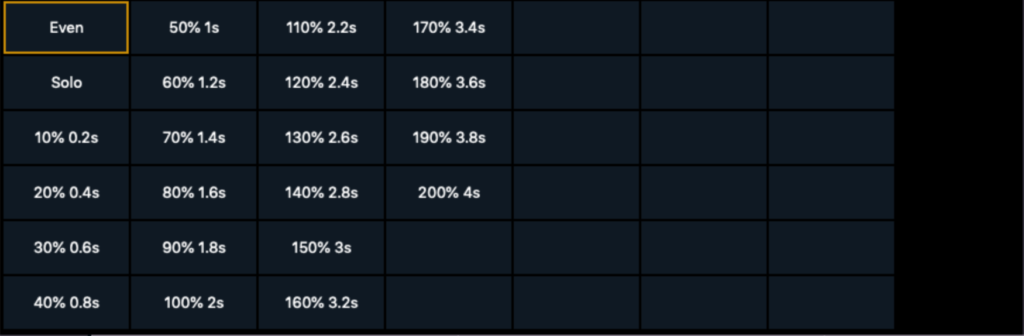
What you are looking at is a series of options for how the effect passes through the fixtures. Since there are many fixtures in our group, the effect is trying to run all the way through in two seconds. That’s why the red is so wide on the cyc. If we want to make it tighter, but still keep the effect moving fairly fast, we want to select something like 30%. Make that selection now, and look at your vis output.
Because I have some OCD, I’m bothered by the fact the effect runs from viewer right to left. If we wanted to reverse this effect, there are two ways of doing that. One involves editing the effect so the Attributes are set to Reverse instead of Forward. But the simplest is to take the numbers in the group, reverse them, and reapply the effect by going to Live and typing 312 [Thru] 301 [Effect] 21 [Enter]. Never undervalue the possibilities of selection when you are trying to get more options out of effects. Here is the finished Effect in Tab 13.

Relative Intensity
Let’s release the stage by typing [Clear] [Sneak] [Enter]. Next, I’d like to dive into doing a Relative effect with the Absolute engine. Go to Tab 13 or double tap [Effect]. Type [Effect] 22 [Enter]. Again, we will choose an Absolute Effect to build. We are going to create a simple effect to raise and lower intensity, though you can use the Params column to have this effect control anything you wish.
{Action} 1 [Enter]. Arrow right to the Level cell. We want the effect to rise and lower by 15%. So type [At] [+] 15 [Enter]. Arrow down to Action 2’s Level cell. Here’s the counterintuitive part. To have the value lower by 15%, we need to type [At] [+] [-] 15. If you just typed [At] [-] 15, -15 is an absolute value, not a relative value. The effect should look like this. Please take note of the + in parentheses on both lines; that means you did it right.

Return to live, and let’s test this. Since this is a Relative effect, we want the fixtures to have a value. Let’s type [Group] 1 [At] 50 [Enter]. With the selection still active (that’s the “golden outline” around each channel in Group 1), type [Effect] 22 [Enter]. When you look at your Live Table and/or your vis output, you will notice that the effect is having the group rise from 50% to 65% and drop down to 35%. That’s a Relative effect. The changes of + or – 15% are relative to what the base value is. If you type [At] 75 [Enter] (again, taking advantage of the selection), the effect will have the fixtures travel from 75 to 90 to 60. Simple, but cool. And quite useful. I hope you already are aware you could take group 1, randomize the selection using Offset, and apply the effect again to mix things up. I mention Selection order a lot, because it’s that useful.
Let’s release the effect by typing [Clear] [Sneak] [Enter]. Now, return to Tab 13 Effect Blind and label this effect “+-15 Intensity”.
Flyout
Start a new effect by typing [Effect] 23 [Enter]. Choose Absolute again. This time, we will make a flyout effect, since it is a fun mix of elements. Though we could do this easily using referenced data, I’d like to show you how to do it specifying parameters with values instead.
When we think about a flyout, step one is the light is at full and pointed straight down. Next, the light tilts up 90 degrees, then the light snaps out and resets pointing straight down. So four Actions. Action 1 is easy— turn the light on. Arrow to the right and adjust the Time Cell of Action 1 to be zero. Arrow to the Right to Dwell time. We want it to be long enough to register to the audience before it starts moving. Enter a Dwell time of 0.3. Arrow to the right to Level and enter 100. Action 2, you need to use your mouse (or finger if you have touch screens) to activate the Params cell.

When you’ve done it- you will see something very familiar.
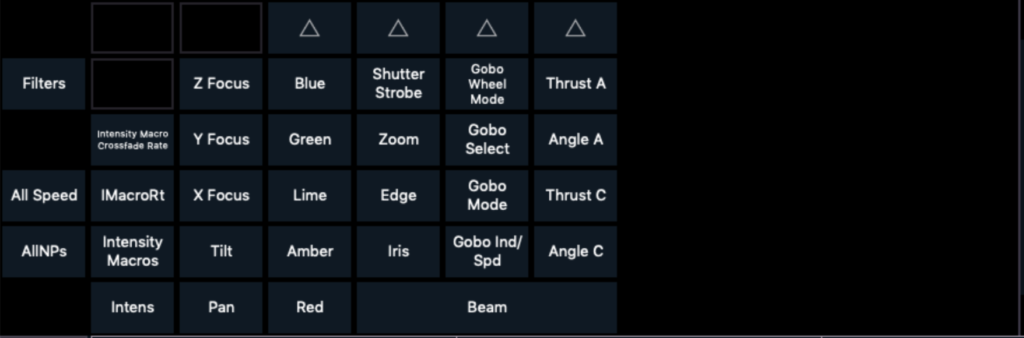
The same tiles that are found in the CIA. Choose Tilt. Arrow over to Time and enter 1.5 seconds. Next, arrow over to Level and enter -90.

We will create a 3rd Action by arrowing down and pressing [Enter] twice. EOS will incorrectly assume we want to adjust Tilt again. Use your mouse to hold down on Action 3 where it says Tilt. Choose Intensity instead of Tilt. Arrow over to Time and enter zero. Then arrow over to Level and enter zero.

Last Action: arrow down and press enter twice to create Action 4. Your Level should already say zero- that’s perfect. Arrow left to Dwell and enter 0.5. This step will restore the light straight down, and leaving a little buffer for heavier lights to react will make this effect more useful for a broader range of fixtures. Now arrow left to Time and enter zero. We want the move to be as fast as possible. Last step: click in Params where it says Intens. In the dialogue box, choose Tilt.

Exit to Live and test your effect by typing [Group] 6 [Effect] 23 [Enter]. This looks pretty good to me, though you could possibly shorten up the Dwell time on Action 4 to 0.4 or even 0.3 to suit your production. Just for fun, with your Group 6 still selected, play with your Pan encoder. This effect will run regardless of the Pan value in the background. BTW, go back into Effect Tab 13 and name your effect “Flyout”.
Hopefully this has helped make clear some basic work flows for the Absolute engine. What are your favorite things you’ve done with an Absolute Effect? Comment below.