Over the course of this series, we’ve walked through the how the effects engine is broken into different Types, the parameters of control common to all effects, and then each Type of the engine and how they operate. One would think you were done, but there’s always more. The last thing I will be covering in this series is the Effect Status Display.
The Effect Status Display is both a place to see a list of every effect currently running, but also a place where you can alter your effects on a cue-by-cue basis. Let’s get into it. Open Mind the Gap vis file and for the show file, open the version of EOS Family Learning Series Level 4 Complete that you’ve been adding your effects as you did blogs 1 through 8.
In Live, let’s get some effects running.
[Group] 5 [Full] [Full]
[Focus Palette] 2 [Enter]
[Effect] 31 [Enter]
[Group] 22 [Full] [Full]
[Effect] 21 [Enter]
[Group] 6 [at] [Full] [Enter]
[Effect] 41 [Enter]
Take a look at your stage just so you know what is going on. When you’re ready, clear your command line by pressing [Clear] once, and the press [Effect] just once. Behold, the Effect Status Display!
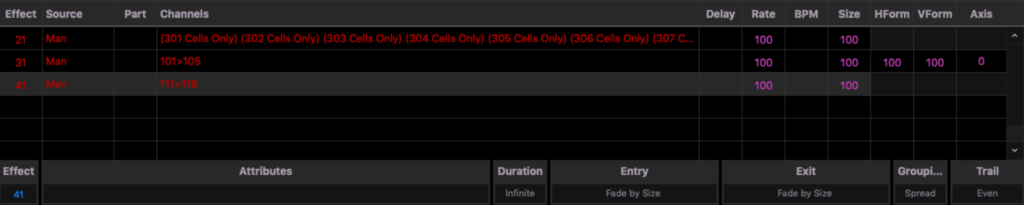
Let’s start with what you are looking at. You see the three effects currently running listed and they are in Red. This color of course is showing us these are Manual values, meaning not recorded anywhere. The effects follow the same color rules as cues to indicate a new value, a tracked effect, etc. When I look at the columns, I see two sections. The left side displays what is running and from where. The right side offers things you can customize to record in your next cue or sub.
Display
Effect- Simply, the number of the effects running.
Source- Where the currently running effects are from. Right now they are manual because they are in the programmer, but if you recorded a cue or submaster, it would list the number for it.
Part- If you placed the effect in a part within a cue, it would list that here.
Channels- Which channels are being affected by each effect.
Customizations
This area is incredibly helpful. If I may become “that old programmer” for a moment, in the past, if you wanted your effect to be a little faster for this cue, you had to create a new effect, alter the tempo and then apply it. Same with if the effect was a little too big or maybe a little too deep or wide on the stage in. Now you can alter these things on the fly as the need comes up without needing to create more and more effects. Let’s step through these options.
Delay- if you needed to add a delay to the start of the effect without affecting anything else in the cue, you could add that here.
Rate- if you need to speed up or slow down any effect, you can alter that here temporarily. Very handy. Remember that a rate of 100 means that it is playing at the original speed. If you wanted it four times faster, you would enter a Rate of 400. If you wanted it half of the speed of the original, you would enter a Rate of 50. Take a moment to run your encoder mapped to Rate up and down to see how this functions. If you are on nomad, click on the value of rate for the effect you want to change, enter your number and press [Enter].
BPM- Short for Beats Per Minute, this is the speed used to describe the tempo of music. If you know what the BPM is, you can manually enter it here.
Size- A way to proportionally increase or decrease the size of an effect. If you wanted the circle effect to be smaller, you would select a Size of 75, for example, and the circle would be tighter around the singer at center. Go ahead and run the Size encoder up and down, or manually enter different values by touching the cell, typing and value and pressing [Enter].
HForm- a Focus-only parameter, this will alter the wave form of a focus effect. If you wanted the circle effect that is running to be wider, you could enter an HForm value of 125, for instance. One encoder is mapped to HForm.
VForm- a favorite of mine, for when the effect you otherwise love is hitting the cyc too much, or perhaps the audience too much. Decrease or increase this value to compress or stretch the Focus effect running. If you hold down [Shift], the encoder mapped to HForm switches to VForm.
Axis- working often with VForm or HForm, though not always, this allows you to rotate the wave form on its axis. Your last encoder is mapped to Axis.
One more thing to point out. Between the areas we have spoken of, right above the encoders, there is a slim area that gives you access to edit the effect without exiting to Effect Blind.

Please note that changes made here will edit the effect itself, so any cue that uses the effect will be changed. Accessing these controls is easy- simply click in the cell that you want to alter.
EOS lays out great tools to create, track and modify effects. Hopefully you feel more confident in your ability to receive a creative impulse from your designer or yourself, decide which part of the engine will do it the best and get it up and running quickly. Is there an effect you were always confused by that you either solved or are dying to dig into? Tell us about it below.
1 comment