Welcome back. This week, we continue the multi-part series exploring the effects engine in EOS with the Linear Engine. Linear is the waveform effect grab bag of everything besides Pan & Tilt, Hue & Saturation. This makes it good for Iris effects, gobo rotate effects, flicker effects, and even one of my favorite Tilt effects. Let’s explore.
Open Tab 13 Effects by opening a new tab or double tapping [Effect]. Type [Effect] 41 [Enter]. Choose a Type of Linear.

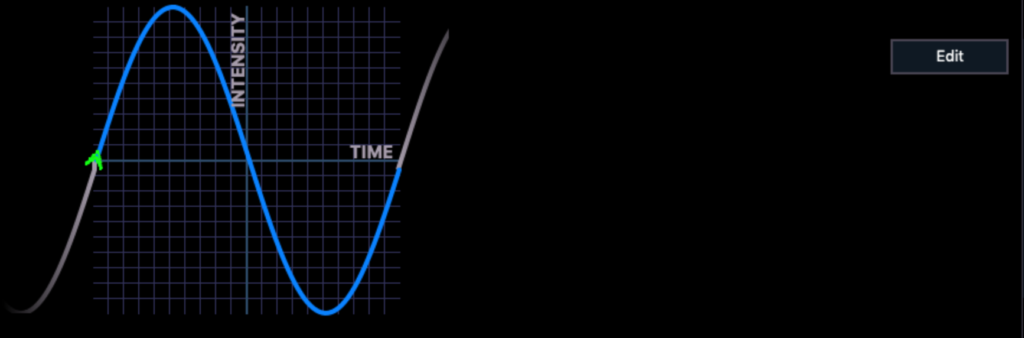
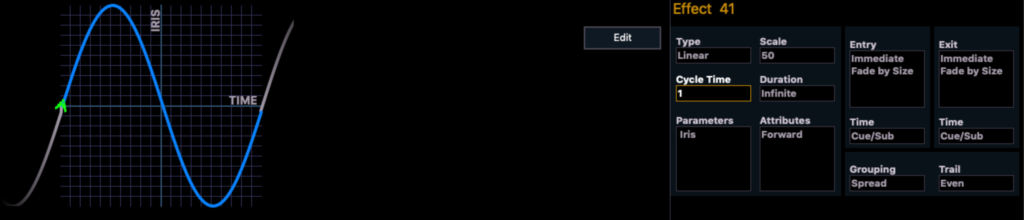
The default for the Linear engine is an intensity Sine wave effect. Notice the two axis are different than the Focus effect. Instead of Pan and Tilt, there is Intensity (or any parameter) and Time. You can place any parameter(s) in the effect, but they will all be controlled exactly the same.
Let’s click our familiar friend Edit and peek behind the curtain.
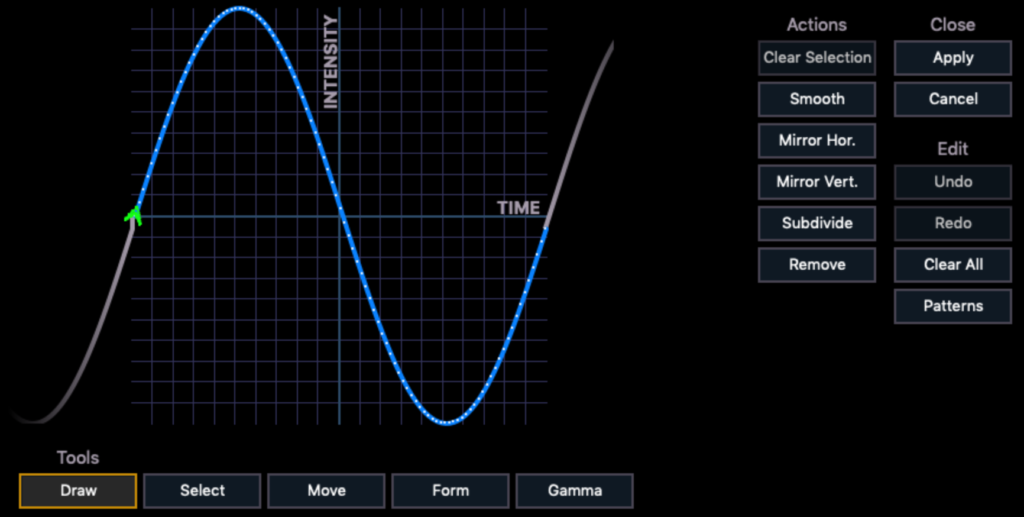
What we see here is very familiar if you already read the last blog post. There is only one new item- gamma. Here is the complete list with explanations (AKA- the Exposition):
Tools
- Draw allows you to create your own waveform.
- Select allows you to select a portion or all of a waveform for editing.
- Move allows you to move what you have selected.
- Form allows you to bend or skew your waveform in useful ways- again, based on your selection.
- Gamma is a tool to skew the wave form. It defies my ability to describe it- just engage the tool and drag it up and down anywhere on the grid.
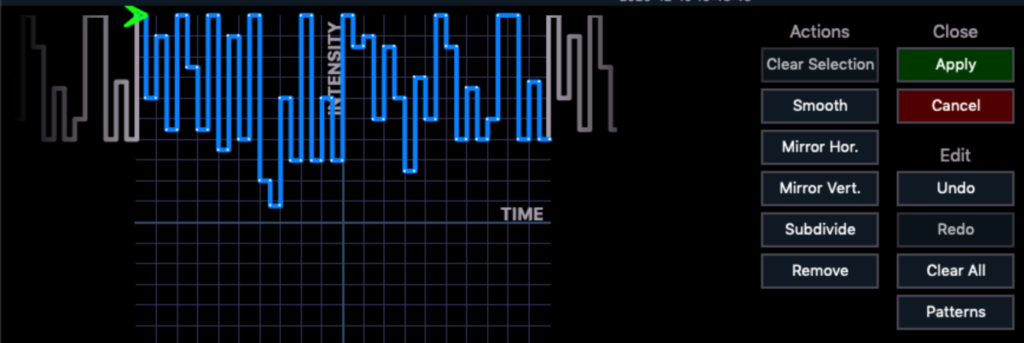
Actions
- Clear Selection releases your selection.
- Smooth takes your sometimes awkward forms that you most often draw with your finger and smooth them out. This is best used with a small selection of the wave form at a time.
- Mirror Hor flips your selection from left to right.
- Mirror Vert flips your selection from top to bottom.
- Subdivide is the opposite of Smooth. It adds points between each point you have selected.
- Remove erases selected points.
Close
- Apply is very important; it’s the only way to not lose all your work! Be sure to hit apply when you are done.
- Cancel closes the window and undoes everything you edited.
Edit
- Undo- undoes your last action.
- Redo- redoes your last undo action.
- Clear All removes all points when you want to draw your own.
- Patterns is a selection of pre-built wave forms. So quite useful stuff in here.
Alright, y’all. Let’s pretend we are programming Be Our Guest in Beauty and the Beast. If you aren’t familiar with the stage version of this song- imagine if the creators decided to create a third act in the form of a dance and insert it near the end of act one. I used about 150 cues in this number alone when I lit the show, and I would have added more if I had had the time to do so. Needless to say- it’s a song that invites you to pull every trick out of your hat and then make up more. So let’s say you ran out of ideas about the time the Can-Can napkins hit the stage. Perhaps you decide an iris chase is just the thing to get you through these next two measures of the song. Let’s build one in the default effect we are currently looking at.
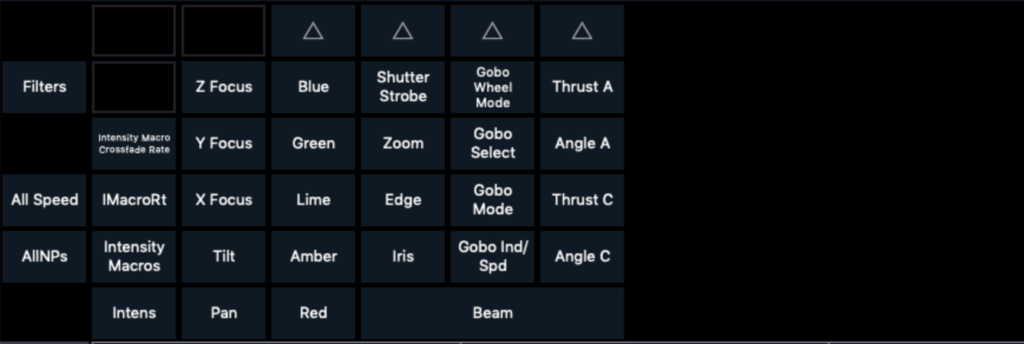
Click where it says Parameters.
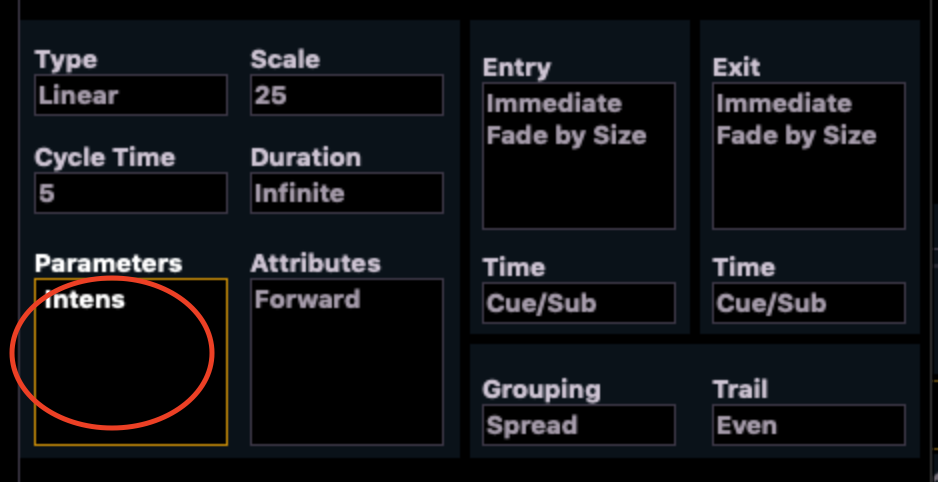
You now are viewing what looks like the Parameter area in the CIA. This is how/where you choose what parameters the effect will control.
Select {Iris} and press [Enter]. Remember that this type of effect is relative- so it will operate relative to what the fixture was already doing. The scale of 25 therefor will only allow the effect to use 25% of the iris. Not enough for an over-the-top song. Lets click below Scale and type 50 [Enter]. The Cycle Time is too slow too. 5 seconds? This whole cue will be over before 5 seconds have elapsed. Let’s change the Cycle time by touching below the label and typing 1 [Enter]. Your effect should look like this:
Let’s check our work. Exit to Live and test this out. [Group] 6 [Full] [Enter]. [Effect] 41 [Enter]. This looks about right to me. Hopefully the director likes it, because we don’t have time to dawdle. [Clear] [Sneak] [Enter] so we can start the next one.
Return to Tab 13 Effects by selecting the tab or double tapping the [Effect] button. Type [Effect] 42 [Enter] and select {Linear} for your Type. An effect I like is one that rotates a gobo quickly, then fairly quickly stops. It’s fun when it cycles through a bunch of fixtures and it’ll be great for the next moment. Touch {Edit} on the screen. We need to trade out the wave form. Press {Clear} to the right and then Draw on the bottom.
You want to draw a sharp incline in your wave form, keep it at that level awhile, and then a slower decline. Use four clicks with your mouse (rather than dragging to draw) and make it look like this:
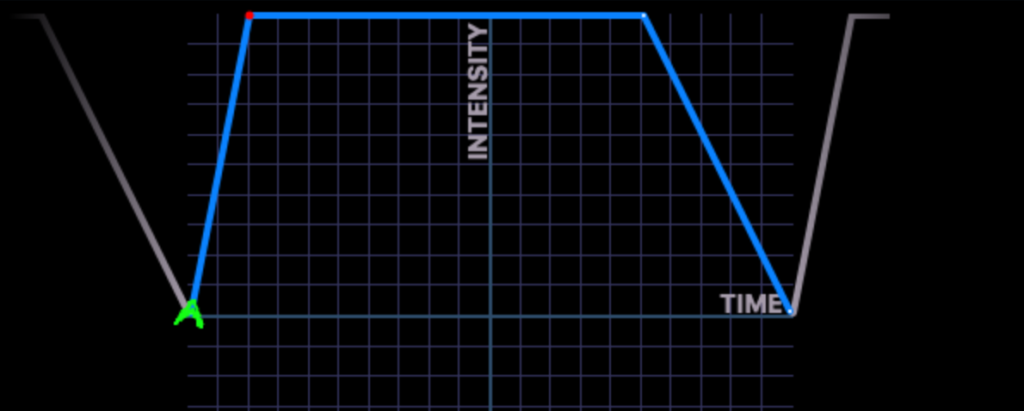
Click {Apply} to save your wave form. It’s time to adjust the speed, which in this case will be expressed by scale. Gobo rotation parameters are all over the place in EOS. Some are 16 bit, some are 0-100, and the fixtures we are about to use are 0-300. We want this effect to be pretty bold (remember- dancing cutlery), so let’s go all in and set scale to 300 by touching {Scale} and entering 300 [Enter]. Let’s pop out to Live and check our work.
[Group] 6 [Full] [Enter]. Put a gobo from wheel one in (something that will show you the rotation clearly), set the parameter to Rot+ mode.

I also set my Edge to 100 and zoom to 25. Now apply the effect with [Group] 6 [Effect] 42 [Enter]. This looks pretty good to me, except I feel like there is too much overlap in the effect, making it harder to track what is going on. The timing of how an effect travels across the fixtures is controlled by Trail. Pop back into Tab 13 Effects and touch {Trail} and select 40% [Enter].

Check your vis view. This looks pretty good now. Let’s move on to the next effect, since we are running out of time (as always in tech). [Clear] [Sneak] [Enter]. Go back to Tab 13 Effects and make sure your effects are labeled. There is always time to label.
Ok. Somewhere in this song there is a Russian dance specialty section. The first time I designed this show, I was on a Hog 3. They have a nice built in effect that has all of your lights drawing upstage slowly and then one at a time popping back downstage. I find that a great way to really get to know a console is to force yourself to recreate effects from another console. So let’s dive in.
[Effect] 43 [Enter]. Choose type of {Linear} again. This time, we want to click below {Parameters} to choose {Tilt} [Enter]. (Fun fact- the first time I tried to make this effect, I started with a Focus effect and removed the Pan parameter and EOS changed the Type of the effect to Linear immediately.) The default Sine wave is not going to get us where we need to be. The motion needs to gradually draw upstage, then snap back down. Let’s make our own wave form to do this.
Click {Edit} in the upper right hand corner of the window. Press {Clear All} to the right, and {Draw} on the bottom. Click three times (don’t drag to draw) to create this wave form. Click {Apply}.

Let’s go to Live to test. [Group] 6 [Full] [Full]. [Effect] 43 [Enter]. The effect is at it’s best when you have a backlight palette recorded (feel free to create one to test), but this gives the idea of what we are going for.
Alright- we are so close to the end. While we have been slaving on our huge dance number cues and fearing that we are trading some part of our life force to generate more ideas, our director has noticed something, and it’s not all the work we have been doing. It’s the fact that the fire in the fireplace is not flickering. Take a cleansing breath and do not give in to frustration. If they don’t have a note on what you have done, decide that it’s because it’s good. Let’s make an intensity flicker since we are coming up on coffee break.
[Clear] [Sneak} [Enter]. Go to Tab 13 Effects and label effect 43 something like Pull Upstage. {Effect] 44 [Enter] type {Linear}. We’ve already done a flicker effect in StepBased effects, but I love a relative effect for flickers. Click {Edit} in the upper right hand of the window, and click on {Patterns}. The ninth wave form is named NX Fire. I love it when console creators recognize building blocks and make them easily available! Select that one and click {Apply} to save.
That’s all there is to it. Apply the effect to your fixture, set an intensity base value if you need it brighter, and you can go to coffee with the crew! (Breaks are important, y’all.) Oh, and label your effect. What things are you going to try to build with Linear? Comment below and let’s nerd out together!