It seems a fairly common desire to have EOS triggered by Qlab, but sometimes programmers get intimidated. Don’t worry, it’s not that difficult. This tutorial is for those who are doing performances that use pre-recorded music (like a dance recital) and have equal access to both EOS and Qlab during tech rehearsals, since adjustments in triggering the lighting cues will need to be made in Qlab. It is especially for people who like to look at a music file wave form and place lighting triggers directly onto it to see where the beats fall. If that sounds like something you want, read on. If not- check back in next week when I do a tutorial on how to get timecode out of Qlab that you can then set up your own triggers inside EOS for cues.
Materials and Methods
Triggering cues between sound and lighting used to only be done with midi. Since fewer and fewer people even know what midi is these days, we will be using a networking to join our two systems and we will be using OSC as our protocol. Qlab version 4.3 or above is needed and I will be using EOS software 3.0.2 today. I highly recommend using a simple unmanaged switch, since it has solved a variety of networking mysteries in my life as a programmer, but I don’t think it is required. You could even run both programs, EOS and Qlab, on the same computer using 127.0.0.1 as your IP, but I won’t be specifying instructions for that. We will be using the EOS Family Level 4 Complete show file from etcconnect.com so we don’t have to invest any time writing cues.
Setup
Networking is the first priority. You need compatible IP addresses and subnet masks between the two. Since I’m a lighting person, and EOS is my primary console, I use 10.101.100.2 for my console and 10.101.50.111 for my Qlab computer with a subnet of 255.255.0.0.
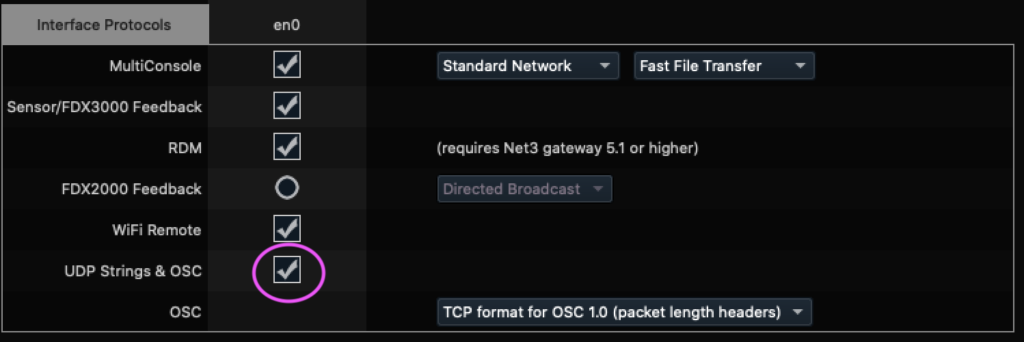
In EOS, go to the shell, Settings>Network. Make sure UDP Strings and OSC is turned on for the network port you are using. If you needed to change anything at all, press Accept at the bottom of the screen.
In Qlab, click on the cog in the lower right hand corner. Select the Network tab first. Add a second Patch for your EOS console by clicking New Patch in the upper right hand corner. Name it, choose the network port/adapter then list the Destination IP address for your console, and finally what port you wish to use for your OSC messages. I went with 8000 since that’s what many other people do. It’s arbitrary, and you can use any number port you wish as long as EOS and Qlab agree.

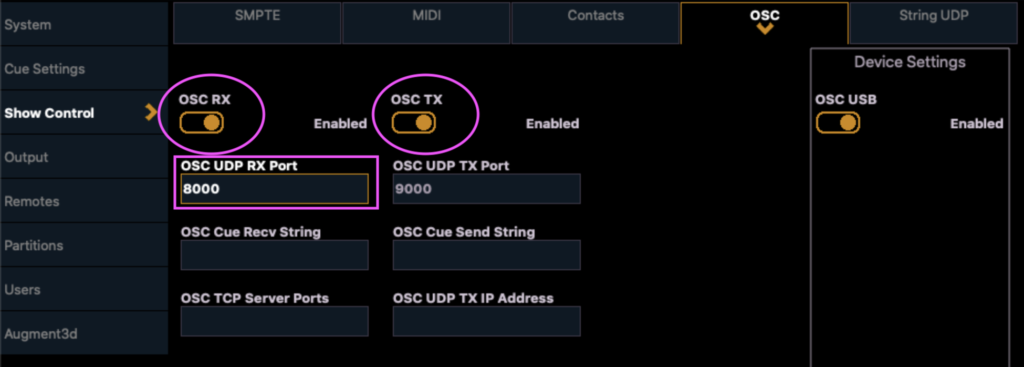
Back in EOS, sign in as Primary (keep in mind you can only send OSC triggers to the Primary on any network). Go to Setup>System Settings>Show Control>OSC. Make sure OSC RX and TX are enabled, and enter under OSC UDP RX Port the port number 8000 (or whatever you have chosen).
Programming
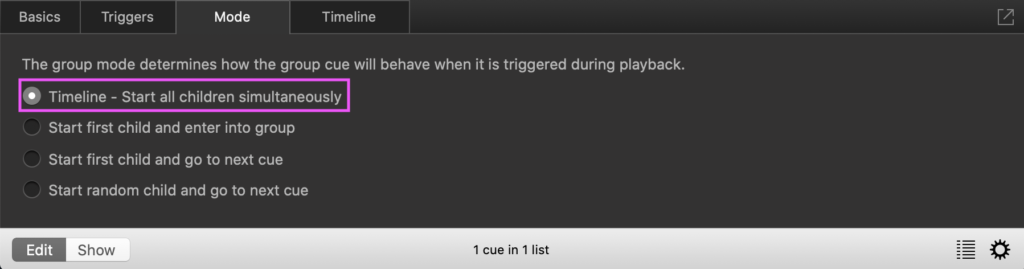
That’s it for setup. Have your music file easily found and create a Group cue in Qlab. Under the Mode tab, make sure the Group is set to Timeline – Start all children simultaneously.
Add your music file inside the Group, then drag and drop a Network Cue into the group. Notice there is a red X next to the Network cue. That is because you haven’t configured it yet, so Qlab is warning you it won’t yet work.

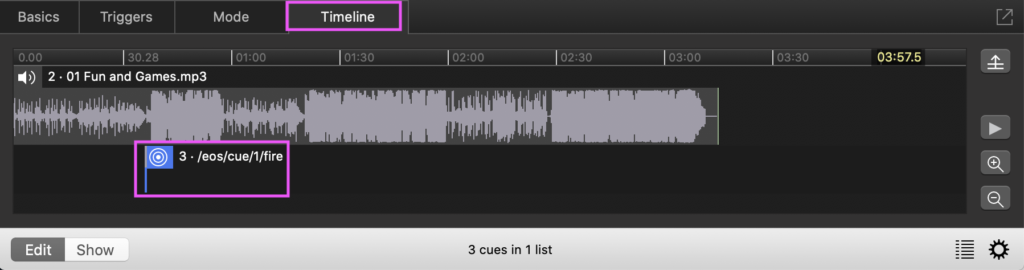
Select the Network cue and go to the Settings tab. Select your network adapter (#2 in my case), then type /eos/cue/1/fire in the OSC argument area. (Why are we arguing?) Now press Send to test it. If it doesn’t work, you should recheck your network settings and/or check if some “helpful” firewall is preventing the message from getting to the console.
One last thing to show you. In Older Times, when you wanted to have cues triggered in succession from within Qlab, you needed to apply a prewait time for each cue so they fired all at once, but happened where you wanted them because a prewait is a delay. Now, it’s much improved. Select the Group cue and go to the Timeline tab. It will show you your Cue 1 go and will allow you to click and drag it along the waveform to determine your Prewait value! As a demo, I’ve dragged mine to a good cue in the music and the Prewait was generated for me. I love this relatively new feature in Qlab.
That’s all there is to trigger your cues from Qlab. A few more suggestions to have a smooth tech:
- Jumping around in the cue stack can be a bit tricky, so make sure you reset to the cue before the start of your next piece if you need to back up or jump ahead.
- Bear in mind that sometimes when you put the lighting trigger exactly onto the beat you want, it might not yet “feel” right since there is a bit of a delay for an incandescent light source to heat up enough to emit light. Also because timing is more than being “right”. You will need to fine tune your placements for the best experience.
- Make sure your Qlab computer is right next to you for corrections! I drove an excellent sound op (and myself) nuts by trying to tell him to make tiny adjustments of a quarter of a second to triggers. If you can’t make corrections yourself, you should not use this method.
- If there is a tiny bit of silence of your track, edit that out BEFORE you start adding lighting triggers.
Automation of cues and timecode frequently get presented as a mythic, huge task. I hope this tutorial shows that it doesn’t have to be. If you have any questions or comments, hit me up!
2 comments