Welcome back to the second in my little series of linking Qlab and EOS. This time, we will explore sending LTC Timecode from QLab to EOS to trigger cues. There are items needed for this project that are not always easy to get ahold of. But if you can source them, I promise that LTC is worth the fuss.
- ETC Response SMPTE Gateway. There’s no way around it. If you want LTC (Linear Time Code), you must have dedicated ETC hardware such as this or the older Show Control Gateway. A reader asked if there was a way to do LTC via network and QLab strongly recommends against such a thing since a typical network is filled with interruptions to a perfect data flow that will make synchronizing very frustrating or impossible.
- Audio output. My use-case situation is a dance recital, which will want recorded playback of music as well as output for LTC. Since no computer (that I know of) comes with more than one stereo audio output, this means you need to source an audio interface that will output for playback of music (which can be as little as 2 channels of output for the L and R signal from the stereo file) as well as the one output (LTC is a mono sound, meaning only one channel of output). You can find many audio interfaces for purchase that offer four outputs. If you want a suggestion for the cheapest option, I would buy a Peavey USB-P which will add two XLR outputs to your computer for $50. You can then use your built in output for the music and the Peavey for the LTC.
- A Mac with a QLab Audio license installed. You can rent by the day or purchase. You can actually build this project without a licenses (and save it) but you can’t reopen it without a valid license.
- A Nomad or a Console.
- Open ports. You can connect the Response Gateway via network cable (with Power Over Ethernet) or you can connect via USB. Your audio interface will (typically) also connect via USB.
- An appropriate cable and adapters to go from the output of your interface (which could have any connector and only you know) to the XLR connector on the Gateway.
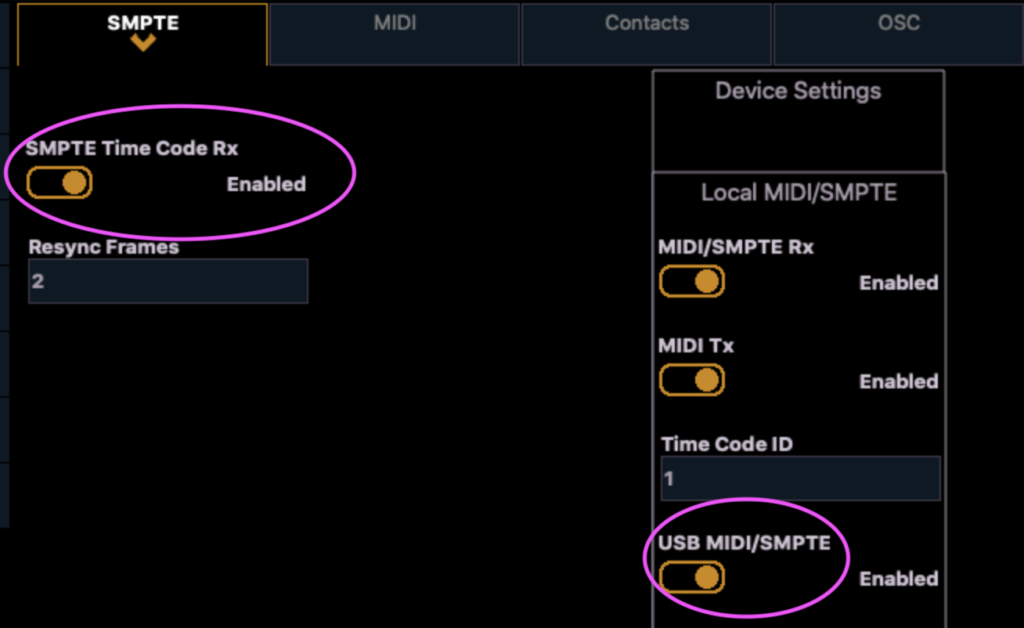
We will start in the EOS Family Level 4 Complete show file (found on etcconnect.com) to bypass the need to patch and write cues. Connect your Response Gateway to a POE network switch connected to the console or connect the Gateway via USB. On the console, go to Setup>System Settings>Show Control>SMPTE and make sure at least SMPTE Time Code RX (RX=receive) is enabled. If you are connecting through USB, make sure USB MIDI/SMPTE is enabled as well.
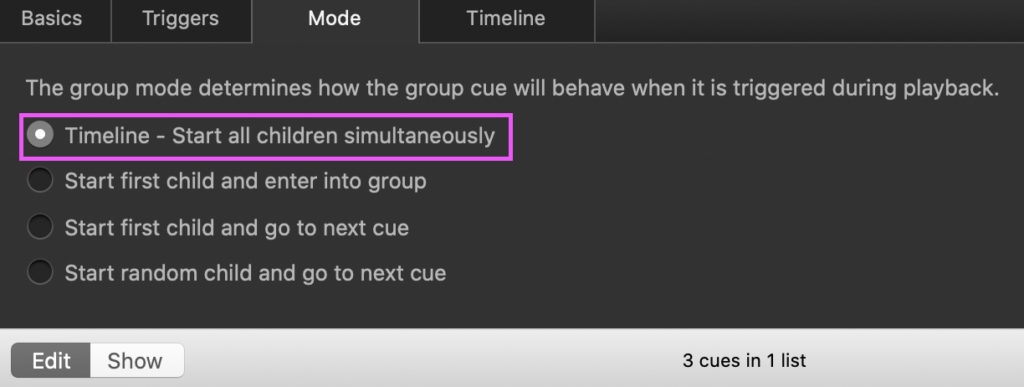
Over in Qlab, we are going to drag in a Group cue. Select the Group cue, go to Mode and Select Timeline- Start all children simultaneously. We want this so Qlab will start our playback file (for the dancers in our example) and our Timecode file (for the console) at the same time.
Drag in any music file you want to use for your music playback/dancers. Next, look for the clock icon in QLab that represents a Timecode cue and drag it into the Group cue as well.

By default, QLab is going to assume a Midi timecode cue. Select the Timecode cue, go to Settings for that cue. A lot of decisions happen here, so let’s go through it.
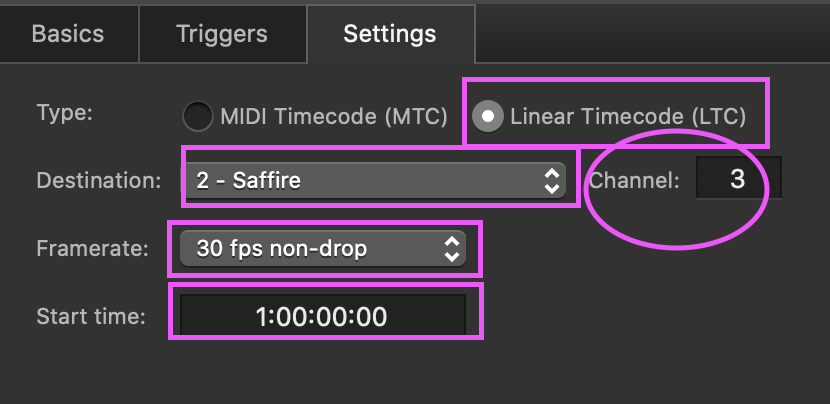
Type: You want to select LTC here, since that’s the protocol we are using.
Destination: You can choose from multiple audio interfaces if you have them (for instance, built in audio and the Peavey device I mentioned earlier). I have a Saffire Pro 40 (overkill and too complicated to easily recommend to many), so I have selected that.
Channel: The output on the device you wish to use. I’m using 1+2 for the stereo output for the music playback, so channel 3 is for the LTC output.
Framerate: Frames are how Timecode divides each second. I pick 30 fps non-drop because it’s the easiest for me to work with. Drop frame, I believe, EOS does not do. 24 frames is a bit trickier when I want to do certain divisions of time (this is just the math in my head- no actual complicated mathematical stuff), so 30 fps it is.
Start Time: Timecode is based off of a 24 hour time with hours, minutes, seconds, and frames as devisions of time. QLab will default to 1:00:00:00 every time, so you will need to customize this for each piece you do. If you have 24 dance pieces or less, separate each piece by one hour. If not, pick another division of time that covers your needs. Just remember- the timecode coming from each piece of music MUST be unique, or you will have the wrong cues firing on the wrong piece.
All that said-I’m sticking with hour 1 for this first cue. When I plug the output 3 from my audio interface into the LTC input on the Response Gateway, I see time! If you don’t, a few things:
- I invested too many hours into troubleshooting my Response Gateway which wouldn’t respond to timecode no matter what I did. After Tech Support and I exhausted possibilities, we decided to update the software on the device. That did the trick, even though tech support said it should not have made a difference.
- Networking. If you are not using the device via USB, make sure your network configuration works.
- Make sure the LTC audio level is neither too high nor too low. Slowly work the slider up and down to find the happy place.
Moving onto the console side. EOS works with timecode as a list of Events inside a List. So let’s create an event list and configure it by pressing Displays>More SK>Show Control. You will go to Blind, Show Control. Since an Event is a container for all actions we want, we start by making an empty List by simply typing [1] [Enter].
This is what that looks like:
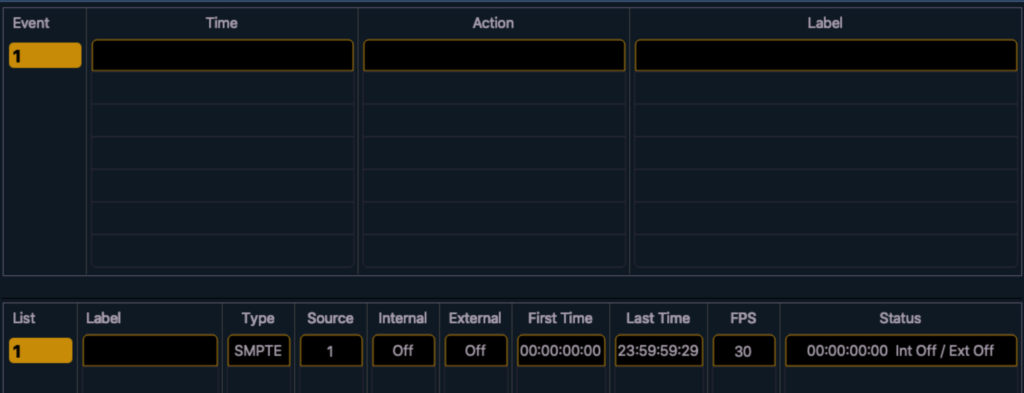
EOS defaults to SMPTE and 30 FPS- easy! The only thing we need to change for now is to turn on External Time by clicking where it says Off.

Go to Qlab and start your timecode. You will see the timecode status clock sync with QLab.
So how do we get EOS to take cues? There are two ways. You can manually enter each cue and the timecode value. This takes quite a while and I don’t recommend it. The better/faster way is to have EOS Learn your cues by you taking them and it memorizing them. Don’t worry- it’s easy to correct things afterwards.
While still in ShowControl Blind, Press {More SK} to get to {Learn Events}. Please note that nothing SEEMS to happen once you press Learn Events, but take a look at your Learn button and notice that it is lit up green to show the console is ready. Also notice at the top of your screen that “Learning” is next to the timecode readout.

Go back to QLab, start your timecode cue and sound playback, and hit [Go] where you want cues to happen. Warning: ANYTHING you do on the console will be captured during this process. All button presses, all submasters, Goto Cue, manual changes- literally everything can be captured. If you press the wrong thing, don’t worry too much, you can remove it later.
Play your cues, and when you are done, press the green [Learn] button and EOS will stop recording. If you restart your timecode cue, you will notice EOS does everything you did during that time. I was a goof and start from the end of the cue list, so here is my event list:
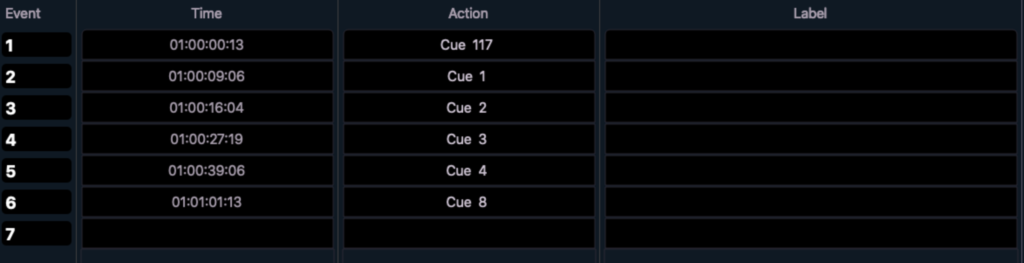
Since I started at Cue 117, I then typed [Goto] 1 [Enter], but EOS simply noted that as Cue 1 go. If you want to adjust the timing on any of the cues, you can hit {More SK} to get to SK4- {Event} then specify the number, then hit the hard button [Time] to enter the timing. Remember that you need to fill all the digits 00:00:00:00 for this to work, then hit [Enter]. If you hit the wrong cue on the first event like I did and want to change it from Cue 117 to Cue 116, you edit that by typing {Event} [1] {Action} [Cue] [116] [Enter]. If you need to insert something, you can either do that by re-learning or by using the {Insert} keyword.
Without diving into minutiae that will make this tutorial super-duper long, I think this is a good overview of the basics of timecode on EOS. (If you want a long post about Timecode, I wrote one on how to do a musical as my very first post. Check it out for many more variables and details, though I did that post using Midi timecode since I didn’t have access to LTC at the time.) I hope this makes timecode that much more approachable and useful to you all. Hit me up with questions, requests or comments!