I’m still quite new to film, so there are certain things that surprise me. One of them is how often profiles are created so that the green/magenta shift rolls in opposite directions. Seems half the time, raising a value drifts towards magenta, and the other half it drifts towards green. This strikes me as odd, since a parameter like zoom always gets bigger when you raise the value, unless a mistake was made. Though I’m still too new to be trusted on which way on the encoder should drift to green (I currently have it drifting down because “green for grass”), I do feel encoders should always work together so when the Gaffer calls for three lights at 6k with 1/4 green, you can grab all of them at the same time and make it happen. To do this, you need to be comfortable editing profiles.
I’m starting in an empty show file. Go to Patch>Type>Manufacturer>Astera LED Technology and patch a Titan Tube. I’m choosing profile 89 D CCT GM CRO RGB 1 Pixel. Touch Type again and instead of Manufacturer, choose Show. This is how you get the Edit button to appear.

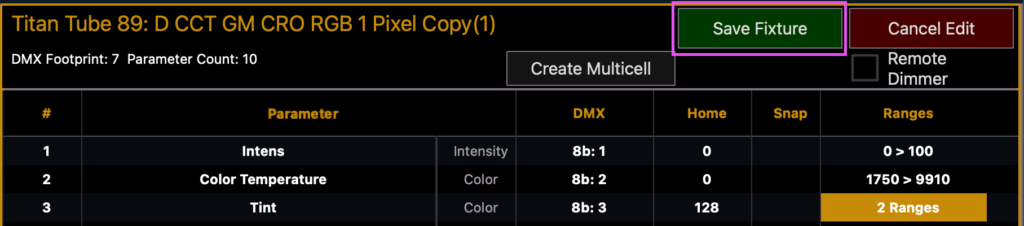
Press Edit and you are now where you can create new profiles or edit them. Select the Titan and press Copy in the lower left hand corner of the screen.

Select your copy of the Profile. You will see a list of parameters to the right.

In this example, item 3 is Tint. Over on the right is the Ranges area. Click once to select where it says “2 Ranges” and a second time to open the editor for those ranges.
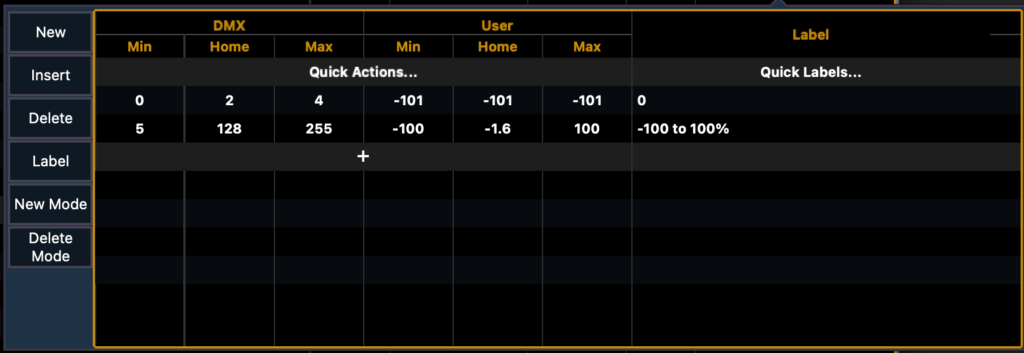
To get you oriented, the items on the left named DMX values are what is built into the fixture and indicate a progression from a low value to a high value. Not the right is how we, the Users, view that information from a negative 100% to zero to positive 100%. We want to change the values under DMX.

If we want to reverse the green/magenta shift on the encoder, we want to reverse the values of the DMX. Click where it says 5 under Min and change it to 255. Click where it says 255 and change it to 5.

Notice your profile is now tinted red. Don’t forget to press Save in the upper right hand corner of that profile area!
To finish, select your patched fixture and change the Type to your new fixture. Feel free to relabel your new fixture with your initials rather than “Copy (1)”.
Obviously, Tint isn’t the limitation of what you can choose to alter on a profile to get a better work flow. I regularly edit fixtures to suit my purposes. Like many things, investing some time to lay out your desk to optimize your work flow is always time well spent. Hope this helps make the process easier. Happy programming.