
(Why Should You Care? – Skip this if you want to jump to instruction)
There is such a thing as Programmer’s Regret. I work in a different venue about every week. I used to think that meant a programming template was impossible, since there were too many variables for it to be worth it. I was wrong. A programming template is the best thing I ever did for myself as a programmer and/or designer. Why mix a primary red color palette for a fixture more than once? And then there’re the beam palettes- two for each gobo- one fixed and one for rotation. How about a beam palette for Sharp to Gobo Wheel 1? Macros? Effects? System Settings? I’m horrified I wasted so much time in my past, but hopefully you won’t make the same mistake. Even a small template with a few fixtures, 12-24 color palettes, a few macros and some of your favorite effects will save you HOURS every show. And that is time you will always need.
Maybe a thing that has kept you from starting your template is the idea of starting with a blank show file. Well, we’re not going to do that. We’re going to start with your most recent show and turn it into something you can use always. For us to have common reference, I’m going to use the “Mind the Gap Level 4 Complete” show file downloadable from the ETCconnect.com website after you create a (free) account. But you should use your own to get the most out of the hard work you’ve already done.
(What Does That Mean? “By Type”)

If you don’t already know, there are two ways to create palettes in EOS. The first is to make a reference for each and every fixture you have in your show. It’s fast, but not versatile. The second way is By Type, and it’s awesome. If I have color palettes for a Viper Profile, and I made them By Type, then however many Vipers I add to the show, all the color palettes will just work. Because the palettes are tied to the type of fixture (hence the name), not the specific channels. All palettes we make or adjust in this tutorial will be done this way, so it’s important you understand this. I highly encourage you to watch one of the ETC EOS YouTube videos on By Type if you aren’t already using them on the regular. It’ll make your life better.
(Get to the Tutorial Already! Instructions start here)
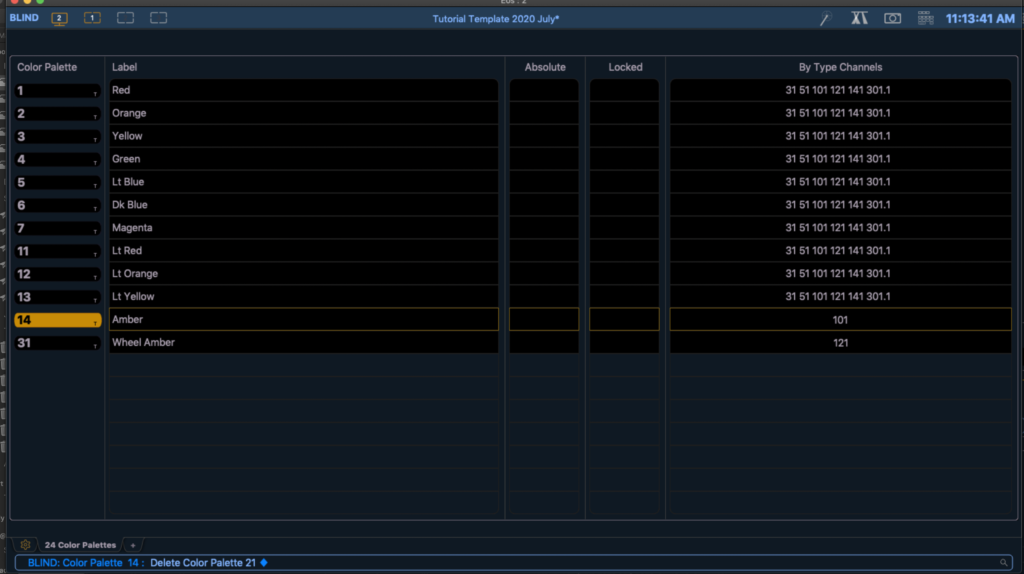
Open your show file and SAVE AS IMMEDIATELY. Pick something that tells you the Month and Year. Now we want to make sure all palettes are saved By Type. When you go to the {24 Color Palettes} tab, you will see every color palette you have made. Listed in the column all the way to the right, you will see which palettes have By Type data because the “leader” channel will be listed. If you didn’t get all of your palettes recorded By Type- we can fix that. Select the first channel of each type (i.e. “Viper” or “Colorsource”) of color-mixing fixture in the show file and look for the soft key {By Type} and then press [Enter]. You will notice the color values for those channels have changed color from white to blue. This means that channel is now the By Type leader. Repeat this procedure for each color palette.

Now be sure to keep going and do your Beam palettes and Intensity palettes. I’m not mentioning Focus palettes, since very few will be useful as By Type except maybe a Flyout. Presets can be useful if they are things like Home, Highlight and Lowlight Presets. Not all things will be reusable. For example, in my show file there is a color palette 21, which is an ombre cyc look. Not really a portable concept from venue to venue, so I will delete it.
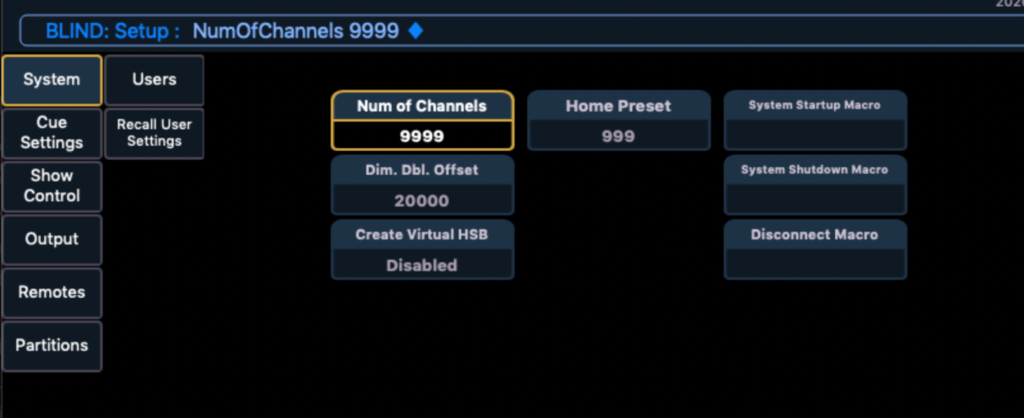
Now we will move all of these By Type fixtures way up in a high channel range that we will only use for these purposes. Most programmers I know use the 9000 channels. You will likely need to change your maximum Number of Channels in Setup>System. Touch where it says Number of Channels and enter your preferred number then press [Enter].
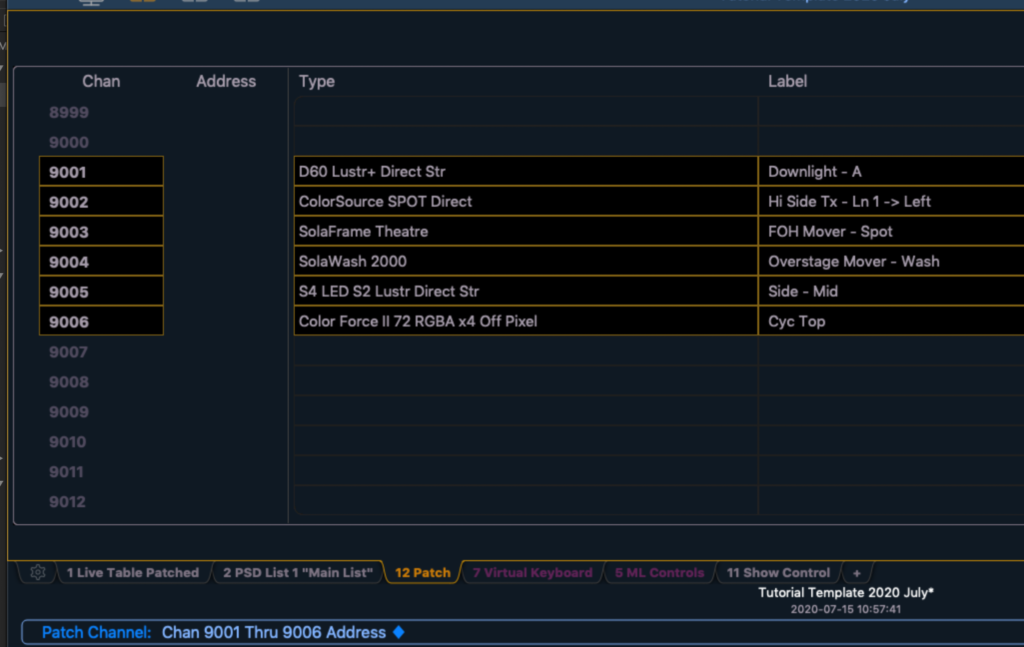
In the show file I’m using, the By Type Leaders are: 31, 51, 101, 121, 141 and 301.1. Go to {12 Patch} and type your first channel [Move To] 9001 [Enter]. (Move To is found by hitting [Copy To] two times in a row.) Repeat for all channels. Once that is done, I like to verify my work by typing 9001 [Enter} and seeing them there. This is also a good time to unpatch these fixtures, since we will not be using these I will also check my palettes and presets in Blind to verify everything looks right. Creating a template is definitely a time to check twice. If you can’t see your 9000 channels in live, make sure that your flexi state allows you to see unpatched fixtures!
From here, we want to erase things that aren’t useful any more. All the cues. All channels below 9001. Any Presets and Focus Palettes we don’t find useful. Groups. I do all of this from Live, though newer users might like to view the Blind tab of each category to make sure they are seeing what they are doing. Once you have deleted everything and double checked your work, don’t forget to save your show file!
Congratulations. You now have started your Programming Template! I will continue to talk about adding and expanding your template in subsequent posts. If you have requests, questions or feedback- comment below.
Pingback: programming to Programmer – Mark LaPierre Lighting